Walkthroughs
- by Harukaba
Obtain 100,000 Gold to give to the Dungeon Overlords and win the scenario. However, if Sandro is defeated in combat, the scenario is lost. Heroes are limited to Level 16, but Sandro and three of his comrades will carry their experience, skills, and spells on to the next scenario. Starting Bonus: 15 Wood or the Vial of Lifeblood.
Maps

Click on a map to see a larger version.
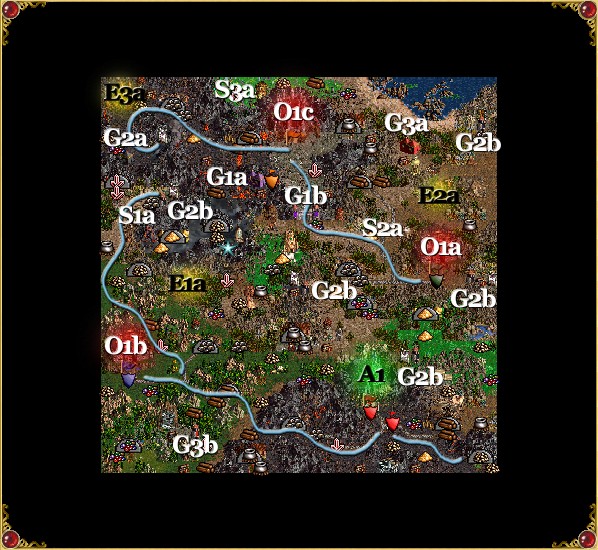
Green - Friendly Town
Red - Enemy Town
Grey - Neutral Town
Yellow - Underground Passage
A# - Allied Towns
O# - Opponent Towns (a,b,c,d,e,f,g indicates which enemy)
N# - Neutral Towns
M# - Mirror Entrances (a) and exits (b). two-way unless stated
E# - Exit (a) entrance and (b) exit
S# - Seer (a) and the location of the item (b)
G# - Guard Tents (a) and the location of the Guard Tower (b)
J - Jail
X - Ambush
Starting Out
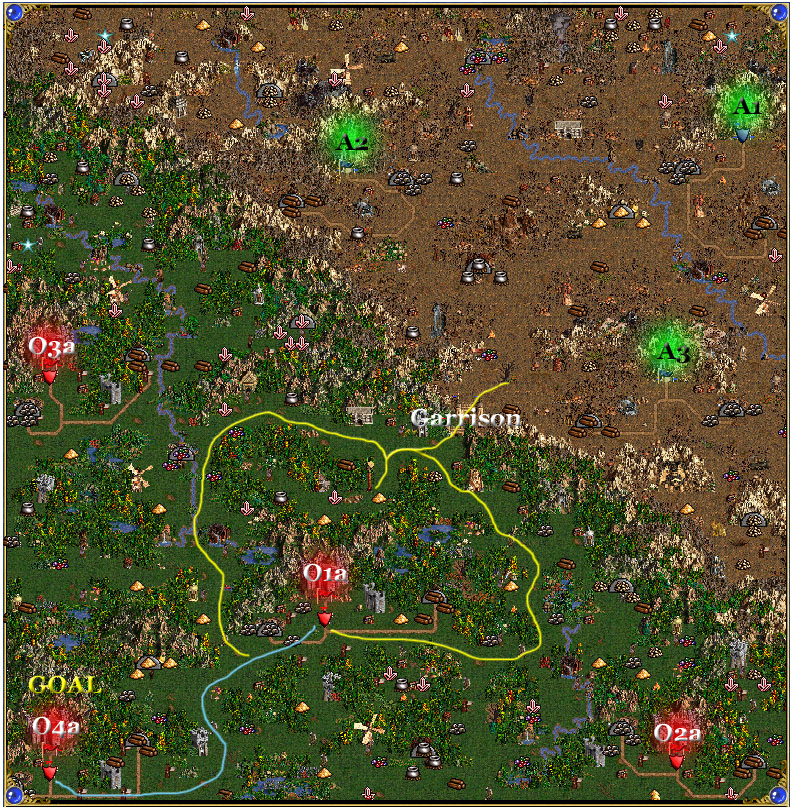
You can either go one of two routes, defeat both heroes or simply engage in enough battles to get to the level limit of 16 and visit underground for the places of learning while you earn gold. Since all you need to do is get 100,000 gold both tactics are valid in winning.
Pick the Vial of Lifeblood as your starting bonus as you will earn more than enough wood soon and your troops will last a lot longer with 2 more hp.
First Leg
For the first week I focused on flagging mines and taking over the other two neutral Necropolis towns in my area. Use the other three heroes busy by flagging mines, picking up loose resources and visiting all of the creature generators you can. Since you will be short on wood and ore for the first few weeks they will comprise much of your troop strength. I worked on building up to City Halls in A1 and N2 while building up to Vampire Lords in N1. I chose to build up N1 instead of A1 because Sandro could pick up the vampires on his way back from taking over N2. Since I didn't have Town Portal traveling to A1 would take too long. I then went north of N1 to flag the two gold mines up there and visited creature generators until N1 had Vampire Lords and went back to upgrade my vampires. Then I followed the blue path in the third week and worked on defeating the red hero. Be sure to use View Air and defeat the enemy hero by the town you take over before moving on to the next one. If you have the resources I suggest building the mage guilds in the Rampart towns for the chance at getting the Town Portal spell. I wasn't so lucky.
Finishing Up
At this point, even if you have defeated the Red hero the Pink one will probably be giving you a lot of trouble with some very tough heroes with a lot of troops. Sandro will be level 16 so I suggest using one of the two mirrors to go underground and visit the places of learning before you get 100,000 gold. Once you do, you'll have won the map.
| Comments (4) | Add comment |
- by Harukaba
Capture Haart Castle and leave the Vial of Poison to win the scenario. However, if Sandro is defeated in combat, the scenario is lost. Heroes are limited to Level 10, but Sandro and three of his comrades will carry their experience, skills and spells on to the next Scenarios. Starting Bonus: Boots of Speed or 20 Zombies or 3000 Gold.
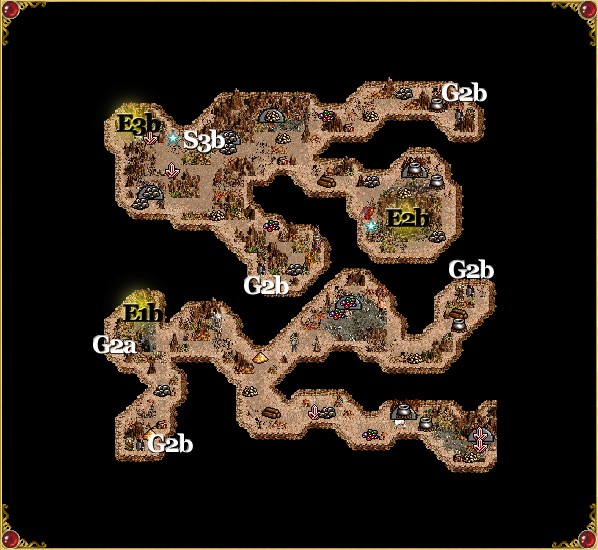
Maps
Click on a map to see a larger version.
Green - Friendly Town
Red - Enemy Town
Grey - Neutral Town
Yellow - Underground Passage
A# - Allied Towns
O# - Opponent Towns (a,b,c,d,e,f,g indicates which enemy)
N# - Neutral Towns
M# - Mirror Entrances (a) and exits (b). two-way unless stated
E# - Exit (a) entrance and (b) exit
S# - Seer (a) and the location of the item (b)
G# - Guard Tents (a) and the location of the Guard Tower (b)
J - Jail
X - Ambush
Starting Out
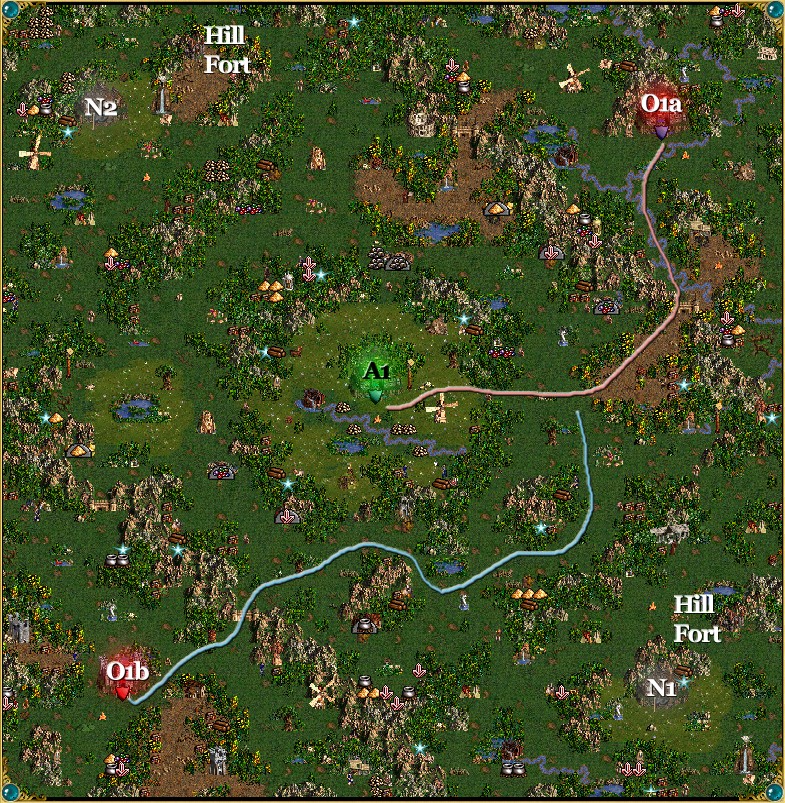
This map is impossible to beat until you take the strategy of building up troops for the first five weeks and heading straight for Haart Castile while avoiding all except the weakest of the enemy troops. The reason for this is the enemy has four Castles which are somewhat built up and plenty of resources while you start out with three towns with nothing built and you will be suffering from a shortage of both wood and ore in the first few weeks. To make matters worse there are enemy heroes which you will not be able to defeat no matter what and the only chance to win is to avoid them. Therefore, take the Boots of Speed as your bonus.
With Sandro concentrate on his magical abilities such as Wisdom, Intelligence, Earth Magic, Air Magic, and Logistics being necessary for success. I never bothered much with the three heroes that carry over and so hired gold and resource produces and used them to pick up loose resources and flag mines.
First Leg
The first four weeks determine whether you will succeed or fail at this map. What I did was spend the first week in every town by building the Cursed Temple, Graveyard, Tomb of Souls, Estate, and a Mausoleum if you have the resources to spare. I did this before building a Mage Guild, Necromancy Amplifier, Cover of Darkness, and upgrading the Town Hall to a City Hall which I did in the second week. If you ever find yourself low on resources in the first week then build something from the second week that doesn't require any. After you have City Halls you can upgrade the Mage Guilds which Sandro will need in the next map. I know this is not a normal build order but it worked for me.
While you're doing this, have Sandro flag the Ore Mines and Lumber Mills before anything else. Try to avoid losses in battle whenever possible and be sure to check out the Witch's Huts as they seem to be set to offer skills which are actually relevent to what Sandro needs (secondary heroes are good for this). The Scholar to the north offers the Archery skill which I'd avoid since Sandro isn't going to have an army of Liches anymore. The Scholar to the south offers +1 Knowledge which I'd try to grab near the end of the four week preparation phase. The Buckler of the Gnoll King which is found north of A1 gives 4 to Sandro's defense which is worth getting.
Finishing Up
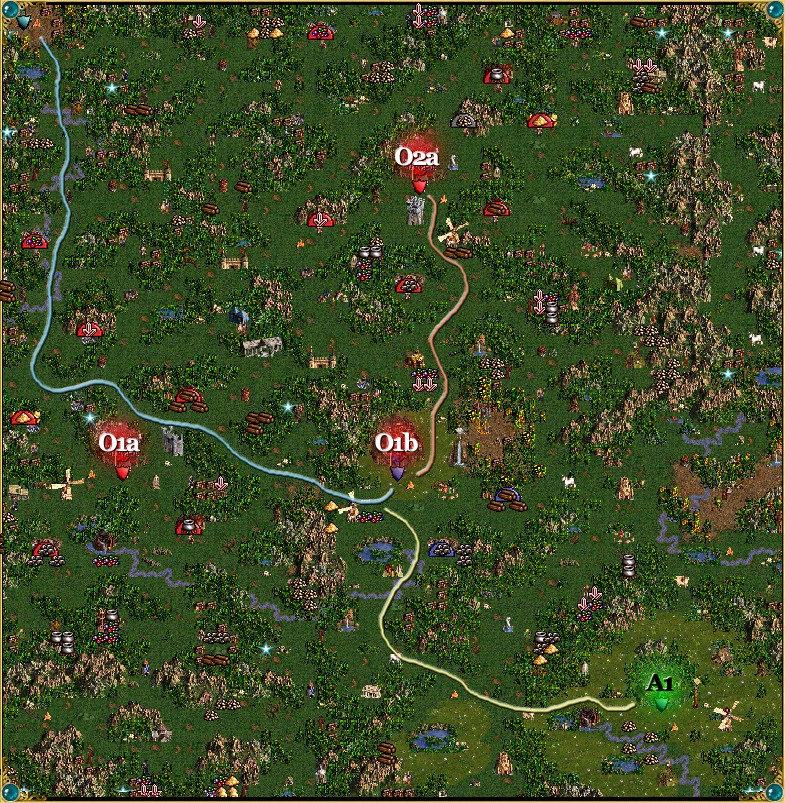
In the beginning of the fourth week start upgrading the troop production buildings in A3 if you haven't done so already so that in the beginning of the fifth week you can use your secondary heroes to bring troops there to upgrade and give to Sandro. As soon as this is done take Sandro along the yellow path and visit the Redwood Observatory so you can see where the enemy heroes are. Depending on where they are you might want to go the north path or the south path. The south path is better because it takes you past a Marletto Tower (+1 Defense) and Mercenary Camp (+1 Attack) but that area has a better chance of having enemy heroes so you might need to avoid that area.
If O1a isn't heavily guarded then I suggest taking it over in the hopes of getting the Town Portal spell and in getting a faster horse. Once done there follow the blue path to Haart Castle and the final battle. If the hero is in the castle you might have to hire a hero from O1a and use it to lure the hero out so Sandro can easily defeat the enemy hero outside of the castle gates. Once you take over Haart Castle, the map is won.
| Comments (10) | Add comment |
- by Harukaba
To win, you must build a Capitol in the town of Welnin. Only then will the Contested Lands be free! Starting Bonus: 12 Wood or 3 Dendroid Soldiers or 6 Dendroid Guards.
Maps
Click on a map to see a larger version.
Green - Friendly Town
Red - Enemy Town
Grey - Neutral Town
Yellow - Underground Passage
A# - Allied Towns
O# - Opponent Towns (a,b,c,d,e,f,g indicates which enemy)
N# - Neutral Towns
M# - Mirror Entrances (a) and exits (b). two-way unless stated
E# - Exit (a) entrance and (b) exit
S# - Seer (a) and the location of the item (b)
G# - Guard Tents (a) and the location of the Guard Tower (b)
J - Jail
X - Ambush
Starting Out
Just as with the other two maps in this campaign, there's a fast way and a slow way to win this map. If you want to build a Capitol in Welnin as fast as you can then take the 12 Wood as your bonus. If you want to defeat the enemies than take the 6 Dendroid Guards as your bonus.
Fast Way
If you want to win as quickly as possible then take the 12 Wood as your bonus because you'll lose 20 Wood before you even start and more starting on day four. So if you find any piles of wood use them by building something and trading in your Marketplace if you need to. Since there are no Lumber Mills you should not waste any wood you manage to find. Explore the area around A1 to get gold and resources. and then follow this very easy building order.
- Marketplace
- Mage Guild
- Blacksmith
- Town Hall
- City Hall
- Citadel
- Castle (you'll probably have to trade your resources and gold for wood)
- Capitol
Long Way
Take the 6 Dendroid Guards as your bonus and hire as many heroes with troops as possible, even if they are not from the Rampart town. A magic user will fare better since the enemies will not have very many troops. Take your hero along the red path and I suggest attacking the Centaur Captain stack northwest of the Battle Dwarves since they have a good chance of joining you and the artifact they're guarding could be pretty good too. There is a lesser chance of the Battle Dwarves joining you but if you visit the Homestead near the Centaur Captain stack for some extra Wood Elves then you should be okay. Head northeast through the garrison which will have 5 Silver Pegasi and about 15 Grand Elves. Follow the red path until you reach O1a and you'll probably be able to walk in unopposed. This town will be more built-up than your starting town so it will be a good source of additional troops, especially if you conquer it by the second week. I suggest building a Citadel for the extra troops for added protection when the Blue hero tries to take back their town. After the Blue town is eliminated, hire the troops at the start of week 2 and perhaps build the Enchanted Spring in the first week to get some Pegasi which are fast and pretty powerful. Also check out the tavern to get some extra troops and head southeast to defeat the red hero before the second week is over using the same tactics. The red hero will be slightly tougher than the blue hero but if you work quickly you won't have a lot of trouble defeating them. After the red hero is defeated simply build a capitol in Welnin and if you were building every turn while defeating the enemies you can build the Capitol the next turn and complete this map and the Restoration of Erathia campaign.
| Add comment |
- by Harukaba
To win, the Ranger, Ryland, must reach the town of Welnin with the Grail, and build it a permanent home. Alternatively you can take over all enemy castles and defeat all enemy heroes. Starting Bonus: Level 3 Mage Guild or 5000 Gold or 3 Dendroid Soldiers.
Maps
 Click on a map to see a larger version.
Green - Friendly Town
Red - Enemy Town
Grey - Neutral Town
Yellow - Underground Passage
A# - Allied Towns
O# - Opponent Towns (a,b,c,d,e,f,g indicates which enemy)
N# - Neutral Towns
M# - Mirror Entrances (a) and exits (b). two-way unless stated
E# - Exit (a) entrance and (b) exit
S# - Seer (a) and the location of the item (b)
G# - Guard Tents (a) and the location of the Guard Tower (b)
J - Jail
X - Ambush
Starting Out
Similar to the previous map, your starting town will be very limited in what it can produce so you'll have to get troops through joins or capturing enemy towns. The level 3 Mage Guild and 5000 gold won't be much help so I recommend picking the 3 Dendroid Soldiers which will fit in with Ryland's specialty.
First Leg
Ryland will receive a message stating that some of the Swordman are sympathetic to your cause. What this means in practical terms is that every Swordsman but not Crusader stack will join you. Very soon you'll have about 60 Swordsmen and be considerably stronger than any enemy hero. Now you can head to your town at A1 to build the Grail to win or attack the enemy and win by defeating every enemy hero and taking over every enemy town. If you choose the former than the follow the blue path and then the yellow path which leads through some easily defeated troops to A1 and victory. If you choose the latter then read on.
Second Leg
ou could take over O1a which is on the way to O1b and there you can upgrade your Swordmen to Crusaders, probably after building the Upgraded Barracks. Hire another hero to protect the town and attack any scouts in the area. Meanwhile have Ryland go to O1b and take it over. This town will probably be more built-up than the other towns. Hire another hero and have Ryland go north on the red path to take over O2a. There will be many enemy heroes wandering around with at least one with a good many troops so use View Air and Visions if you have them and try to make sure that Ryland faces this strong enemy hero. After you defeat all of the enemy heroes then this map will end with your victory.
Finishing Up
There are quite a few resources lying around as well as mirrors and some Guard Tents but they aren't really necessary if you go on the offensive early since you won't need their advantages and the enemy won't have a chance to get them. There are a lot of stacks that will join you which is always a surprise and the clues you get about which ones will join are a nice addition. None of your heroes transfer over so you don't need to take the time to groom them.
| Add comment |
- by Harukaba
To win, you must find the Grail within 2 months. Starting Bonus: Boots of Speed or 5000 Gold or 4 Pegasi.
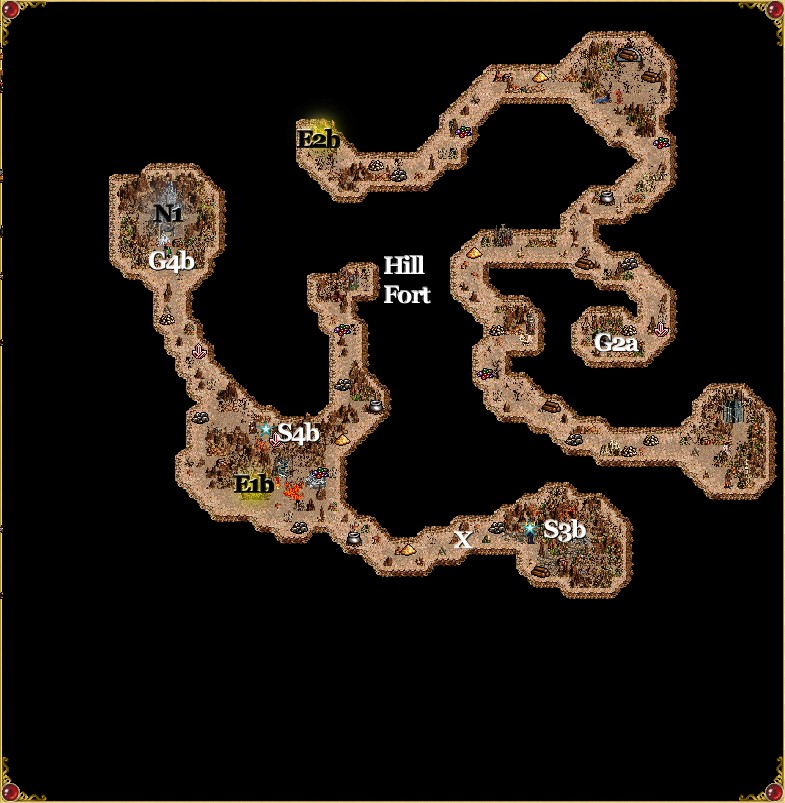
Maps

Click on a map to see a larger version.
Green - Friendly Town
Red - Enemy Town
Grey - Neutral Town
Yellow - Underground Passage
A# - Allied Towns
O# - Opponent Towns (a,b,c,d,e,f,g indicates which enemy)
N# - Neutral Towns
M# - Mirror Entrances (a) and exits (b). two-way unless stated
E# - Exit (a) entrance and (b) exit
S# - Seer (a) and the location of the item (b)
G# - Guard Tents (a) and the location of the Guard Tower (b)
J - Jail
X - Ambush
Starting Out
All of your troops will come from Recruiting Structures since your town is severely limited in what you can build (no fort and no creature generators) so you don't need the gold. The four Pegasi are okay and you will be able to upgrade them later but since you have a time limit I recommend taking the Boots of Speed as your bonus.
First Leg
I suggest using Mephala as your main hero because she has the Armor specialty and you want to protect every troop you get since it's not easy to get more. Build a Tavern at A1 and hire more heroes and give Mephala the troops. Have Uland and Malcolm grab the resources and go to the Monoliths where they will get more troops. Have Mephala, Uland, and Malcom meet south of A1 so that they can give Mephala their troops and any artifacts they picked up from the ambushes. Pick either the yellow or pink path and have Mephala go through the Garrison which will both have 15 Marksmen, 20 Archers, 20 Halberdiers, 10 Griffins, and 25 Pikemen. With your Wood Elves and the Slow spell you should emerge victorious with few losses. Continue along the path you've chosen until you come to a Hill Fort which will make the rest of this map a lot easier. Now it will be easier to visit the rest of the Monoliths and clear the area where the Grail is.
Second Leg
During the time that Mephala is making her way to the Hill Fort, your other heroes should be visiting the Recruiting Structures every week just in case you need more troops. I recommend especially getting the Pegasi and Wood Elves because they are the most powerful and useful. There are two tents that open up towers with a random artifact behind each and a one-way mirror which will make it easier to deliver troops but I wouldn't bother going out of my way to visit the tents unless the artifacts are useful.
Finishing Up
After transferring as many troops to Mephala as you want and visiting all of the Monoliths, go to the swamp area and attack the wandering stacks that block your way to the Grail location. Hopefully you won't have to attack the Angels but if you do I suggest waiting for another week or two of reinforcements if you aren't confident at your ability to defeat them. All you need to do is dig up the Grail without taking it back to your town to win.
| Add comment |
- by Harukaba
Defeat Duke Alarice and his allies to win the campaign. However, if Sandro or Finneas are defeated in combat, the scenario is lost. Sandro and Finneas are limited to level 25, but will carry their experience, skills and spells on to their next campaign. Starting Bonus: 5 Vampires or Citadel or 10 (each) of the 4 precious resources.
Maps
Green - Friendly Town
Red - Enemy Town
Grey - Neutral Town
Yellow - Underground Passage
A# - Allied Towns
O# - Opponent Towns (a,b,c,d,e,f,g indicates which enemy)
N# - Neutral Towns
M# - Mirror Entrances (a) and exits (b). two-way unless stated
E# - Exit (a) entrance and (b) exit
S# - Seer (a) and the location of the item (b)
G# - Guard Tents (a) and the location of the Guard Tower (b)
J - Jail
X - Ambush
Starting Out
This is another map where you rely on Sandro and his ever growing army of Liches for most of the fighting. You also have to be extremely aggressive since the enemies start with towns that are completely built up and the key to victory is to defeat them before they can overwhelm your Liche army. Therefore, take the 5 Vampires as your bonus since this will enable you to attack wandering stacks much more quickly.
I have verified for myself that both Sandro and Finneas won't transfer over to the next campaign even though you are told they will be. Therefore, it's not necessary to visit any Places of Learning or go out of your way to gain levels.
First Leg
Give Sandro the Vampires and Wights and send him northwest along the yellow path attacking wandering stacks to build up his Liche army. Since Sandro will have such powerful magic, even Death Ripple will enable him to win many battles. You will come across a powerful enemy hero by the name of Nagash who will also have powerful spells but not a big army so your spells will tear through his army very quickly. Once you've taken over O1a (teal), you will have a town that is fully built up and you will be able to upgrade your Liches to Power Liches if you are so inclined. As with the other maps in this campaign, hire a hero and as many troops as possible to protect the town from any enemy heroes that might be lurking about. If you have View Air, check the area for enemy heroes and defeat them before heading south on the yellow path to take over O2a (teal) defeating wandering stacks along the way to increase your Liche army. This shouldn't be a problem and now you can hunt down any O2a (teal) heroes that are wandering about. As with O1a, hire a hero and as many troops as possible just in case the enemy manages to attack O2a (teal) while you're gone. The mirror system will be a big help and once you've defeated the last hero O2a (teal) will be eliminated.
Second Leg
While Sandro is doing this, build a Necromancy Amplifier and City Hall in A1 to enable Sandro to get even more Liches. I took Finneas to O1a and O2a (teal) to give him all of the troops besides the Liches so he can help Sandro exploring and flagging mines.
Now you have to defeat O1b (blue) so you will have some breathing room to visit all of the tents you have to in order to face Duke Alarice to win. Head south to the mirror and then west, defeating all O2b (blue) heroes along the way. Once you've done this, you can visit tents in peace since Duke Alarice doesn't seem to leave his town even though he's able to. There's a Dragon Utopia northwest of O2a which you will want to visit just for the chance of getting good artifacts.
Finishing Up
Have Sandro visit G1a (east of O2b) so you can visit G1b and G2a (west of O2a). While you're doing this, take Finneas with a good-sized army to the northeast corner so you can visit G2b and G3a. While Finneas is going northeast, take Sandro through the mirror south of G1b to visit G3b and G5a in the southeast corner. After Finneas is done, have him go west to visit G5b and G6a once Sandro is finished. Now you can get access to N2 by visiting G4a in the southwest corner and have Finneas travel west to G4b and G7a. If Sandro or Finneas is level 25, you can take over N2 if you want to. I was able to hire Nagash who was level 25 but I'm not sure if this will happen to everyone. Taking over N1 or N2 is not necessary but N2 does have a Grail so you might want to do that if only for the boost to your Necromancy skill it gives. Sandro can then retrace his steps, get access to N2, then north to G6b and north to O1b (blue) to defeat Duke Alarice.
| Comments (5) | Add comment |
- by Harukaba
Defeat all of Sandro and Finneas' enemies to win the scenario. However, if Sandro or Finneas is defeated in combat, the scenario is lost. Sandro and Finneas are limited to level 20 but will carry their experience, skills and spells on to the next scenario. Starting Bonus: +2 Defense or 8 Vampires or 15 (each) Wood and Ore
Maps

Click on a map to see a larger version.
Green - Friendly Town
Red - Enemy Town
Grey - Neutral Town
Yellow - Underground Passage
A# - Allied Towns
O# - Opponent Towns (a,b,c,d,e,f,g indicates which enemy)
N# - Neutral Towns
M# - Mirror Entrances (a) and exits (b). two-way unless stated
E# - Exit (a) entrance and (b) exit
S# - Seer (a) and the location of the item (b)
G# - Guard Tents (a) and the location of the Guard Tower (b)
J - Jail
X - Ambush
Starting Out
Once again, Sandro and his army of Liches will be doing most of the fighting so I would pick the +2 Defense as the bonus to give Sandro even more of an edge. Finneas will be following after Sandro engaging in odd battles.
First Leg
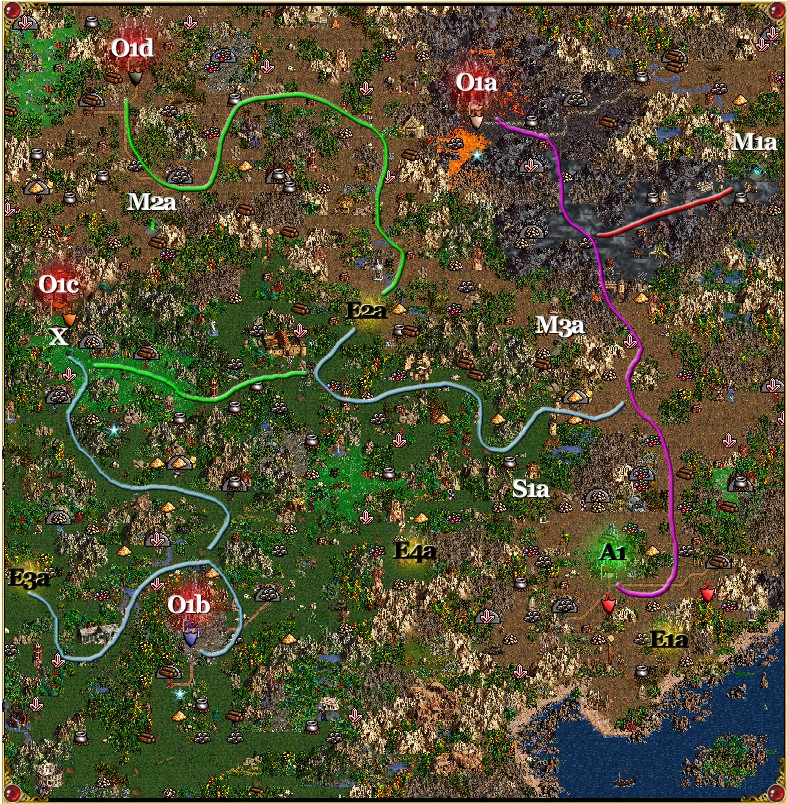
I hired two additional heroes for their troops and gave them Sandro so he could clear the two local mines to start his army of Liches. Once that was done, I gave the non-Liche troops to Finneas and had Sandro go north to defeat O1a (tan), defeating wandering stacks along the way to get more Liches. I was able to defeat the O1a (tan) heroes out in the open so the battle against their town was very easy. O1a (tan) was defeated in the first two weeks. Now it's important to hire another hero in O1a (tan) and build a Castle along with the level 1-4 creature generators to be able to protect the town from the many enemy heroes that will be swarming over the map. Since you don't have the Town Portal spell and Liches have a speed of 6, it will be impossible for Sandro to protect all of the towns. Do the same thing with your home town at A1, making sure to build a Necromancy Amplifier and Cover of Darkness. Once Finneas has some troops, you can send him south from A1 to engage in some sea battles as well as heading down E1a to flag the mines down there.
Second Leg
Now Sandro is going to go on a long trip to defeat three of the enemies as well as hitting the most powerful of the Places of Learning. Have Sandro travel south along the purple path and then west on the blue path, making sure to visit the School of War and attacking wandering stacks along the way. Go in E2a and south along the blue path, visit the Mercenary Camp along the way and attack O1f (purple) and any enemy heroes in this area. Just as with O1a (tan) hire a hero and build a castle along with the level 1-4 creature generators to protect this town from the enemies. There are no places worth visiting down here so continue along the blue path south to E3b. Now you're by E3a and travel south making sure to visit the Library of Enlightenment for its +2 to all primary stats and the Arena which is south of that. Defeat any enemy heroes along the way to O1b (blue) to get another Necromancy town. Once again, hire a hero and build a castle along with the level 1-4 creature generators and the Cover of Darkness and Necromancy Amplifier (if they aren't built already). Check the surrounding area for any strong enemy heroes and have Sandro defeat them since there probably won't be many troops to recruit in O1b (blue) until the following week. Once that's done, have Sandro travel north to defeat O1c (orange). There is a strong ambush in front of the town consisting of 8 Green Dragons, 19 War Unicorns, 24 Dendroids, 32 Silver Pegasi, 41 Grand Elves, 52 Battle Dwarves, and 101 Centaur Captains but they will be merely additional Liches for your army. Now you can take on O1d (green) by following the green path, visiting the University if you have an empty skill slot that needs filling. There is a Marletto Tower up there that you can visit if you're so inclined. Defeat all of the enemy heroes you come across (Expert View Air is great for this) and attack O1d (green) making sure to hire a hero and build a castle along wth any available troops.
Meanwhile, give Finneas the troops you have from A1 once you have a good force and have him take out O1e (red) for you. You'll want to go north and then east along the red path to M1a to go underground and further east, defeating any hero you come across. Depending on how many troops Finneas has, this could be a tough battle so bring more than just Skeletons and Walking Dead. If need be, use the troops from the Dungeon town if you haven't built up your A1 town.
Finishing Up
There are very many Places of Learning on the map and most of them are along your path so it's not necessary to delay the game to make sure both Sandro and Finneas has visited them all or to ensure they are both level 20. The one quest asks for 16 Halberdiers although I was never able to complete this since it's impossible to do and I have no idea why it was put there. Simply make sure the enemy doesn't take over a town you have conquered by using View Air to monitor the activity of enemy heroes and using Sandro to defeat those who are too strong for the troops at your towns. Once all of the enemies are defeated, this map is won.
| Comments (5) | Add comment |
- by Harukaba
Defeat Ethric and all of his allies to win the scenario. However, if Sandro is defeated in combat, the scenario is lost. Sandro is limited to level 10 but will carry his experience, skills and spells on to the next scenario. Starting Bonus: 3000 Gold or +2 Knowledge or 3 Liches
Maps
Click on a map to see a larger version.
Green - Friendly Town
Red - Enemy Town
Grey - Neutral Town
Yellow - Underground Passage
A# - Allied Towns
O# - Opponent Towns (a,b,c,d,e,f,g indicates which enemy)
N# - Neutral Towns
M# - Mirror Entrances (a) and exits (b). two-way unless stated
E# - Exit (a) entrance and (b) exit
S# - Seer (a) and the location of the item (b)
G# - Guard Tents (a) and the location of the Guard Tower (b)
J - Jail
X - Ambush
Starting Out
I would pick the +2 knowledge as your bonus because Sandro's Liches will do most of the fighting so you don't need the gold or the 3 Liches. You don't need to groom Vidomina because she doesn't carry over to the next map even though she does feature prominently in this map's story.
First Leg
Start out by flagging the Estate south of the town and recruit all available Vampires to give to Sandro and all of the other troops to Vidomina since she might need to defend A1 from enemy heroes. Have Sandro attack the gold mine near A1 and then head west along the blue path, attacking weak wandering stacks to build up Sandro's supply of Liches. Attack O1b (blue) and be sure to hire another hero, recruit troops, and build up at least a Castle to help defend it from enemy heroes. Then go north along the blue path to make your way to a 2-way mirror. Even though it's guarded by a Guard Tower, O1c (orange) will most likely have opened it by the time you get there. Once you get to the mirror, press the spacebar a few times to see all of the mirrors you have access to. You don't use any movement so it's an easy way of getting a look at part of the map as well as which Guard Tower's have been removed. The mirror you want is in the northwest which is nearest to O1c (orange).
Meanwhile, build a Cover of Darkness and Necromancy Amplifier back at A1 along with a Castle and a Mausaleum. You might be tempted to have Vidomina head out and flag mines but there are quite a few ambushes in front of them, some very dangerous so wait a while before you have enough troops to handle them.
Second Leg
Have Sandro attack O1c (orange) and any heroes you see along the way. O1c (orange) is the more threatening enemy since they seem to be more aggressive in building up their town and Ethric, their primary hero, can be very dangerous. Ethric knows how to cast Resurrection and can have a good deal of spell points so you want to defeat him before he gets stronger. Make sure you visit both G1a and G2a before leaving this area.
You may lose the Rampart town you conquered (O1b) but Vidomina could be strong enough at this time to take it back for you while Sandro heads east to defeat any of the O1a (green) heroes that you see until you get to O1a. However, don't attack it because there are some quests you want Sandro to do before winning this map.
Finishing Up
Take Vidomina and give her as many troops as you can and park her in front of O1a (green) so that Sandro can do some running around without having to be too concerned about the enemy. S1a will give you +9 knowledge when you get to level 10. S2a will give you the Pendent of Death if you bring it the Eversmoking Ring of Sulfur. You'll find this in the area of O1c (orange) but they will most likely snatch it up before you so you'll most likely get it off an enemy hero when you defeat them. S3a wants the Speculum which is found underground and will give you Advanced Logistics in return. I recommend you take this as it seems that getting Town Portal is impossible and since Sandro will be doing most of the fighting it's important for him to get to the enemy as fast as possible. Since Liches have a speed of 6, Logistics will really help out.
You should also be building up the Mage Guilds in each of your towns and have Sandro visit them to build up his Mage Book. Once you've finished visiting the quests, simply attack O1a (green) and you should win handily with Sandro and his huge army of Liches.| Comments (5) | Add comment |
- by Harukaba
Defeat all of Sandro's enemies to win the scenario. However, if Sandro is defeated in combat, the scenario is lost. Sandro is limited to level 5 but will carry his experience, skills and spells on to the next scenario. Starting Bonus: Lightning Bolt Scroll or 8 Walking Dead or +2 Attack Skill
Maps

Click on a map to see a larger version.
Green - Friendly Town
Red - Enemy Town
Grey - Neutral Town
Yellow - Underground Passage
A# - Allied Towns
O# - Opponent Towns (a,b,c,d,e,f,g indicate which enemy)
N# - Neutral Towns
M# - Mirror Entrances (a) and exits (b). two-way unless stated
E# - Exit (a) entrance and (b) exit
S# - Seer (a) and the location of the item (b)
G# - Guard Tents (a) and the location of the Guard Tower (b)
J - Jail
X - Ambush
Starting Out
Although you might be tempted to take the +2 Attack Skill as your bonus, taking the Lightning Bolt scroll will make the first three weeks much easier. Not only will you be able to attack wandering stacks immediately but you will be able to defeat the enemies closest to your starting town much sooner and before they become a dangerous threat.
You also have to equip all of the artifacts that Sandro has and agree to combine them. You get Armor of the Damned (casts Mass Slow, Mass Curse, Mass Weakness, and Mass Misfortune on the enemy when you get initiative which lasts until the end of combat) and Cloak of the Undead King (gives a +30% Boost to the Hero's Necromancy ability as well as raising Walking Dead at basic Necromancy level, Wights at advanced Necromancy level and Liches at expert Necromancy level). These effects are in addition to the bonuses each of the artifacts give individually. Therefore, you should increase your Necromancy skill whenever possible.
First Leg
Both O1a (blue) and O1b (tan) will be nosing around in the first week so building the Cover of Darkness will keep them away for a bit longer. You should focus on creature generator buildings instead of gold producing buildings for the first week or two so you can defeat both of these enemies quickly. Fortunately, there are quite a few treasure chests, gold piles, and gold mines lying around close to A1 so you will not be lacking money. I suggest attacking O1a (blue) first since their hero, Jeddite, is dangerous with his high mana points, Magic Resistance, and a Destroy Undead spell and seems to be much more aggressive in building their town than the O1b (tan) hero. I suggest defeating both O1a and O1b as soon as possible and I was able to do it by the end of the third week. At this time, you should be raising Liches with your expert Necromancy and it will make the rest of the map much easier.
Be sure to hire heroes in both O1a, O1b, and A1 along with hiring troops there because the enemy might land and attempt to take them over. They are mostly scout heroes so building Castles and continuing to hire troops will keep them mostly safe. By this time you will have enough gold and resources that doing this shouldn't be a problem.
Second Leg
I took Sandro with his Liches and left everything else to my secondary hero and traveled north to defeat both O1c (green) and O1d (orange) along with any enemy hero along the way. Since it takes so long to travel anywhere, it's possible that a enemy hero from O1d (orange) will travel to your area while you are making your way to O1c (green). This is why you want to maintain some troops in each of the towns you conquer because if the enemy hero is a scout or doesn't have a lot of troops, Sandro doesn't need to backtrack. Once you defeat O1c (green), hire a hero and as many troops as you can and make your way to O1d (orange) and do the same there. Any remaining enemy heroes should attempt to take over any town they can but they should be easily defeated.
Third Leg
The only remaining enemy is O1e (purple) and they are cursed with having only one exit from their town and with your huge army of Liches you will be able to defeat them easily. Yet you don't want to do that. There are quite a few Places of Learning and many seer quests with rewards you absolutely don't want to miss. So what I do is park Sandro at the gate west of S1a and then bring up a good secondary hero with all of the troops from your Necromancer town and then take Sandro on a multi-month tour of the map. You might have to ferry additional troops to replace any that are lost in battle but you shouldn't have many problems with holding off O1e (purple) from being anything more than a nuisance.
S1a wants a Titan's Gladius which is found on the island to the east and will give you +13 Attack. S2a wants a Clover of Fortune which is found in the marsh area in the southwest area and will give you +3 Knowledge for it. S3a wants a Sentinel's Shield which is found underground and will give you +13 Defense. S4a wants a Eye of the Dragon and will give you +2 Knowledge. S5a wants 12 Griffins which you can only fulfill by having a wandering stack join as there are no Castle towns on the map. It seems that having a Month of the Griffin is programmed into the map as I got one every time I played this map. I actually was able to hire a hero with Basic Diplomacy to get Griffins, gave them to Sandro, and went to S5a. I was told that I'd be rewarded but didn't notice any change or improvement in my skills so I think this quest is useless.
One final thing you may want to do is go underground at E2a and defeat the Titans there to visit G2a, go back up and visit G2b which is east of E2a and then G3a which is a bit north of that. Then go to the southwest corner at G3b to get the Clover of Fortune and G4a. This lets you have access to a Necromancer town underground which is defended by a large force but is fully built-up and has the holy grail which has some very nice bonuses. This is completely optional and not necessary to win but it's fun to do.
Finishing Up
Be sure you've visited all of the Places of Learning, the Witch's Towers if they have good skills, the mage guild in every town for spells, and completed all of the quests (except for S5a with it wanting the 12 Griffins) and travel to O1e. There use Sandro and his giant army of Liches to easily defeat the enemy. You should have no problem in winning, even if the enemy has two-dozen Archdevils.
| Comments (10) | Add comment |
- by Steven W. Carter
The Price of Peace: The Price of Peace
Objective:
- Defeat Gavin Magnus.
Walkthrough:
The map is divided into two parts. Teal (Reed) and Blue (Magnus) are on the left side while Green, Red, and you are on the right. Teal is your ally, and it’ll try its best to hold Blue in check, but it’ll be defeated as soon as Reed is defeated, and that’ll probably happen within the first couple months, unless the two players just spend the entire scenario trading resource buildings, which is possible.
Meanwhile, you won’t be able to get to Blue or Teal until you acquire the Mind Shield, which will be a while. But this will give you the opportunity to watch a computer player at work, and so if you ever suspected that the opponent AI is weak, now is your chance to verify that theory firsthand.
Note: If you’re using the retail release of the game, Blue won’t capture any of Teal’s towns or resource buildings after Teal is defeated, making the last part of the scenario easier. But if you’re using the patched version, then you’ll have to deal with a stronger Blue at the end.
To start off, if any of your heroes has nobility, have that hero visit your starting town. Then you can either put all your heroes together into one army, or you can try splitting them up so they cover more ground. If you built up Kodge in the last scenario, then he can probably work well enough by himself and kill some of the neutral stacks while Emilia and Solymr take on the heavy duty fighting.
Your part of the map is pretty standard with resource buildings and troop buildings -- except that the troop buildings are for Life units rather than Order units. If you want to keep Kodge separate from Emilia and Solymr then this works out well enough since he’s a Life hero anyway. Otherwise, feel free to ignore the Life troop buildings, and only recruit from them if an enemy hero approaches.
Once you’ve cleared everything from the ferry (to the north) to Green’s garrison (to the south), put as many Order troops as possible into your main army and head for Green. With three high level heroes plus two towns backing you, you should be able to easily defeat Green, who only has one town. Once Green is eliminated, clear out everything beyond the garrison and then head for Red (by using the ferry).

Red’s island, like the main map, is divided into two parts. The western side has a single Red town plus some things useful to your heroes (artifacts, ability gems, trees of knowledge), while the eastern side has two Red towns plus the Mind Shield. Since obtaining the Mind Shield opens up the path between your lands and Blue’s lands, you should do the eastern half last.
There shouldn’t be any problem conquering everything in Red’s domain. Chances are, your three heroes can do it by themselves, and with lots of titans, genies, and magi, it should be overkill. The only difficult fight is likely to be the titans holding the Mind Shield. They’re located next to the purple dragon portal at (7,114), just past Red’s two eastern towns. But with liberal use of hypnotize, martyr, and forgetfulness, even a stack of 60+ titans poses no problem. Once you defeat the titans and gain the Mind Shield, take the dragon portal, re-supply your troops, and then head for Blue. The path should be open now.
All you have to do in Blue’s lands is kill Magnus, so don’t worry about capturing towns or resource buildings, unless you just want to increase your visibility in the area. Note also that you shouldn’t capture Blue’s southern town. For some reason if you capture it and Blue captures it back, you’ll lose the scenario. So just hunt for Magnus, and kill him when you find him. He’ll only be around level 25, and he probably won’t have a strong army with him. None of your heroes needs to wear the Mind Shield. Once Magnus is down, the scenario (and campaign) will end.
| Comments (7) | Add comment |
Page 13 of 23