Walkthroughs


Here is the real start of the game. The first place you can visit and receive training, equip yourself, and take on significant quests.

Don't miss adding the paladin NPC in the temple!

Quests
  • Jaarl: Clear the Imps from Anskram Keep
  • Find the Saboteur
  • Rescue the General from Drangheim Prison
  • Find the Manuscript in the Beet Hoven
  • Catch the Petty Thief (Paladin Quest)
  • Love Quests
  • Gladiator Promotion Quests
  • Stop the Sturmford-Drangheim War
  • Clear the cellars quest???
Trainers
  • Weapons and Armor: Expert and Master
  • Magic: None
  • Specialties: None
  • Grandmaster Training: None
Promotions
  • Mercenary --> Gladiator
Altar
  • Jaarl's Entryway
QUESTIONS! We do not yet have the answers to the following:
  • None
SHIP SCHEDULE
  • Mon: None
  • Tues: Drangheim
  • Wed: None
  • Thurs: Drangheim
  • Fri: Drangheim
  • Sat: Drangheim
  • Sun: Drangheim
Sturmford City
Since this is your first time with skills trainers, you'll find that unlike previous MM releases, they a not in fixed locations. Skills trainers do, however, stay in a general location. However -- be warned -- they sometime go inside buildings (like stores, banks, etc. There are four entrances to the sewers named the "Beet Hoven" -- an obscure musical reference I've been totally unable to figure out!! -- (Update: Mukkel points out that I am an idiot! I didn't notice the quest giver's name was Ludwig Van!). The two easiest to use are the one just outside the tavern, and the one at the far end of the training arena. Skills are sold in the library. General stores have a mix of items.

Scot points out that there are two money bags at the bottom of the well near the entrance to the training center (near the kids and the magic shop.) No much in them, but early in the game every bit helps.

Beet Hoven
Clearing out the Beet Hoven is a tough challenge until you are at the expert level in weapons and/or armor. The lobber pods are tough because of sheer numbers, and the nasties in the lower level will give you a good battle. A team with good ranged skills is a great help here! Playing through a second time, coming back when all 4 party members were expert in Bow, made this easy! This is a fun dungeon, though. Well thought out! (Laks and Grubbedijkie point out that there is an entrance in back of the temple.) There is also an entrance in the kitchen where you received the quest, but I was unable to get down that ladder! (D'oh! Jonney points out that if I had crouched, I could have used this ladder!) When you enter, the idea is to get to the ladder down to level two. The problem is Lobber Pods on the ceilings throughout. These generate a little beastie every 4-5 seconds. The key is to kill the source, then worry about the ankle biters. They give you disease and poison you if not careful. Two lobber pods are in a recessed area at the entry to the ladder room. Save before entering! The best approach is to sneak along the right wall and just edge out enough to take on the left lobber without the one that will then be just overhead noticing you. If they both catch sight of your party, the combined flow of lobbers will overwhelm you in short order.

When you climb down the ladder, take a brief swim, surface, and head into level two.

  • The bulk of your enemies on level 2 are skeletons, ghouls, and bats. Some of the ghouls have magic abilities and cast bolts at you.
  • At the far south is a mini maze with a couple nice chests and a skill shrine. It's worth the trip.
  • Rooms throughout the 2nd level have chests, and crypts (trapped) that contain goodies.
  • Over on the west side of level 2 is another ladder to level 3.
  • In level 3, your good friends the Lobber Pods return to haunt you.

Grab the manuscript, return from whence you came, and claim the quest points!

Anskram Keep

(Exterior)

When you enter the clearing and see Anskram keep before you, there is no obvious way to enter. Head around the keep to the left, and wipe out the Basilisk who takes offense at your intrusion. Now head to the back of the keep, take out the 2nd basilisk, and loot the chest. At the back of the keep on the NW corner is a weak section of wall. Whack it, and you can enter. A central room on the lower floor has another Basilisk. Now, head up the stairs to the top floor. The door on the South side of the keep gets you into the imp area. At the front of the keep you will find trap doors that let you destroy the defences of the building.
Anskram Keep

(Lower the Defences)

Enter from the hole in the back wall on the NW corner of the keep. Head up to the top of the keep, got to the front, and cross the bridge to the platform at the East side of the Keep (near the drawbridge.)

Spoiler: Use the key from the Jaarl of Drangheim to open either trap door. Break the two chains holding up the drawbridge. Press the (hard to see in the dark) lever on the floor in the middle of the front wall to raise the portcullis.

Anskram Keep

(Imps)

Make sure you download patch v1.2 from 3DO before trying this quest. It fixes an annoying scripting bug that prevents some players from solving the quest!)

Early on, Anskram Keep is a pain -- because of all the traps. If you take this on after visiting Thjorgard (to train someone in Expert Perception) then it is much easier. (Thanks J Greeley -- he found that Perception 2 is enough to spot the traps.) This is another well-designed dungeon -- well balanced with a nice mix of brain and brawn required to solve it. The goal is simple –– wipe out all the imps and destroy the imp generators. The generator part is easy -- just find them, kill 5 imps when they transport in, and the generator is finito. There are eight generators -- six in the main area, and two behind the trick doors. When you kill the last imp generator and re-enter the main room at the N end of the keep, the section of floor that looks like a set of stairs on the map will rise with one last big imp doing battle with a couple guards. You face lots of imps, and a few spiders and beetles. Per J. Greeley one of the rotating floor traps lets you find a chest.

Getting to the final two transporters and final imps is a tad harder. (Spoiler just below the map).

Spoiler: To get to the final imps and generators, you have to get through the door at the north end of the main hall. Throw switches at A and B to activate the switch at C. Now, go to switch C, activate it, and IMMEDIATELY run past the now-closing first door. When it is closed, the second will open. Slog through the baddies, call in incoming on the last to generators, then amble out the north door to return and collect your quest points.

Find the Saboteur (Thanks to Lillia, Hanni, Kreegor, Louisa!)

You receive this quest from the Bjarni at the left end of the bar in the tavern. Find out who has been sabotaging Sturmford's defences. Go to the town hall. Inside the door is a seedy looking sort named Ranvar. Talk to him, and note his attitude problem. Confront his obvious lies, and you've got him. Report back to the tavern for the reward.

Love Quest Simple Fed-X job. After you return with the general the Jaarl will ask you to take a love poem to Kira the Cold in Thronheim and report back to him the results. She turns him down, but leaves how you break the news to him up to you! (Take the honest approach!)
Gladiator Promotion WARNING: Make sure you have read the "Bugs and ONE HUGE WARNING" section about the serious Promotion Lockout Issue before you do this!!!

Three pretty straight-forward quests:

  • Get a basilisk skin (there are several near Anskram Keep.
  • Get Kira's shield (leaning against the wall outside her throne room in Thronheim)
  • Win a battle at the Lord level in the Thjorgard Arena (Minor scripting bug? If you don't wait for the arena baddies to come to you, you don't get credit for the kills! I discovered that by rushing to confront them in their two "dressing rooms" before they came out.)
Find the Petty Thieves Part of the Paladin Promotion Quests

(Thanks for the help Claus, Hipshot, DvuS)

As part of the Paladin Promotion Quests you must ruin a mans life, then save a family. The only hint you get (by later looking at your Quest listing and seeing that the entry has changed) is to check with all town halls to find out who is having trouble with thieves. Turns out it is Sturmford. Go visit the small family in the SE corner home. Confront the son on the 2nd floor. Find dad behind the temple and lead him into the jail. (That "ruins") his life.) Then check with the shopkeepers to find someone who will hire his son. (That "saves" the family.)

Stop the War Thanks Linda for reminding me I left this out!

This quest is given late in the game after you have accomplished all quests from all six Jaarls. A messenger will find you, and indicate that Drangheim and Sturmford are at war. You must find a way to stop it. Go talk to both Jaarls., and use a bit of diplomacy. You will find that you need to find someone to write a treaty between the two cities. Hint: You do not need to wander around asking everyone you meet. Someone is a logical choice. SPOILER: How about another Jaarl they both respect. BIG SPOILER: How about the cutest Jaarl?

Clear the Cellar?? (Arthur reminded me to add this)

A note on the floor of the bank offers a reward for clearing out the rats from the Banker's cellar.

Open Question: Did anyone find this to be real?

Methinks this is a joke --> poking fun at the fact that every one of the classic RPGs have always started with the 1st quest being "Clear the xxx from my cellar" where "xxx" is rats, mice, spiders, etc.


Comments (1)   Add comment   

The village of Lindisfarne is most valuable for the five magic grandmaster trainers that will enable your promoted Mages, Liches, Druids, and priests to cast the most powerful spells in the game!

Lindisfarne also contains the Monastery -- at the heart of many quest and promotions.

An awesome hint (Thanks Claus) -- Claus says there's a way to climb through the mountains west of Lindisfarne! There is a way to slide down the cliff down where the South central thralls are located, but per Clause there is another way north of that (near "A" on the above map. Neat!

Quests
  • Book of Rules
  • Steal the Relic for the Jaarl
  • Steal the Saint's Bone for the Abbot
  • Find the Priest (Priest promotion quest)
  • Paladin Quests
  • Dragon Cave
Trainers
  • Weapons and Armor: None
  • Magic: None
  • Specialties: None
  • Grandmaster Training: All magics
Promotions
  • Paladin
Altar
  • None
SHIPPING SCHEDULE
  • Mon: Drangheim
  • Tues: Sturmford.
  • Wed: Guberland
  • Thurs: None
  • Fri: Thronheim
  • Sat: Thjorland
  • Sun: None
OPEN QUESTIONS:
  • None
Lindisfarne City
Other than the GM trainers, there is little of interest in Lindisfarne Village. See the annotations on the general map, above.

Lindisfarne Monastery
The monastery will be the focus of many visits!

There are four key reasons to visit the monastery: To steal the relic, to receive the Paladin promotion quests, to get the Saint's bone quest from the Abbot (that causes the dragon to start appearing in the dragon cave,) and to find a priest for the new church.

  • Steal the Relic for the Jaarl (I forgot who originally gave this quest!!!!!) (Thanks DvuS and Claus -- It was the Jaarl of Thjorgard!) The relic is in the NE corner at "A". You can take it by force (killing all the monks) but since you need the help of the Abbot for the Priest Promotion Quests and for the Dragon Quest ... it is not recommended. A note tacked near the entrance to the monastery gives a vital clue. The relic is well-guarded except when the monks are called to prayer. Hmmmmm. You will find various ladders into the upper levels of the monastary. An important one is in the area to the left of "C" on the map. (SPOILER: Here are six levels of hints so you can try as much as you want of it:
    • 1) Monks are called to prayer by church bells. Up on the third level at "E" are the ropes that ring the bells.
    • 2) The key is .... what tune do the monks expect? At the second level "C" is an organist who will give you the key clue -- his composition is based upon the bell sequence. Go back, ring the bells, then head down to the now-unguarded relic.
    • The organist's tune seems to be based upon a progression of playing from low to high.
    • Pull the bell cords so the sequence is lowest tone to highest tone.
    • 1-5-2-4-3
    • Okay. Email me your address and airplane fare and I'll come over and press the keys!!! :)
  • Findy noticed that if you stand with your right side by the cords, you can look up and see the bells. That makes it easy to see the order to play as the biggest bell makes the lowest tone, and the smallest bell makes the highest tone.
  • if you later go to the Abbot, he will confide that "somehow" the relic has been stolen, and doesn't seem to notice the huge bulge under your coat.
  • Priest Promotion: Find the new priest Just ask the abbot. He'll volunteer a monk who is not cut out for the monastery. You go meet him in the courtyard at "F." The monk will promise to meet you back in Guberland. Minor Scripting bug: Many gamers (including myself, so far) have reported that they can never find the priest back in Guberland and have wasted a lot of time searching for him. I even returned to check the Monastery, only to find he is no longer there. It turns out -- don't worry about it. When I completed the other two parts of the Priest promotion quests, Gray told me "he's already here."
  • Paladin Quests: See below

Paladin Promotion Quest

WARNING: Make sure you have read the "Bugs and ONE HUGE WARNING" section about the serious Promotion Lockout Issue before you do this!!!

Grehgknak is near position "E." and assigns you three tasks.

  • Save a man's life. See Thjorgard :"Save the Jaarl."
  • Ruin a man's live. See Sturmford "Find the Petty Thieves."
  • Save a man's live. See Sturmford "Find the Petty Thieves."

Steal the Saint's Bone The Abbot asks you to find and return the Saint's Bone. This relic is located in the Wizard's lab in Yorwick. See the walkthrough, there.

Note: This is part two of the three-part Snorri quests. Snorri (in the Thjorgard tavern) sends you the the Training hall 1st and suggests that it is part of the path to "kill a dragon." Only when you return to Snorri after completing the training hall wil he send you to the Abbot in Lindisfarne to "get the dragon to appear." The Abbot says he will (only if you went back to Snorri after completing the Training Hall) as soon as you get the Saint's Bone (relic) back from the Wizard's Lab in Yorwick. When you complete the Saint's Relic quest, then the dragon will start appearing in the Lindisfarne cave.

Michael reminds me to mention the irritating scripting bug here. The Abbot never acknowledges the relic. The "I've returned for the priest" dialogue stays active ("He's waiting in the Courtyard") even though that quest is finished.

Dragon Cave The path to the cave is well-guarded by mages and sorcerers.

Note: This is part three of the three-part Snorri quests. Snorri (in the Thjorgard tavern) sends you the the Training hall 1st and suggests that it is part of the path to "kill a dragon." Only when you return to Snorri after completing the training hall wil he send you to the Abbot in Lindisfarne to "get the dragon to appear." The Abbot says he will (only if you went back to Snorri after completing the Training Hall) as soon as you get the Saint's Bone (relic) back from the Wizard's Lab in Yorwick. When you complete the Saint's Relic quest, then the dragon will start appearing in the Lindisfarne cave.

I never went back and killed the dragon -- but here is various input provided by many, including Chang, Crow, and Alpha)

Other than pride, and winning a special certificate (the "Super Guber") there is no quest-related reason to kill the beast. Apparently, The Prima guide reports a total HP for the dragon over 100,000 --> the actual is 37,000.

Poison cloud was reported by many as the best way to kill the beast. Elemental protection and Pain reflection are also good. Having your NPCs in the front row of your formation helped a ton (as they died first, before your party.

The black chests (2) respawn every time you enter (up to a point). Ignore the dragon and loot them several times to get some great goodies. Alpha adds a particularly diabodical and clever cheat! Sneak in, quickly plant a Lloyd's Beacon, then exit. Now you can re-enter as much as you want -- and no dragon! The program's AI only creates a dragon if you walk in the front entrance!

Ta'sar Academy Ta'Sar Academy contains the Book of Knowledge.

(I forgot who originally gave this quest!!!!!)

Thanks Grep: The quest was given my Jaarl Markel in Guberland.

The quest is in two parts. In the first part of the Academy you fight a large number of guards and captains. Then you have to figure out a few clues to find the real book.

Inside "C" are many guards and captains. If you fight within a doorway to can limit the attacks on you to a couple at a time while you thin their ranks.

The barracks and classrooms on the E and W sides are empty.

In the room at "E" is a switch hidden behind a wall panel that opens a storage area.

The heart of the quest is found on a table at "F." You probably saw the apparent "book of knowledge" at the end of the hallway at "G." It's a fake, and a trap door drops you on a set of punji sticks at the bottom. Instead, you must take each of the 4 books on the table (one at a time) and put them on the correct table up in level 2 and 3 of the room. Pick one up, then open your inventory and read the title of the book. Now go up the ladder in the central column ("K") and find two tables on each level, with a note on the table telling what kind of book to leave there.

When all four books are in the correct position, a secret door will open on the 3rd floor ("H") leading to cryptogram you have to solve. The hardest part of solving it is the horrible text quality of the dialog box! A gentle hint for those who wish to try --- look for a pattern of letters that might be "The Book of Rules." That gives you enough letters so you can figure it out easily!

(Thanks Grep on this fun historical note -- When you figure out the code, you will find the encription pattern is the same simple one Roberta Williams used in the original King's Quest!)

(SPOILER: If you have trouble, it tells you to go through the revolving bookshelf in the next room. Press the book at "L" and get the book at "M.")


Add comment   

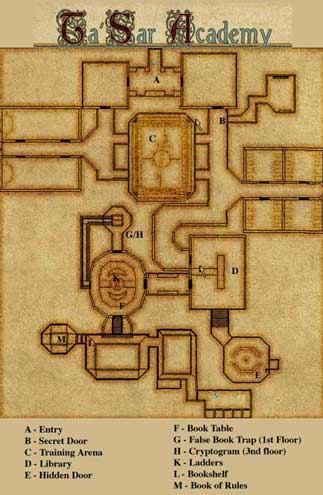
This is a TOUGH dungeon. The main problem is Apparitions and Terrors. A lot of skeleton warriors and undead infest the place, as well.

The Ruins are central to the Mage Promotion Quest and to the whole endgame sequence.

Quests
  • Mage Quest
  • Writ of Fate
Trainers
  • None
Promotions
  • None
Altar
  • None
SHIPPING SCHEDULE
  • None
OPEN QUESTIONS:
  • Missing hint -- location of Study?
  • Euthanasia Room?
Dealing with Apparitions Apparitions (and terrors) are tough, even for level 30 parties.

However, here's an approach that made them relatively simple to whittle down to size, at least for me!

  • When I took on the Ruins for the mage quest, all my other party members were already promoted. My assassin could wield two weapons (both with stun capabilities!) that gave me a huge advantage against many enemies. My GM ranger with Everstrike could pick off Apparations at a long distance well before they could get close. My Priest had great spells.
  • Wrath of Bugs is a great spell to use. Even better than turn undead. Major-league monsters get confused and you pick them to pieces while they wander around, or swing and miss at you.
Mage Quest
Johannes at the University in Thjorgard sends you here to find the Verhoffin book.

The important parts of this quest are points A and F on the map. In theory, you could complete the mage quest (the Verrhoffin Ruins part) by only going to these rooms.

The key in "A" lets you into the room at "F." You will find "Verrhoffin's Silver Book." Set a Lloyd's Beacon, take it back to Johannes, and he says it's the wrong one, but gives you a key that will get you to the correct one that is "under a floor" and that (Thanks Grep and JohnS) maybe it's in Drangheim.

SPOILER coming!

The key does not open anything in the Ruins. Hmmmmmm.

Remember anywhere along your way where you found a door that should open, but didn't? (Framed in "green.")

Did you notice a brief message onscreen about needing a key?

Maybe in Drangheim?

In the village?

In the corner of a house near the windmill that you can now enter with the key you will see a crack in the floor. Break through, get the book, and see Johannes to become a mage.

Other parts of the ruins At "B" is an important scrap of paper with a sequence of colors.

There is a door at "H" that is barred on the S side. You break the bar to open the door.

Scripting Bug? -- If you leave the Ruins and re-enter, the door at "H" will be barred again, and can no longer be opened.

Open Question: (Euthanasia Room) What is the purpose of the two rooms at C and D? The four switches in "D" lock the entry door and start flood the two rooms. A switch in "C" stops the process and empties the room. Other than assisted suicide, is there a purpose? (You can drown just as easily in the central pools.) Is there another sequence of buttons in "D" that does something? BTW -- until shown otherwise, I suspect these two rooms are an "unfinished" idea. I wonder if this was originally planned to be the way to get to Arslegard? Biohazzard came to the same conclusion.

SPOILER: The colors found at "B" show the correct sequence to step on the pentegram flames.

Writ of fate
The room at "J" and "I" is critical to the endgame. When you have won the capstone of order, you place it on the pedestal at I, turn around and get the Writ off the table behind you.

(Details are in the Dark Passage walkthroughs.)

Warning another serious scripting bug: (Thanks Praetor!) Praetor reports that he "Went to Aslingard" before picking up the writ. Without the Writ, he cannot continue. When he goes back, the writ is no longer there! Worse, the autosave reentering overwrites his chance to restore. Obviously he is dead in the water (a horrible pun to those who have played this part!) at that point.


Comments (4)   Add comment   

islemerged

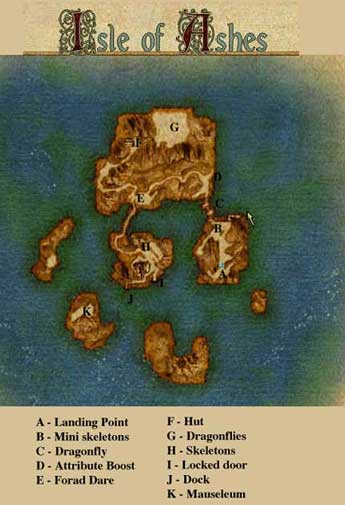
You've left the training center, hopped on the boat not sure of what lay before you. Next thing you know, you're stranded on an island, and hear the disturbing sound of clicking bones in the distance.

Or is that the sounds of your knees knocking!

Quests
  • Clear the Dragonflies
  • Destroy the Mausoleum
Trainers
  • Weapons and Armor: None
  • Magic: None
  • Specialties: None
  • Grandmaster Training: None
Promotions
  • None
Altar
  • None
SHIPPING SCHEDULE
  • Mon: Sturnford
  • Tues: Sturnford
  • Wed: Sturnford
  • Thurs: Sturnford
  • Fri: Sturnford
  • Sat: Sturnford
  • Sun: Sturnford
OPEN QUESTIONS:
  • None
 
First Steps  You begin at point "A" on the map. The first goal is to work your way to Point "E", at the start of the bridge. Along the way you will meet mini skeletons and dragonflies. If you have ranged weapons this is a lot easier. The skeletons are fast and jump around.

(Thanks Paul - don't miss the chest down near the shore behind you at point "A.")

 
Clear the  Dragonflies
When you reach point "E", you will find an NPC named Forad Dare. He tells you to seek out the seer in the hut at "F". She, in turn will not help until you accomplish the classic RPG first quest "clear out the cellar." Only this time the cellar is a nearby clearing ("G")

Try to take on just a few at a time. If you are getting hurt, run back to the hut. Behind it is a well that will heal you.

Loot all the bodies! You might have to search a bit to find some of the "booty bags" on the ground. Don't miss the chest at the back of the clearing.

When complete, return to the seer for your experience point reward, and she will tell you a bit about your destiny, and tell you to see Forad Dare to get off the island.

 
Clear out  the Island Forad Dare immediately joins your party. (Interesting note: Dare is the only NPC you cannot dismiss from your party. Does he play a key part in your future?) He tells you that you must destroy the mausoleum ("K") to stop the skeletons from showing up on the island, and hints that the answer is "behind a locked door." Only then can he get to the boat.

Once he has joined your party, talking to him (press the #5 key couple times to speak to him --- he's in party member slot "5.") he will then remember to mention that the seer has a key to the door! Return to her and get the key.

Now, head to the island and kill all the skeletons BUT DO NOT open the door yet. We're going to do a little stealing first, before some automatic cutscenes take over and you leave the island (for now).

 
Steal some Goodies 

Head around to the entrance to the ruins and head inside.

Warning: The nasties in this place will easily wipe out a party of level 25 members!!! You are mincemeat if you "explore" too much.

Just head to the opening on your right and to the chest at "X." grab the goodies and leave!

 
Destroy the Mausoleum
 Now head to the locked door at "I." A few skeletons will pop up out of the ground as you pass. Deal with them.

When you enter, before you touch the book ahead of you, loot the chest behind the door.

Now, touch the book, and you are ready for the real start to the adventure -- Sturmford.


Comments (1)   Add comment   

Guberland is your first access to skills trainers in the magics! The Jaarl and Healer quests are quite easy, even for a young party. There's an easy source of cheap treasure up in the Honks Temple (along with the world's only level 250 "peck-of-death" goose!)

Quests
  • Jaarl: Eliminate the Dook
  • Jaarl: Outwit Ivan the Smart
  • Promotion to Healer: Free Ned
  • Promotion to Priest: Multiple
  • Jaarl: Book of Rules
  • Capstone of Order (Circus)
Trainers
  • Weapons and Armor: None
  • Magic: E/M dark, light, elemental, spirit
  • Specialties: Meditation
  • Grandmaster Training: None
Promotions
  • Initiate --> Healer
  • Healer --> Priest
Altar
  • House on W central part of city
SHIPPING SCHEDULE
  • Mon: Lindisfarne
  • Tues: Isle of Ashes
  • Wed: Thronheim
  • Thurs: Thjorland
  • Fri: None
  • Sat: Drangheim
  • Sun: Sturmford.
OPEN QUESTIONS:
  • None
Guberland City
The SW portion of the town has all the magic trainers. The trainer in meditation is near the Jaarl's hall.

You probably will not need it, but a Gatemaster NPC can be hired by the tavern. She only casts at Expert level (nearest town if in the same region), so she is of little use. Your existing magic users should have that level of town portal by now.

Dook Castle
The Jaarl asks you to get rid of the Dook as a contender. This is an easy quest. Just walk in, find the Dook, and tell him to leave! "There's always the blade." He wimps out and agrees to run.

Oddly, no one ever challenges you despite a zillion guards walking around. Lots of nice chests to loot.

However, that all changes if you enter the caverns (needed for the ranger quest) -- unless you catch them napping! The cavern has some tough Trellbergs, basilisks, and a cavern filled with Flying Apparitions. At the far side is a black chest ("B") with an awesome bow -- Everstrike -- that can only be used by Rangers.

Spoilers under the photo

To get into the cavern, turn the shield on the wall at "A". If you want to get out without taking on the whole set of guards, consider what you read on one of the notes you find along the way. Seems that Dook's guards have a habit off sleeping on duty late at night. So wait until after midnight and there are fewer to contend with! (If you forget, then run back into the room with the entry to the caverns, loop around the far end (with 100 guards chasing you) then loop back and run down the hall and out the door.

Thanks Nichole - There is a 2nd black chest under the water in the caverns near Everstrike.)

Temple of Honk Another easy one (once you get there.) Nothing to do inside except loot the chests behind the secret wall at the back of the temple.

Watch out for the killer goose. If you attack him, he deals out about 60-70 HP damage with each peck!

Note: You do NOT have to do anything here to solve Kira's "Eliminate the Honks" quest.

There is a locked door at the top of stairs. (Thanks Kreegor -- The locked door is part of a quest I have not reached having to do with "The Game of the Gods in Asgard.")

Follow-up: The upper level Honk quest isnow in the Arslegard walkthroughs.)

Book of Rules This quest for the Jaarl is in the Lindisfarne Ta'Sar Academy.

(Thanks DvuS for reminding me who gave that quest!)

Outwit Ivan
The Jaarl asks you to outwit him. Ivan, the self-proclaimed "smartest man on earth" is at the circus. He asks you seven history questions.

Don't worry about penalties to get them wrong. You can always start over.

SPOILER: If you don't want to bother: 3-1-1-2-3-3-2

Healer Promotion WARNING: Make sure you have read the "Bugs and ONE HUGE WARNING" section about the serious Promotion Lockout Issue before you do this!!!

Rtjolnir in the temple needs help. Ned has gone mad because of a spell put on him by the Old Hag.

This is easy, quick, and bloodless. Go to the apothecary and he'll tell you he needs a lock of hag's hair. Go down to the beach and pick it up on a chair in her cave. Return to the apothecary with it. Wait an hour while he mixes up a brew. Take it to Ned by the Jaarl's hall. Return to Rtjolnir.

Done! You're a healer. Now run down to the SE corner of town and train up!

Capstone of Order (Circus) Thorin Mouth will give you a capstone of order if you win all the prizes at the circus. There are 6 that are needed. Note: The Capstone is a critical endgame quest item. (I suspect that you cannot actually trade for the capstone until that quest is given -- see the Dark Passage Walkthroughs.)

The contests are the same as those described for the Thjorgard circus.

Note: You cannot actually win the Capstone until the Capstone quest is given late in the game. (The Thjorgard circus will also not let you win the doll until the Bikki quest is given late in the game by Yrsa.)

Note: You can actually just do one contest many times until you have all six items. You seem to get a somewhat random prize. Eventually you will get the final one you need. Trade them for the Capstone, and discard the extra gudge.

Priest Promotion WARNING: Make sure you have read the "Bugs and ONE HUGE WARNING" section about the serious Promotion Lockout Issue before you do this!!!

Gray is found in the temple. He gives you three quests.

  • Find a replacement priest. When you get to Lindisfarne, ask the abbot and he will tell you what to do. (See the Lindisfarne section of this site.)
  • Find the Tree of Life in Frosgard (See Frosgard section -- Ruined Temple Quest)
  • learn the Consecration ritual from Nathi in Frosgard (see the Frosgard section -- You just need to talk to him where he stands in the corral near the training hut.)

Add comment   

Quests
  • Jaarl: Break the ice
  • Jaarl: Eliminate Yanmir
  • Scholar --> Lich promotion quest
  • Crusader --> Ranger promotion quest
  • Healer --> Druid promotion quest
  • Ruined Temple (Priest promotion)
  • Beer Quest
  • Nathli Consecration Ritual (Priest promotion)
Trainers
  • Weapons and Armor: None
  • Magic: None
  • Specialties: All except meditation
  • Grandmaster Training: None
Promotions
  • Scholar --> Lich
  • Crusader --> Ranger
  • Healer --> Druid
Altar
  • Inside the magic shop in a cave in the SE corner of the city
SHIPPING SCHEDULE
  • Mon: Lindisfarne (After ice Quest)
  • Tues: Thronheim (After ice Quest)
  • Wed: Sturmford (After ice Quest)
  • Thurs: Guberville (After ice Quest)
  • Fri: Thjorgard (After ice Quest)
  • Sat: None
  • Sun: Drangheim (After ice Quest)
OPEN QUESTIONS:
  • None
Frosgard City
Frosgard is similar to Thjorgard in terms of trainers (though MUCH less expensive).

The city contains the Promotion Masters for Druids, Liches, and Rangers.

Break the Ice
No ... nothing to do with getting the wallflowers onto the dance floor. The dock is frozen solid. The Jaarl needs it freed up to get critical supplies to the city.

Hint: Wonder if there's any way to blast through the jam?

SPOILER: Check the explosives seller in the W side of the city. Talk to him, get his help, then shoot the barrels he delivers.

Druid Promotion Quest

WARNING: Make sure you have read the "Bugs and ONE HUGE WARNING" section about the serious Promotion Lockout Issue before you do this!!!

Since I had no druid wannabes in my party I did not take this quest, and suspect there might have been a part 2 that I missed. (Thanks Nichole -- Nope, just the Green man Quest.)

Menja asks you to find the Green Man. Easy. He's down in the SE corner of Frosgard. Lots of wolves and Yetis will slow your travels, but the green Man is easily found near the base of the large tree.

Yanmir's Fort The Jaarl has one more problem ... a man-mountain named Yanmir. Problem is, you have to kill him, but he can't be killed by you! The only answer is the Jaarl's vague reference to "tricking him."

To get to the Fort, travel through the ice caves starting north of the Green Man and go to the transporter at the NE corner of Frosgard.

Enter and go north. A scroll you will find amidst the goodies in the Sage's bedroom is a critical clue as to how to get rid of Yanmir. Lot's of treasure and loot along the way to solving this.

When you pass through the throne room you will probably catch sight of Yanmir to the south. Ignore him, enter his bedroom, and battle the yetis to get to a nice chest.

Head E out of the throne room, then S. Ignore, for now, the room shown on the map with the secret door into the secret passage.

Sweep through the rest of the Fort. Many chests. Lots of treasure. You will find two groups of kids locked up in cages (see "Children's Quest.")

Finally, when everything except Yanmir is complete, head back to the secret door to the secret passage. The note from the sage you found earlier gives you the answer!

Major spoilers below map.

SPOILER: whack all of the beams, both sides, then get out of there. Yanmir (in a cutscene) will do the rest.

Children's Quest? The kids seem just begging to be freed, except there's no way to unlock their cages. As well --- there is no one I found that asked for a "Save the Children" quest. Anyone have any ideas?

Thanks timeetyo! Timeetyo found that there is a key sitting on the throne! Problem is, it is too high to reach! Get it (spolier below) and free the kids! Kreegor and HipShot add that the kids follow only part way, and do not seem to appear back in Frosgard when you return.

Who gave this quest???

(SPOILER -- per timeetyo, there's a box you can slide over that lets you jump up to the throne!)

Ranger Promotion Quest

WARNING: Make sure you have read the "Bugs and ONE HUGE WARNING" section about the serious Promotion Lockout Issue before you do this!!!

Fenja in Frosgard City gives you these two quests.

  • The Bow "Everstrike:" -- IMHO, the most powerful weapon in the game! Can only be used by a ranger. 100% accuracy. 40-50 points damage per arrow. A GM with three arrows can cause a LOT of trouble, at VERY long range, with a weapon like this! The bow is in the caverns below the Dook's Castle. See the walkthrough in the Guberland pages.
  • Pass through the Dungeon of Secrets without tripping any alarms. At first this dungeon really bugged me -- seemed to be more appropriate for Lara Croft than Vox the Mighty, Invincible Ranger Before Whom All Mortals Quake! (Or, actually, Vox the senile archer with the warped bow.) Too much thumbriding and reflexes. But the quest grew on me when I realized it is absolutely appropriate for a ranger (GM in Perception, etc.) and when I found it takes more thought than reflexes. The problem is a weak game design that gives too little feedback. You can make it through, and not have a clue why you failed. Here's the secret.
    • The key is to not trip ANY traps, not just the ones during the "official, timed tests." If you open a door and the axe falls, you lost. So, for the doors, stop well short, open then from a distance, then walk through.
    • Do a quicksave before each section. If you blow it, just "F9" and repeat that section.
    • For the fireball room, switch your default setting back to "WALK!" On "RUN" you have to be incredible adept to make it (too easy to overshoot.) On walk, it's actually easy.
    • For the room with the stairs, switch back to "run", only crouch until you pass the traps, then run like heck to and up the stairs.
    • In the final room, zigzag through. You start on the right, head diagonally L, then diagonally R, then to the door. It works.
    • When done, the power of Everstrike is yours to command!
  • Thanks Anjalena: " I finally figured out what I was doing wrong. The official strategy guide (Vox: Prima?) said approach the stairs, wait for the spinning blade to emerge then stop, then run by.) I haven't seen the Prima guide yet. I like their work, espoecially the maps, but the MM9 guide is not carried at my local outlet. Prima is usually very accurate, so if this is them, it's an unusual goof.
  • Normally I don't post hacks that exploit an oversight in the game, but this one is so clever, and "outside-the-box" that I will. And, afterall, aren't rangers-to-be supposed to be judged on their perception and ability to see the way around traps!! Cecil found that Lloyd's beacon is the answer! Don't talk to the attendant. Walk to the end and don't worry about tripping alarms. In the final room (just BEFORE you exit to the attendant, set a beacon. Now talk to the NPC, warp to the beacon, walk through the final door "without tripping any traps" and claim your prize. Diabodically clever!
Lich Promotion Quest

WARNING: Make sure you have read the "Bugs and ONE HUGE WARNING" section about the serious Promotion Lockout Issue before you do this!!!

Skulkil in Frosgard City gives you this quest.

Sorry. Didn't take this, so don't know. Probably something to do with the "Lich Instructions Part 2" I found in the Chasm of the Dead in Drangheim, and the Lich Lab in Yorwick. Don't have a clue where "Lich Instructions part 1" can be found.

(Thanks DvuS for a preliminary description): Per DvuS you get part I of the Lich Instructions from Skulkil in Frosgard. Look at the Chasm of the Dead walkthrough in Drangheim and you will see where part 2 of the instructions is found. Now, enter the Lich lab, find the ingredients for a potion, mix it up in the kitchen, then go to another location to convert yourself to a lich! Obviously, more to come!)

Ruined Temple This is part of the Priest Promotion Quest. It's a clever little dungeon. Lots of traps, secret doors, a couple nice puzzles.

You enter at "A", and work your way to the stairs down at "B." Assorted nasties all along the way.

At "C" is a genie who will grant you a wish -- more gold, and item, experience, or an attribute bonus. I chose attribute bonus, and cannot tell exactly what happened (I do wish 3DO had finished this game!) I think I received a significant boost in magic skills across the party. Anyone know exactly what happens here??

(Thanks Wizzcat: Gold: 5000 gold, experience 15000 points, item: a piece of Fre's set, Attribute: +10 might.)

The door at "D" is locked from the other side. When you enter the room at "E" the hall collapses behind you. A trapped door at E lets you into a puzzle room "F". (Spolier at bottom of section.)

In "J" is a crypt (more on that in a moment.) Up the ladder at "J" leads you through rooms with chests and treasure to the locked door at "D". You're back in the top of the genie room.

Sooooo ... where's the Symbol you're searching for?? Hint: spend more time in the crypt room. Spoiler below.

Spoiler "F" - Set the wall icons to match the icons on that side of the pedestal.

Spoiler "G" - There's a switch on the wall behind the crypt near "H" that opens the top of the crypt. Hop inside. Keep bashing the bottom of the crypt, each time dropping a level, until you are at the base of the ramps in section "H." Head up the ramps, and at the top is the Symbol and the way back into the crypt room.

Beer Quest (Thanks Grep -- forgot to add this one!) The bartender in Frosgard will give you a minor quest to sell his beer at the tavern in Guberland. Total reward seems to be $500. hardly worth it for a party of your stature!
Consecration Ritual This one is easy. Just talk to Nath'li in the center of the corrale N of the training center.

Add comment   

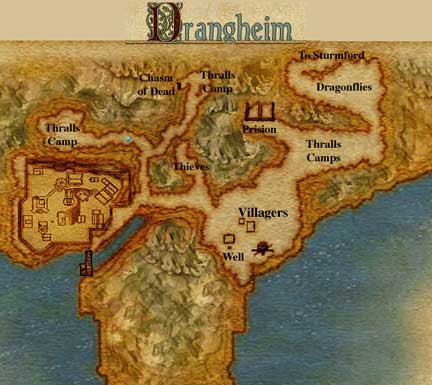
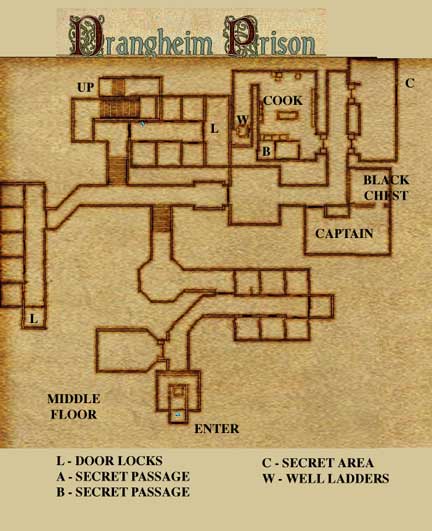
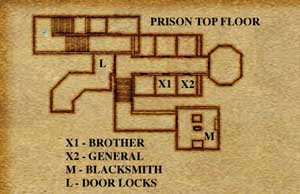
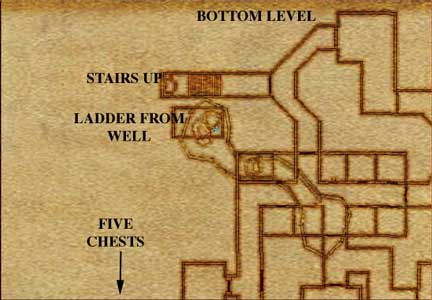
Drangheim is the twin of Sturmford. The same skills trainers, two more promotion masters, and three significant quests. You don't want to even think about taking on the Chasm of the Dead for a while. The first half is fine --- but then you meet a pack of apparitions! The other two quests -- prison and thieves -- can be attacked early in the game.

Quests
  • Jaarl: Destroy Anskram Keep Defences
  • Jaarl: Chasm of the Dead
  • Promotion to Crusader: Eliminate the Thieves
  • Promotion to Assassin: (2)
  • Find Nicolai a job
  • Rumor Quest
  • Stop the Sturmford-Drangheim war
Trainers
  • Weapons and Armor: Expert and Master
  • Magic: None
  • Specialties: None
  • Grandmaster Training: None
Promotions
  • Fighter --> Crusader
  • Mercenary --> Assassin
Altar
  • Jaarl's bedroom
SHIPPING SCHEDULE
  • Mon.: Guberland
  • Tues.: Sturmford.
  • Wed: Guberland
  • Thurs.: None
  • Fri.: Sturmford.
  • Sat: Guberland
  • Sun: None
OPEN QUESTIONS:
  • None
Drangheim City
There is very little difference between what Sturmford and Drangheim can offer in terms of shops and trainers. |Do NOT use the training center in Drangheim unless really necessary. It costs 4 times the training cost in Sturmford, and 10 times the centers in Frosgard and the Thjorgard Black Market!! Several key trainers are located inside buildings in the NE part of town. Don't forget the barrels inside the foundry (on your right as you enter the city.)

Prison Quest

Thanks to Lillia, Kirith, Herville, Deathmonger, and Slarti for their hints on the prison quest before I finally went back and remapped the place!

There are two ways to enter the prison -- the front gate and a secret passage from the village outside Drangheim City. The easiest is to simply go in the main gate and ask the guard straight ahead of you for a visitors pass. No one seems concerned that your party is armed and dangerous, and you can wander around the place pretty much unquestioned.

If all you want to do is free the general, head to the stairs in the NW corner of the prison. You will find him in a cell on the top floor. Free him, fight through the guards and return to the exit, and leave. When you find the general and let him out of his cell, he'll follow you back to the exit, then he will leave you for a drink in the Sturmford tavern. Pick him up there later, lead him to the Jaarl, and collect your quest experience.

If you take that "quick-in-and-out" approach you miss a number of fun options, a minor quest, some secret passages, and lots of chests (One black.)

A black chest is in the Captain's quarters on the E side of the middle floor. North of him is a room with a small crawlspace "C" that does not appear to be accessable. It probably is just a home for all the beetles that infest the area.

The cook will give you a minor quest to save his brother (who is in the cell next to the general on the top floor.) If you accept it, he shows you one of the secret passages at "B" (behind the cow!) that leads up to the blacksmith's room on the top floor. There seems to be little value in this passage, other than the fun, unless you wish to avoid a fight or two along the way.

The general is in "X2" on the top floor. A lever at "L" opens the cell. Obviously, pulling the lever also makes all the guards hostile. In the blacksmith's room is an attribute barrel. Moving the forge at the N side of the room uncovers the cook's secret passage down to "B" on the middle floor.

If you now decide to head back to the front, you might have to wait sometimes for the general to catch up with you. All guards along the way will attack.

There is another secret passage from a cave underneath the prison that connects with the bottom and middle floors. (Thanks Tim --> In the SW corner of the botttom level are five chests, three out in the open and two in a hidden room.)

The well in the village allows you to enter the hidden cave, and easily climb up to the middle floor.

Anskram Keep

(Exterior)

When you enter the clearing and see Anskram keep before you, there is no obvious way to enter. Head around the keep to the left, and wipe out the Basilisk who takes offense at your intrusion. Now head to the back of the keep, take out the 2nd basilisk, and loot the chest. At the back of the keep on the NW corner is a weak section of wall. Whack it, and you can enter. A central room on the lower floor has another Basilisk. Now, head up the stairs to the top floor. The door on the South side of the keep gets you into the imp area. At the front of the keep you will find trap doors that let you inside to destroy the defences of the building.

SPOILER: Shoot the two chains holding up the drawbridge, and press the (hard to see in the dark) floorswitch to raise the portcullis.

Chasm of the Dead Quest
Getting through this from the entrance (top of map) to the chasm at point "A" is straight-forward, even with a level 8-10 party. Lots of traps, a few tough fights. And, of course, the problem with undead is that you have to kill many of them twice!

But, at point "A" you will run into LOTS of apparitions that will eat up any party under level 20 or so, maybe even level 30. So, you might want to make this one of your mid-game quests.

The apparitions are "buried" in the pathway that works it's way around the rim to the chasm floor in area "A". There's no way around them. Every 20 feet or so, when you pass them, they appear behind you and attack. If you run, you just trigger all 10 or so to appear, and they have no problem catching, surrounding, and, well, you get the idea.

So, go slow through "A" and take out one at a time. Wrath of Bugs is a great weapon against apparitions. They get confused, don't attack, miss a lot, and make it a lot easier. Rayhne points out another idea -- featherfall down and bypass all the apparitions. Then, town portal out when you have the Crona Kiga. Paul avoided the apparitions by tiptoeing along the edge of the path.

The floor of the chasm at "B" is filled with patches of undead, 4-5 at a time, that rise and attack as you pass.

The mini-temple in the NE corner has lots of mummies, a bit of treasure, some traps. The same with the rooms just before the Crona Kiga at "D".

At "C" is a complex with 12+ mummies guarding a central pyramid. On top is a scroll of the Lich, Part 2.

The room at "D" is well guarded with skeletons.

Thanks Deathmonger - There is a black chest I missed "...behind the flipping floor trap in the hallway just off the chasm." I will try to track down a specific location on the map.

Crusader Promotion

WARNING: Make sure you have read the "Bugs and ONE HUGE WARNING" section about the serious Promotion Lockout Issue before you do this!!!

Keith is in the entry to the Temple. This is an easy quest once you have your party built up a bit. A couple fighters with Expert armor, and at least one expert weapon apiece is essential. 6-7 thieves and bandits immediately surround you. Once you defeat them, loot their camp. Take the plow, dolly, and herbs to the villagers in the SE corner of the map, then return to get your promotion.

BTW -- did you notice one of the houses in the village is locked, and cannot be entered even though with "perception" you see the green outline that indicates an area to enter? Hmmmm. Remember that one.

Two great hints from Neriana: Newbies to MM will underestimate the importance of using geography to your advantage in battles. Neriana points out the cleft in the mountain on the right side just as you enter the thieves area. Get their attention, then run over there and back in. Now, only 1 or 2 can hack at your party (instead of surrounding you) and the big rock to your right even prevents some of them from throwing daggers at you. If you look at the write-up on the assassin's quest and Kluso's house, you will see the same approach using the stairwell. Fighting in doorways, without fully entering the room, is a great tactic. Second, Neriana made good use of a new MM feature overlooked by many of us (including me until the midgame!) the "F" key. Press "F" and you can set up a formation for your party. Your fighters and an NPC in the front row can shield your weaker magic users in the back.

Stop the Rumors (Thanks Lillia!)

Here's a quest I missed from the Jaarl. (Details to be provided next time I get back to Drangheim.) He asks you to talk to a woman in town to find out who is spreading rumors. The Drangheim woman fingers another woman in Sturmford. Confront the gossip in Sturmford, threaten to rat her out to the Drangheim Jaarl, and she folds like a cheap suit. (Lillia: "Pretty easy way to get gold and experience early on.")

Get Nicoli off Welfare Another one I missed! Thanks again Lillia!

Prince Nicoli (remember him from MM6, trying to find the circus where he had run away!) needs a job. As Lillia puts it, "There's a guy in Guberland circus who needs to hire someone, but not someone who looks as scruffy as you!" (Hey, cut me some slack Lillia, I shaved and everything this morning!) Just let Nicoli know, then return to Thorin Mouth at the Circus for your reward.

Assassin Promotion WARNING: Make sure you have read the "Bugs and ONE HUGE WARNING" section about the serious Promotion Lockout Issue before you do this!!!

Atli is found in the Tavern. He gives you two quests.

  • Get the Knife. Go to the house in the N part of Drangheim and prepare for tough fights. 12-15 Guard Captains are the start, then you get Kluso himself. The key to victory here is survive the first onslaught of 5-6 guards, then carefully pick off 1-2 at a time of the guards spread around the house. Backing into the stairwell at "B" lets you fight without getting surrounded. Attack room "C last. A tough captain and Kluso await. At "A" on the bottom floor is a black chest. My mercenary with Expert disarm at level 12 (enhanced via various goodies I'd found along the way) opened it with no problem. A very nice dagger is inside, just waiting for my soon-to-be-assassin to use in two-handed blade fighting! Take the knife out of the wall over the fireplace, and blow this popstand. It is this knife, not the one in the black chest, that is needed. When you take it, an alarm sounds, and any guards you left alive come running. (Note ... thanks Joe and DvuS -- you don't actually have to kill Kluso, just getting the knife solves the quest. But, Kluso does have some nice loot if you do!) (Thanks Kirth -- you can also go in the upper back window and miss the welcoming party at the front door.) Big hint: Trying Kirth's hint when playing through a second time, I discovered that all the guards are asleep at night. You can attack one at a time, and their dumb "comrades-in-arms" sleeping 10 feet farther down the hall don't even wake up and help their friend. Take them out one at a time. That only leaves a group of 5-6 in the room with the knife and black chest to deal with as a group. If you really want to be cheesy and take on Kluso "for free", then jump from the balcony to the top of the bookshelf on the back wall. Pick him off with arrows while all he can do is shake his fist at you! (He has some nice loot.)
  • Kill Guaine in broad daylight. There is no hint where this guy might be, or even what city. If you're observant, though, you will now see a new person holding two daggers standing in front of the Drangheim bank. Yup. That's Velsii!
Stop the War This quest is given late in the game after you have accomplished all quests from all six Jaarls. A messenger will find you, and indicate that Drangheim and Sturmford are at war. You must find a way to stop it. Go talk to both Jaarls., and use a bit of diplomacy. You will find that you need to find someone to write a treaty between the two cities. Hint: You do not need to wander around asking everyone you meet. Someone is a logical choice. SPOILER: How about another Jaarl they both respect. BIG SPOILER: How about the cutest Jaarl?

Add comment   

Well, if you are here, you are dead. Sorry about that. But it also means that you figured out how to get to Aslengard!

The Missing Council
When you returned from getting Bikki her doll, Kira's hall in Thronheim is empty. All the Jaarls have gone.

Hint: The guards probably know where they went.

Betrayal in Yorwick
You rush to Yorwick, and find the Jaarls and army dead or dying. Forad Dare was a traitor! You must "get the army back" and save Chedian. It's all up to you, now.
Getting to Arslegard So, where is Arslegard? Most of us searched everywhere for an entrance and spoke to anyone you met ... but do not find out where Arslegard is located. Yet the hints were all along the way in various dialogs throughout the game.

Hint: The army you need to get back is a "dead" army.

Hint: How do you meet the dead?

SPOILER: Kill yourself. Drowning is a convenient way! (Side note: I agree with Ran that this was a pretty strange quest requirement by NWC. This is one of the few very "forced" quest actions in MM9 that does not live up to the caliber of the rest of the RPG.)

But the Gatekeeper won't let you in. You need a "Writ of Fate" to enter. So he sends you to the Dark Passage.

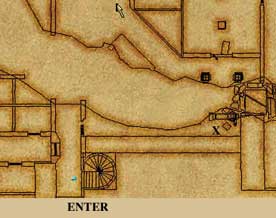
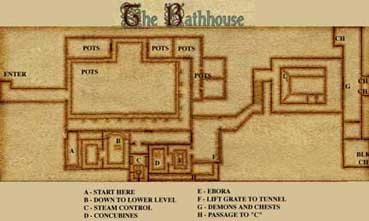
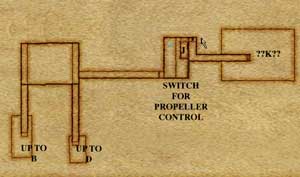
This is a fun dungeon. Clever design. Classic RPG!

  • Entry: Be sure to note the parchment about the ghouls, skeletons, liches, etc. It has an important set of clues for the bridge puzzle.
  • At "A" is a big blue figure (A Reptilian Terror). Note that if you touch it, "something" seems to happen, but it is not clear just what. (For MM8 players -- remember switch "A" in the top of the flooded Minotaur lair?)
  • Head down the ladder to the bridge segments. At the far end is a crystal behind a locked gate that you cannot open. Even if you trick the system (for example, by raising the final bridge and running over to click the gate) it will not open until all bridge segments are in the up position. Pressing the various statues on the bridge raises and lowers segments of the bridge in no apparent order. When they are all up, the gate opens. Touch the crystal and you are transported into the next section. Hint 1: The scrap of paper you found when you first came in Hint : It's simpler than you think. Ignore all the details in the note (like "X" doesn't obey "Y", etc.) Hint 3: Notice the sequence of capitalized names. SPOILER: Touch the statues in the same order as the note. You will have to swim a couple times. If you goof up, climb the ladder and touch the big statue to reset the bridges to their starting point.
  • Fight through the spectres and enter the banshee maze. This one is also easier than it appears. Look around and find the statue (of Kira?) that unlocks the gate to the next crystal. Hint: there is a hard to spot ramp leading up on the right as you enter the room.
  • Other than the fights and a hidden door, there is no puzzle in the Colloidal Forest. Just touch the crystal.
  • It's a long fight down the next hall. When you can see the water, jump in, take care of sea monster #1 (firing arrows from above is almost no fun), swim through the tunnel to the next room, and climb up on the island. (Note, Judy reports you cannot swim through the tunnel until the 1st sea monster is dead.) The next crystal is covered by a cage. Dive in, and when you have eliminated sea monster #2, the cage is gone and you can move on.
  • The next area starts tough!! 6-8 Reptilian and Desert Terrors. In each corner "C" is a column you can get behind that lets you take them on one at a time and easily.
  • Upon entry to the mirror puzzle, I briefly saw Njem in the distance. He warped out before I entered, though.
  • The Mirror maze: If you study the area, you will discover four mirrors (1,2,3,4 on the map), a crystal at "5", and a pedestal at "X" that shoots a beam towards mirror #1 when you touch it. There is a locked door behind the crystal. Touching the crystal does nothing. Hint1: Wonder what the mirrors and the laser beam do? Hint2: If you touch a mirror, it rotates slightly. You can "aim" them. SPOILER: Rotate each mirror so that the beam from "X" shoots to 1, 2, 3, 4, then hits the crystal. When you are successful, the doors on the sides of the area open and 6-7 Desert and Reptilian Terrors attack. If you run to the SE corner, you can back up a gully that lets only 2 or 3 attack at a time.
  • Before you go through the locked door, save your game! Cast torchlight and wizard eye! There's a trap on your left, and a few invisible spectres. Head through the secret wall at the far end.
  • The ramp puzzle is fun. Clever RPG. Hint -- notice the pattern of lines and the switch on the front wall. Note the four spots on the floor. SPOILER: Turn the switch, then step on the four spots in the same order as the wall lines (3-1-2-4). On "4", it will rise and lift you to where you can jump onto a ramp.
  • Finally ... the end of the Dark Passage. Except now you find that getting the Writ is not that simple. First you must get the Capstone of Order.
Capstone of Order
Head to the Guberland circus and win all six prizes so you can trade for the Capstone.

(See the Guberland walkthrough.)

Writ of Fate WARNING: Major scripting bug here! Careful!!

Head to the Verhoffin Ruins again, step on the pentagram in the correct order, and enter the room. Place the capstone on the pedestal at the far end of the room, and then make sure you pick up the Writ of Fate off the table, behind you, before you leave! If you die without it in your inventory you will have to restore from a saved game other than the autosave. (See Praetor's bug in the "Scripting Errors" section of the bugs summary.

Now, with the Writ safely in your pocket, head back to Arslegard again via the usual way. Glug ... glug ... glug.

(See the Isle of Ashes Part 2 walkthrough for map details.)


Comments (1)   Add comment   

Quests
  • Skraelos: Light the Six Pillars
  • Sven: Save Frosgard
  • Fre: Temple of Honk
  • Bath house - TBD
  • 1000 Terrors - TBD
Trainers
  • Weapons and Armor: None
  • Magic: None
  • Specialties: None
  • Grandmaster Training: None
Promotions
  • None
Altar
  • ???
SHIPPING SCHEDULE
  • None
OPEN QUESTIONS:
  • None
Arslegard City
Hall of Gods
You enter the hall of the gods through a transporter in the SE corner of Arslegard.

Afterworld

Skraelos will give you back your army if you light the six pillars -- Guilt, Confession, Suffering, Retribution, Absolution, Rebirth.

(I suggest you save before you talk to Skraelos!)

He transports you to the eerie Afterworld. In the distance you can see bodies on the ground -- the dead army from Yorwick. Now you have six tests.

  • Guilt: Simple question "Are you guilty of the death of your friends?" Yup.
  • Confession: Find each of the six Jaarls and admit your guilt to them. Then return to Skraelos. (Interesting minor scripting bug -- If you visit Drangheim, Sigmund is still up in his bedroom! The rest of the Jaarls are gone.)
  • Suffering: A set of 6 questions. Get any one wrong and you are diseased (no apparent loss of hit points, though) and have to start the sequence over.
  • Retribution: You have to kill off two groups of your enemies who appear, including Forad Dare. (Too bad, it's not the real Forad. Kill him will be enjoyed soon, though!)
  • Absolution: Get the Jaarl's weapons and return them to Skraelos. Go over to the dead army area (not to where you found the original Jaarls) and search for their weapons. Pick them up with the spacebar. Hint: There are only 5, not 6. Markel did not die in Yorwick!
  • Rebirth: Just step through the pillar of fire.

You return to the Hall of the Gods. See Skraelos again, and he will tell you that you have the army back. Meet Sven outside the hall. Rush to Frosgard (I set a beacon first.)

Battle in Frosgard When you get your army back, town portal to Frosgard (set a beacon in Arslegard first!) Tamur Leng and Forad Dare are there with their army.

There are skirmishes between your soldiers and Leng's near the training corral. Best keep away from those ... your army can handle it, and it's quite hard to tell who to hit!

Head towards the Jaarl's house. Along the way you will meet a couple squads of the enemies you can dispatch. Near the Jarrl's house is Forad. The real one. Ah yes, finally vengeance.

Inside the Jaarl's hut you will meet Tamur. Big battle? NOT! Turns out he has a Writ of Fate, too, but it seems to say the opposite of yours! You have to return to the Hall of the Gods to sort it out. So he joins your party!

(With the extra sword of Tamur, I decided to not go directly back. Why not let him help me clear out the Temple of Honk, first!!

Temple of Honk (Part II) Fre back in the Hall of the Gods gave you this quest.

Sorry -- just a very brief walkthrough until Monday!

After Fre in Arslegard gives you this quest, the upper door at the Temple of Honk in Guberland can be opened.

You seem to be able to go anywhere and loot the place at will UNTIL you take the "Accountant's Key" in the N Central room. At that point, everyone is your enemy. I suggest you loot all the chests before taking the key. The chest in the central room has some especially nice goodies.

The Golden Honk is in the sanctuary all the way to the E.

Once you set the temple against you, the Honk followers are TOUGH!!! 800-1200 HPs, and a strong melee and magic attack. Take the S route back to the entrance (or Town Portal out) to miss the large number of Honkers in the central room.

When you return, Fre answers three questions for you. Unfortunately, they tease more than help!

Open question: What does the Accountant's Key do??

Bath House

Thanks to Terry, SyCottic, DvuS, Claus, and 1979 for filling in some blanks!)

This quest is given by the Tavern barkeep. He is peeved that Ebora has taken up light housekeeping in the baths.

Note: Many readers have reported (and I also confirmed) that battling in turn-based mode in the bathouse (aginst the concubines) or in the 1000 Terrors (against demons) can cause the game to lock up. Play this section in real-time mode. For the concubines, it might is possible to kill all but the last concubine in turn-based mode then switch to realtime for the last one.

It does not appear to play a key part in the endgame. I did go in and clean it out, set the steam pressure on overload, and stopped the propeller --- so maybe by dumb luck I did the right things. Also, while I chased Ebora out of her quality time ("You've ruined my bath.") she disappeared again and I did not see her again although l won the game later that day.

Clear the top half of the main area, and be sure to check the pots! Many have nice goodies inside that help you pay for training.

Now, enter room "A" in the SW. You can take out the Colloidal Warriors in the next room through a window, and do the same thing for the baddies in "B".

Once "B" is cleared, swim down to the lower level. There is a switch that turns on/off a propeller at "J". The switch un-floods the area to the east of the stairs leading to "G".

Zone K is the same as zone L. Put yourself in front of the switch in zone J. Look at a map and you can see the left hand chess from zone G. (Submitted by Raistlin)

Now, swim up the tunnel at "D" into the concubines room. Jump out of the pool (so fewer of them can beat on you at once) and kill three concubines and a colloidal icky. You'll see Ebora bathing in the next room at "E". When you've cleared out her friends, she leaves "You've ruined my bath" and I never saw her again. Note: I was able to easily defeat the big green Colloidal beastie in the pool. Others found it impossible without using the steam to fry him (see below.)

Open the grate an "F" and watch out for the 200HP damage steam vents! Head down to the control room. There is a wheel that puts the steam vents on overload. This will toast the colloidal in "D" if you haven't already whacked him

Finally, at G are several good chests.

1000 Terrors

The final dungeon!

When Krohn sees the two Writs of fate, he gives you the key to Njam's house and asks you to find out what Njam is planning. Njam's house is NE of the baths. (Note: I was unable to open this door until I realized I had to have the person holding the key active!)

Note: Many readers have reported (and I also confirmed) that battling in turn-based mode in the bathouse (aginst the concubines) or in the 1000 Terrors (against demons) can cause the game to lock up. Play this section in real-time mode. For the concubines, it might is possible to kill all but the last concubine in turn-based mode then switch to realtime for the last one.

Inside you find a scroll on a desk. Njam rushes in. Take Krohn's advice and run like mad out of there! Report back to Krohn, and receive your final quest: lure Njam into his own trap deep within the Tomb of 1000 Terrors.

This 3-level dungeon is filled with demons, beholders, and Desert Terrors. Plus, Njam shows up many times to beat on you, then runs away just when you are starting to hurt him.

The two rooms at "A" have nice chests, and a pair of dueling statues that keep hitting you in their crossfire. The door at "J" is locked. You need a key to move on to level 2.

(Note: the area between "K" and "M": in the NW is part of level 2.)

Head into the room at "B". Lots of beholders in this area. Once they are cleaned out, you can jump across on the blocks (they sink as you stand on them) or swim. If you stand on the central block (right under the "B") and let it drop, you will see a hidden switch. It opens secret area "D." Inside, guarded, are two nice chests. At "C" are another pair of dueling statues. Stay out of their line-of-fire as you clean out the beholders, then loot the rooms.

Either the door or the tunnel "E" lead you to the next section. The puzzle doors at "F" are not hard to figure out. ( Does rearranging the letters N-J-A-M give you an idea?) )A "reset" button is next to each. When all squares are depressed, the door opens.

The hallway at "G" is trapped with fireballs. At level 48+, just run down the side and you take little damage.

Room "H" is tough, but rewarding! Four demons, beholders, and good old Njam himself. Defeat them, wait for Njam to run away, and loot the chests. Three black chests! Plus, the key to the stairway. Another NJAM puzzle door to get out.

Ready for level 2.

The stairs lead up to the skull room. The skull shoots fireballs while demons and beholders attack. The area is very dark -- light your torches before entering. (Note: I ducked out, then back in, and found the skull had now stopped firing, and did not restart on my 2nd entry.)

Careful!!! The trap at "N" leads to death even for a strong party! The outer two of the three switches are safe. But the middle drops you into a pool full of beholders, demons, and Desert Terrors. You are surrounded, trapped, and the only question is if you drown before they kill you. From location "O" you can work your way back and clean out this area a lot more safely.

At "O" is a genie lamp. I rubbed it, some smoke came out, but I never saw what actually changed.

Open Question: What did the genie lamp do??

Head down the stairs into the water, and clean out all the nasties (lots of demons, beholders, and desert terrors) down there. Work your way to the chess room. There are several pieces on the board (2 pawns, 2 knights, 2 kings.) Don't step on any squares they guard. At the far side are two black chests, and Njam makes another brief visit. You also find the maze key needed to access the final area.

For those who do not play chess, do not walk on the gray squares:

Open Question: Is there a way into the rooms at "??P??" (Update thanks to Chang, Jinx, Fire, Claus --- There are two ways into area "P." You can jump the bridge if you first cast fleetfoot on the party. Also, if you are standing on the broken bridge and look to your left, you will see broken pillars that let you jump your way up to the area. Inside you battle a couple lesser terrors, and meet up with Njam again.

Now, head through the water to the hard to find rap leading up to the area at "Q". Demons and Njam guard some treasure. Njam also shows up at "S."

Time for the maze. use the maze key from the chess room. Not much treasure or opposition here -- mainly beholders and a couple demons. Get to the far NE corner, cross the bridge, and follow the narrow path to position "L." Looking back at the level 1 map, work your way to the elevator at "M". There are traps in both hallways.

The final confrontation:

You enter at "A." When you get to position "B," Njam (cutscene) tells you he will disappear and come back when you are dead.

Just at the entry to "C" is a trap.

At "C" starts one of the toughest battles in the game. The chess pieces come to life as lesser demons, along with lesser demons and beholders from the large area to the east. Six lesser demons and 6 beholders sounds simple? Well, when you kill these lesser demons, they are immediately resurrected as greater demons.

When finally done, you enter the main room. It looks like nothing special. How do you convince Njam you are dead so he will return?

Enter the secret room and hide at "D." A cutscene takes over. You've done it. Mrs. Filbert's frozen Njamwich.

The Finale The final scene is an arguement between the Gatekeeper and Krohn. Turns out that the previously wimpy gatekeeper dares to argue with Krohn himself to save you. You are now free to roam arond Chedian at will.

Congratulations! You made it!


Add comment   

Shadowspire

map_shadowspire

Expert teachers:

  • Vampire

Master teachers:

  • M: Dark
  • S: learning, perception, Vampire

GM Teachers:

  • Staff, Identify Item, Mediation, Vampire

Training:

  • To maximum level. The best training center in the game.

Magic shops:

  • Dark

Quests:

  • Necromancer Promotion
  • Destroy skeleton transformer
  • Vampire Promotion
  • Bone of Doom
  • Grave Dirt
  • Puzzle Box
  • Potion of Pure Intellect

Dungeons:

  • Necromancer's Guild
  • Mad necromancer’s lab
  • Vampire Crypt
  • Yaardrake’s cave

Shadowspire is the toughest area in the game. You have to come here to get the best training, and dark magic spells. There’s probably the best potion and magic items shops in the game, as well. But, other than running as fast as you can along the E-W road to Ravenshore, or the N-S road to Rust, avoid Shadowspire until you have a senior party. You will be inundated with powerful magic attacks. I suspect that without GM level "Protection from Magic," there is no way to get past the bone dragons, vampires, and necromancers.

  1. Bone of Doom. You found this back in Ravenshore in the Dire Wolf cave.
  2. Necromancer Guild. (Up the mountain road E of the town.) This is a mainline alliance quest if you have sided with the Temple of the Sun. To succeed, you will have to dump one of your party members and add Dysan Leander (a weak character who easily can be killed.) Your cleric should have "Raise Dead" by now. You’ll probably need it for Dysan! Things are fine when you first enter. Wander around. One important door, and all the bedrooms, are locked. Up a level, around, and down on both sides leads you to elevators to two separate towers. Up one is Sandro. You must see him if you have allied with the Necromancers to get the Nightshade Brazier quest against the temple of the Sun. Up the other is Dysan. Add him to your party. Whoever you dump will be back in the guild at Ravenshore, waiting. Now, head down to the door that was straight-ahead and up when you first entered. Fight your way through to the room with that is the control room for the skeleton transformer. You will be taking on a lot of necromancers and archers! When you have sent them back to the pit that spawned them, you will destroy the transformer. First click the levers to allow the door slider to move, then press the button that closes the door. Click the slider to secure things. Now walk into the transformer area, and a cut scene will let you know you succeeded. When you leave, expect even more baddies. Use Dysan and his key to get into all the bedrooms. There is good treasure in each, including the shield "Eclipse" that Laithus wants back in Ravenshore. Report back to the Temple of the Sun, and they will join the alliance.
  3. Mad Necromancer’s Lab. This is in the NW part of the area and is surrounded by bone dragons and vampires. VERY heavy magic attacks! When you cross the moat and enter you are fighting vampires and necromancers on all sides. To the right is well-guarded room (bone dragons) and an elevator to a second floor. The ghost of Brazen Stormlance is here. He will give you the rest of the Knight promotion quest you got from his daughter in Garrote Gorge. (Go to Dervishe’s house in the NW part of the village of Ravenshore to get a potion that will restore him.) Back in the entrance, and this time to the left leads you through two very difficult rooms to a set of stairs down. Here are many necromancers, bone dragons, and archers. There are quite a few good chests here. They contain lich jars for the Lich Promotion Quest, and the spear Ebonest (part of the Knight Promotion Quest.) You will also find the puzzle box wanted by Benefice back in Shadowspire.
  4. Vampire Crypt. Another tough fight, inside. When you enter, one of the tombs on the right side is a secret door to some treasure. A room to the left has an altar that moves aside when you touch it to reveal a passage down. There are two rooms with nice treasures below. One has the Vial of Grave Dirt needed by Hallien back in Shadowspire.
  5. Yaardrake’s cave. If you can fly, and are a high level (methinks you have to be at least level 30-35?) then you can get the dragon Yaardrake to join your party. Use the fly and invisibility trick you used up in Rust to enter his cave and safely pass his "friends." His cave is high on a mountain in the NE of Shadowspire just before you cross over into Rust. As with the other dragon cave, there’s one great (highly trapped) chest that contains great stuff and a rare item.

Add comment