Armageddon Blade
- by ithacor
Gather the Sword of Hellfire, Breastplate of Brimstone, and Shield of the Damned to win the scenario. However, if Xeron is defeated in combat the scenario is lost. Xeron will be allowed to advance to 12th level and carry over his experience, skills, and spells to his next scenario.
Starting Bonus: Speculum or Equestrian’s Gloves or Necklace of Swiftness
 Click on a map to see a larger version.
Green - Friendly Town
Red - Enemy Town
Grey - Neutral Town
Yellow - Underground Passage
A# - Allied Towns
O# - Opponent Towns (a,b,c,d,e,f,g indicates which enemy)
N# - Neutral Towns
M# - Mirror Entrances (a) and exits (b). two-way unless stated
E# - Exit (a) entrance and (b) exit
S# - Seer (a) and the location of the item (b)
G# - Guard Tents (a) and the location of the Guard Tower (b)
J - Jail
X - Ambush
Starting Out
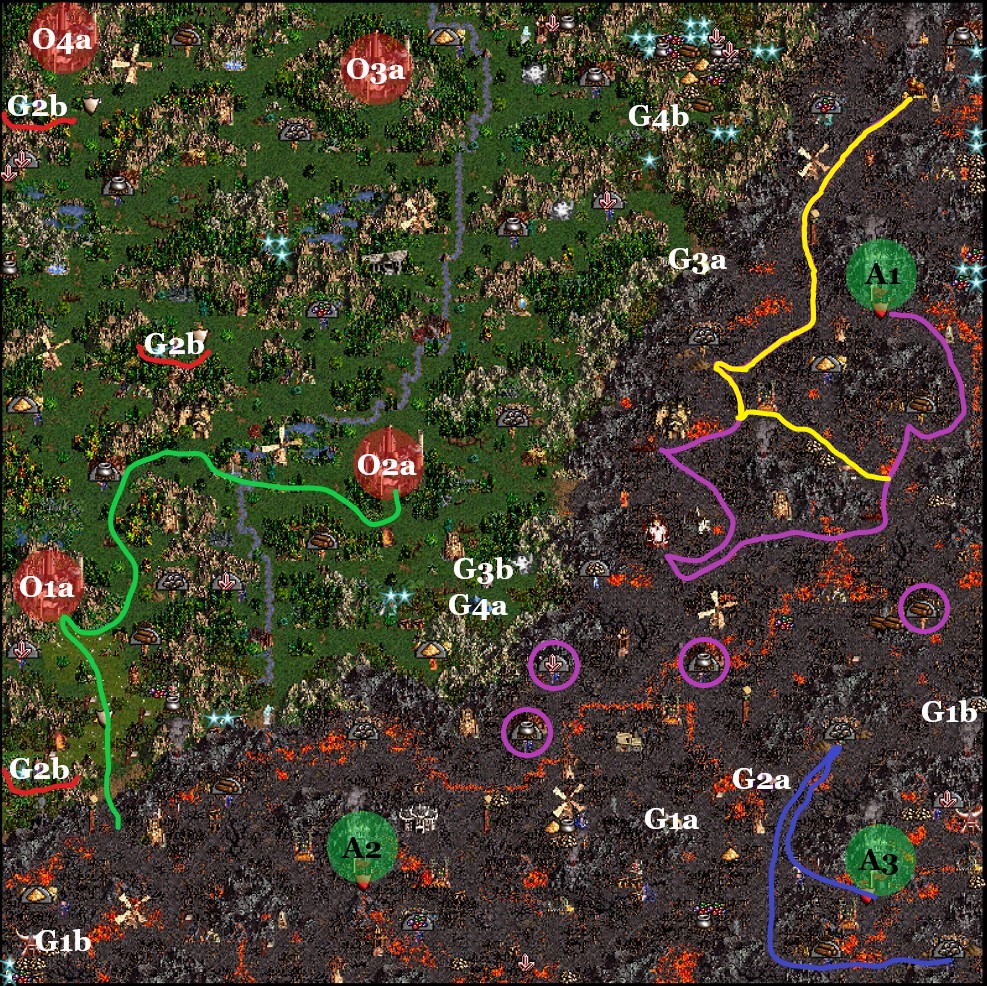
The enemy has four cities to your three, and starts with three heroes that are too strong for your starting army to handle. Fortunately, these heroes are guarding the three artifacts you need to win the scenario (behind the G2b guards underlined in red) and they cannot stray too far from them for at least the first month. Your territory has a wealth of mines and external dwellings that can allow you to keep up with early enemy production.
The bonus choice is a close call between the Equestrian’s Gloves or the Necklace of Swiftness. I recommend the Necklace because it boosts Cerberi to speed 10 on native ground. This is a major tactical advantage against the many swarms of Sprites infesting your territory.
Xeron can be built up in this map to make the next map easier, but it may be worthwhile to avoid building him up since you will fight against your Xeron build in the last two maps of this campaign. If you decide to build him up I recommend trying for Expert Wisdom by level 12 since the map offers 7 chances at good level 5 spells. It may be worth restarting until you like the skills that Xeron and Ash begin with.
Note that your three cities all begin with Castle Gates so you can easily shuttle heroes and troops between the three locations.
First Leg
Start by having your heroes visit the towns to pool their armies and to learn spells from the mage guilds. Upgrade the Kennels in Blackpool (A3), buy all of the Hellhounds and Cerberi in your towns, upgrade these plus your starting Hellhounds to Cerberi, and give all of your Cerberi and Devils to your main hero along with your bonus artifact. This hero should move along the blue path, clearing the way for a scout hero to tag G1a and then claim the gold mine behind the eastern G1b. Have another scout hero depart from Havoc Peak (A2) to pick up the resources behind the western G1b.
Buy a fifth hero in Mourningdale, buy as many Gogs as you can afford, and take the rest of your troops along the purple path to claim two Hell Holes and a Forsaken Palace. Have the last hero follow them to flag the Sawmill then split off on the yellow path to grab the loose gold piles. Have the purple hero move to the yellow hero and hand over the troops to ensure you capture the Fire Lake during the first week. If you kept your losses to a minimum, the purple hero can keep the Pit Fiends, half of the Gogs, and some Imps, and use them to clear the lightly guarded mines circled on the map while leaving enough for the other hero to take the Fire Lake. Your main hero should prioritize at least one Sulfur Mine after finishing the blue path.
- Build priorities in week 1: City Halls in Havoc Peak (A2) and Mourningdale (A1), a Citadel and Fire Lake in Blackpool, a Hell Hole and Citadel in Mourningdale, and Cages in all three towns. If you have sufficient resources (mainly Ore) try to build a Fire Lake in Mourningdale and a Citadel in Havoc Peak.
- Build priorities in week 2: finish building Citadels and Fire Lakes everywhere, plus a Resource Silo, Castle, and Forsaken Palace in Blackpool.
Second Leg
In week 3 (or week 4 at the latest), upgrade the Fire Lake in Blackpool, upgrade all of your Efreets to Efreet Sultans, and give your Gogs, Cerberi, Efreet Sultans, Devils, and whatever other troops you can afford to your main hero. You should be strong enough to take out Fiur and claim O1a and O2a along the green path. Have a secondary hero grab the Shield of the Damned for your main hero. O1a has a Magic University built; I recommend using it to teach Earth Magic to your main hero.
Erdamon hangs out near the Breastplate of Brimstone a little north-west of O2a. If your losses so far have been minimal you can challenge him straight away. Otherwise you can resupply from the Conflux towns and/or have your secondary heroes bring some reinforcements before you attack him. He carries a Tome of Earth Magic that can let you easily resupply with Town Portal if you have Advanced Earth Magic. If necessary you can use G3a to pass G3b to reach G4a so you can access the massive pile of resources behind G4b.
Finishing Up
If you don’t plan to build up Xeron at all, you can strike directly towards the final G2b (guarded by Ciele) and grab the Sword of Hellfire to win the map. It is not necessary to have the artifacts together or to have them on Xeron. As soon as any of your heroes picks up the third artifact the map ends—unless one or more of the artifacts is held by a hero in a town garrison, in which case the scenario ends when you end a turn with all three artifacts on non-garrison heroes. If you do want to build up it is easiest to take out Tan entirely, which gives you 7 mage guilds that can all be built to level 5. Leave an artifact on the ground (or in a garrison) until you are ready to end the map.
Even if you plan to leave Xeron weak it may be worthwhile to build him to Advanced Wisdom and to build L4 mage guilds everywhere. One of the fixed heroes on the next map has excellent chances to start with Expert Scholar and Advanced Wisdom, allowing them to learn the spells from Xeron and teach them to your other starting heroes.
- by ithacor
Defeat all your enemies to win the scenario. However, if Gelu is defeated in combat the scenario is lost. Gelu will be allowed to advance to 12th level and carry over his experience, skills, and spells into his next scenario.
Starting bonus: 20 Marksmen or 15 Grand Elves or 10 Sharpshooters.
 Click on a map to see a larger version.
Green - Friendly Town
Red - Enemy Town
Grey - Neutral Town
Yellow - Underground Passage
A# - Allied Towns
O# - Opponent Towns (a,b,c,d,e,f,g indicates which enemy)
N# - Neutral Towns
M# - Mirror Entrances (a) and exits (b). two-way unless stated
E# - Exit (a) entrance and (b) exit
S# - Seer (a) and the location of the item (b)
G# - Guard Tents (a) and the location of the Guard Tower (b)
J - Jail
X - Ambush
Starting Out
I recommend you take the 10 Sharpshooters. The other options are weaker until you have enough gold for Gelu to convert them into Sharpshooters (5000 for the Marksmen, 2625 for the Grand Elves), and it is difficult to accumulate that gold without compromise in other areas. Gold is such a scarce resource on this map that I recommend taking gold from all Treasure Chests.
Try to get Gelu to expert Wisdom since six of the seven towns on this map can build a level 5 Mage Guild. Gelu can only learn one new skill besides Wisdom if you want to ensure this happens by level 12.
The map has numerous Scholars. Most of these give extra stats so you should try to visit them with Gelu. The one north of A1 teaches Luck and the one northwest of O3a teaches Pathfinding. I recommend avoiding these Scholars with Gelu; neither skill is very valuable in this campaign.
First Leg
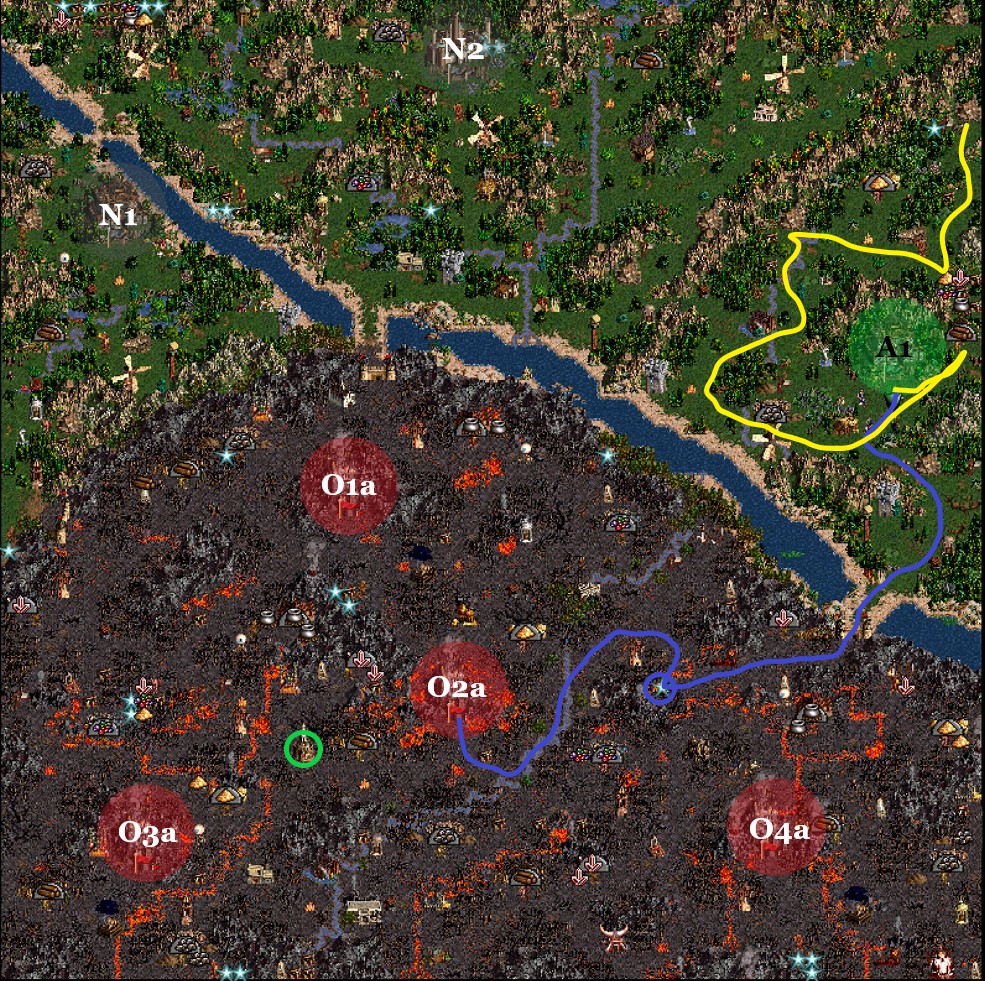
You start with one town to the enemy’s four, and your town is more restricted in its max development than any of the enemy towns. Enemy territory also has more mines, better artifacts, and plenty of loose resources. Therefore you must make a timely push into enemy territory or you will be overwhelmed by the enemy’s superior production.
To your advantage, your starting town is nicely built up and you have access to a powerful starting army. Send Gelu directly to town, picking up the 30 Elves. Move the 60 Elves off of Gelu into the town garrison so you can upgrade them to Grand Elves, buy a Spellbook for Gelu, and recruit another hero. Upgrade that hero’s troops and have them pick up the Archers, Marksmen, Sharpshooters, and Grand Elves to save Gelu’s movement.
I recommend splitting these troops as follows: Gelu keeps 20 Silver Pegasi, 10 Sharpshooters, and 60 Grand Elves, and is given the 30 Archers and 20 Sharpshooters picked up on the map. Gelu should upgrade the 30 Archers to Sharpshooters for 9000 gold. The 2nd hero keeps 10 Grand Elves, 20 Marksmen, and whatever troops they started with. This gives Gelu an army strong enough to defeat almost anything on the map with minimal losses (split the Grand Elf and Marksmen stacks for extra flexibility), and the 2nd hero an army strong enough to clear the starting area.
Send Gelu down the blue path through the garrison to pick up the Boots of Speed (blue circle) while the 2nd hero uses the yellow path to flag the Sawmill and Ore Pit. Gelu’s next objective is to capture O2a while the 2nd hero breaks into the area north of A1. Hire a 3rd hero in O2a, leave their troops in the city garrison for a little protection, and send them to the nearby Cartographer (green circle) to expose the map.
Building priorities are to get a City Hall in A1 and to build a Citadel, Demon Gate, and Hell Hole or Fire Lake in O2a.
Second Leg
With full knowledge of enemy hero locations and the movement boost from Boots of Speed, Gelu should be able to capture O1a and O3a while killing off enemy heroes. Hire some extra heroes to pick up loose resources, flag mines, and defend your towns. A secondary army assembled from your Inferno towns and/or your initial town can help with cornering any remaining enemy heroes. Once this is done use the secondary army to trap the enemy in O4a.
Finishing Up
With the map under control you are free to level up Gelu, visit places of learning to increase his stats, and build up your mage guilds to teach him powerful spells. Be sure to build Orders of Fire in all of your Inferno towns for extra Spell Power. Have secondary heroes visit the Witch’s Huts to see if any of them teach skills you want to learn with Gelu, and consider building a Magic University in N2 to teach Earth, Air, and/or Water Magic to Gelu. Once you are satisfied with your Gelu, take O4a to win the map.
- by ithacor
Defeat all your enemies to win the scenario. However, if Catherine is defeated in combat the scenario is lost. Catherine will be allowed to advance to 18th level and carry over her experience, skills, and spells into her next scenario.
Starting bonus: 30 Pikeman or 20 Archers or 8 Griffins.
 Click on a map to see a larger version.
Green - Friendly Town
Red - Enemy Town
Grey - Neutral Town
Yellow - Underground Passage
A# - Allied Towns
O# - Opponent Towns (a,b,c,d,e,f,g indicates which enemy)
N# - Neutral Towns
M# - Mirror Entrances (a) and exits (b). two-way unless stated
E# - Exit (a) entrance and (b) exit
S# - Seer (a) and the location of the item (b)
G# - Guard Tents (a) and the location of the Guard Tower (b)
J - Jail
X - Ambush
Starting Out
Catherine starts at level 12 with 5-8 skills learned. She will always know Archery, Logistics, Diplomacy, and Leadership. Ballistics, Offense, and Estates are common 5th/6th skills and I have occasionally seen her start with various other skills including Wisdom, Armorer, and First Aid. It is probably worth restarting the scenario until you have a Catherine without First Aid and with the capability to have both Wisdom and at least one school of magic. The Conflux towns can build Magic Universities so you can pick up the school of your choice. If possible, try to get Catherine to Expert Wisdom so she can benefit from the L5 mage guilds in the Inferno towns.
Sorsha and Cuthbert start at level 4, but their starting skills are far less important than Catherine’s.
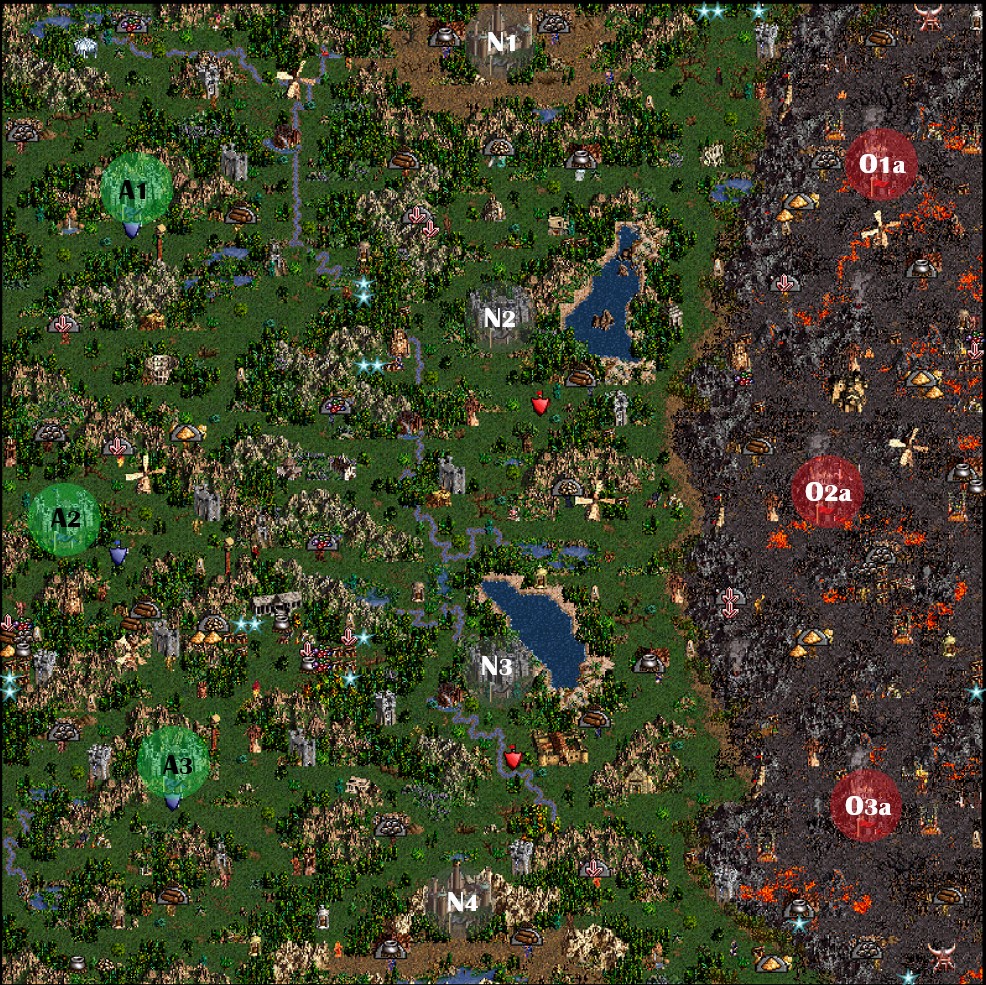
I recommend taking the 20 Archers for your bonus. They offer the strongest contribution to your starting army. Both you and the enemy start with powerful heroes, three moderately developed towns, and substantial numbers of troops. The enemy will almost certainly capture two of the neutral towns on their first turn putting you at a disadvantage until you claim at least one for yourself.
First Leg
All three of your heroes should visit their starting towns. Catherine and Sorsha should buy spellbooks, Sorsha should pick up the 50 Crusaders in Pandathalyn (A3), and Cuthbert should pick up the 100 Marksmen in Marshallston (A1). Now it’s time to invest the rest of your starting gold. I recommend upgrading Catherine’s Archers to Marksmen and having Catherine clear the Familiars to her southwest, the Horned Demons near her starting position, and move towards the Imps to her east. Hire another hero from the Tavern in Defiance (A2), leaving a Castle hero for Cuthbert, and have that hero go where the Familiars were to pick up the three Treasure Chests for gold, the Bow of Elven Cherrywood, and the Bowstring of the Unicorn. If you avoid picking up anything else here (for now) except what is necessary to reach the Chests/artifacts, this hero will be able to deliver the artifacts to Catherine at the start of her second turn.
Sorsha does not need to hire or upgrade any troops. The 50 Crusaders are easily capable of clearing everything in her starting area except the large Efreet stack guarding a treasure horde. In Marshallston, hire the starting Castle hero from the Tavern, give their troops to Cuthbert, and have them visit the Redwood Observatory. If possible (it will depend on the Treasure Chests), buy a City Hall in Pandathalyn and a Marketplace in Marshallston, and then spend any remaining gold on upgrading Cuthbert’s starting archers to Marksmen and hiring additional Marksmen and Griffins from Marshallston. Sorsha and Cuthbert can start clearing their areas while Catherine heads east and south to capture Goldenton (N3) and track down Olema, who has the strongest enemy starting army. Goldenton is a good place to upgrade Catherine’s Swordsmen to Crusaders.
I recommend giving Cuthbert reinforcements because Fiona is likely to invade his area before the end of the first week unless Catherine is able to quickly come north (this depends on what Olema does). His 100 Marksmen alone are too vulnerable to defeat Fiona, but he can win handily if they are supported by the troops you can recruit from Marshallston and the surrounding dwellings. Use his extra hero to help with flagging dwellings and transporting troops around.
If Catherine can quickly defeat Olema she can head north to help capture Endelstadt (N2). Otherwise she should stay in the Goldenton area and Cuthbert should prep to make a push on Endelstadt in early week two after receiving reinforcements from Marshallston. Building priorities are to get City Halls wherever you can and Citadels in Marshallston and Pandathalyn. It is possible to purchase a Portal of Glory in Defiance in week 1, but I recommend waiting until week 2 for that. Instead, build a Castle, Stables, and Training Grounds in Marshallston and save some gold to maximize Cuthbert’s week 2 army.
Second Leg
Once you control all five Castle towns you can relax somewhat: you are out producing the enemy and the two central towns naturally guard the main routes across the map. Send scouts to explore, pick up treasures and flag dwellings, and try to get some visibility on the northern passage so an enemy army can’t sneak across to Marshallston. The southern passage isn’t a problem since enemy heroes going that route have to pass near Goldenton to reach Pandathalyn. Use secondary heroes to shuttle troops from your starting towns to your main heroes and the forward Castles.
If you’ve preserved a decent amount of your starting armies and destroyed the enemy starting armies I recommend hiring reinforcements from Endelstadt and Goldenton and making an immediate push into enemy territory with Catherine and either Cuthbert or Sorsha wielding their combined armies. Two week’s worth of Inferno troops can’t stand up to dozens of Crusaders and Marksmen backed up by substantial numbers of Pikemen/Halberdiers, Cavaliers/Champions, Royal Griffins and maybe Zealots. Otherwise, consolidate your side of the map and work on flagging mines, and consider invading Nothenden (N1), Southerdale (N4), or defeating the Efreets near Pandathalyn to access the substantial treasure horde they are guarding. The combined growth from 3-4 towns over a couple of weeks should build up a strong force you can use to invade by week 3 or 4. All three of the Inferno towns start with the same development so the order you attack them is a matter of convenience.
Finishing Up
To build up Catherine for later maps in this campaign I recommend trapping the enemy in O2a. A hero positioned in front of that town completely blocks enemy heroes from exiting, making it safe for secondary heroes to deliver reinforcements to ensure the enemy stays trapped. Catherine is now free to visit stat boosting buildings (make sure to visit the Library of Enlightenment), pick up Earth Magic from the Conflux towns, and build up and visit all of your Castle and Inferno mage guilds for powerful spells (the Conflux guilds are limited to level 1). If Catherine is still short of level 18 she can visit the Tree of Knowledge and Altar of Sacrifice. When you’re ready, conquer E2 to win the map or, if you’re daring, let an enemy hero out so Catherine can get another +1 Power from the Order of Fire and one more chance at a good level 5 spell before you finish them off.