Walkthroughs
- by Pepak
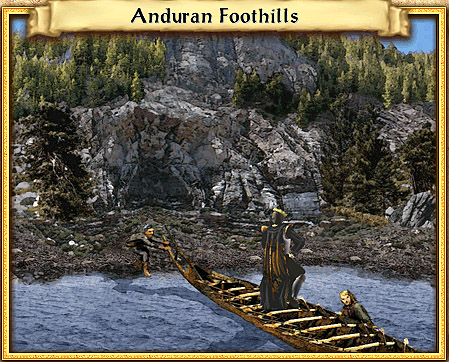
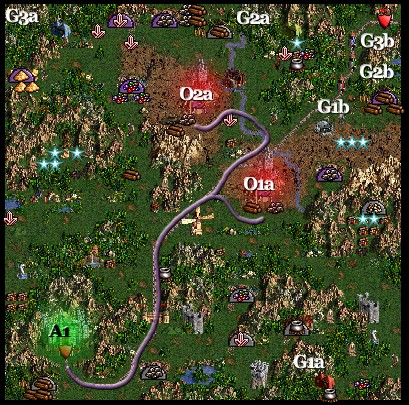
In the first campaign of The Winds of War, we get to guide a young king Spazz Maticus through his quest to expand his domain a little. The first target of his conquest is a region of Anduran Foothills, which will give him the necessary resources to continue further to his ultimate task of capturing Channon.
Spazz starts his quest as a Level 5 Witch King, with advanced Chaos Magic, and basic Conjuration, Pyromancy, Nobility and Estates. That's quite an interesting setup, as a Witch King is one of those classes with cool bonus that you rarely get to actually play - he is imbued with the ability to strike Fear in the hearts of his opponents, much like a Bone Dragon. Unfortunately, the primary skills (Chaos and Nobility) make him VERY vulnerable in combat, and it's likely he will change the class very soon. Which he did, in my game - as I play on Champion difficulty, I find that high Combat and Melee are an absolute must for survival.
Spazz doesn't start with any towns, but he has a rather large army of Bandits, Orcs and Minotaurs at his disposal, and he knows some basic spells, including direct damage. With these resources he shouldn't have any trouble beating the nearby moderately-sized neutral armies, and still have plenty of loose bandits to send as scouts. Too bad all the mines around are undeveloped, and require an investment of Gold and other resources - something you can't afford for now - to start working. Fortunately, these mines can be flagged by creatures alone - just leave a single bandit around to claim them when you earn the necessary amount of Gold.
 I recommend to head eastwards, liberating a soon-to-be
Woodmill on the way. About a day's walk away there's a lightly guarded area
with a Learning Stone, a Treasure Chest, two Crystals (Speed and Magic) and
Surefooted Boots, all of which are very useful to get ASAP. Then you can
start capturing towns. There are three Asylums in the accessible area: One
is right in the center of the map, another lies in the south-east corner,
and the third can be found in the center-east. All of them are guarded
by the standard guards - about 50 of both Orcs and Bandits, and about 15
of either Minotaurs or Medusae. The order in which to capture them doesn't
really matter; I went for the central town first, then east and finally
south, but the east-north-center direction is just as viable, if not even
better, as you will be doing most of your further attacks from the central
town. In all of the Asylums you can build creature generators up to Level 3,
and all miscellaneous structures. Just don't forget to build and visit all
three Thieves' Gauntlets and Battle Academies!
I recommend to head eastwards, liberating a soon-to-be
Woodmill on the way. About a day's walk away there's a lightly guarded area
with a Learning Stone, a Treasure Chest, two Crystals (Speed and Magic) and
Surefooted Boots, all of which are very useful to get ASAP. Then you can
start capturing towns. There are three Asylums in the accessible area: One
is right in the center of the map, another lies in the south-east corner,
and the third can be found in the center-east. All of them are guarded
by the standard guards - about 50 of both Orcs and Bandits, and about 15
of either Minotaurs or Medusae. The order in which to capture them doesn't
really matter; I went for the central town first, then east and finally
south, but the east-north-center direction is just as viable, if not even
better, as you will be doing most of your further attacks from the central
town. In all of the Asylums you can build creature generators up to Level 3,
and all miscellaneous structures. Just don't forget to build and visit all
three Thieves' Gauntlets and Battle Academies!
When you secure all three cities, you will have just three more tasks to complete:
1) Clear your conquered area of neutral creatures, gathering artifacts, mines and resources, 2) attack the northern "bonus" area, 3) and finally invade the north-eastern area and crush Erutan's forces.
For now, you can focus on point 1. You will be safe from Erutan for quite a some time, as the lightly guarded entrance to his domain is overgrown with trees, and the other pass is heavily guarded with Level 4 units neither you nor he will be able to beat for quite a some time. The bonus area is also heavily guarded by Unicorns; I found it easiest to leave it alone until you capture some of Erutan's Preserves, as the Water Elementals from their Portals can take care of the Unicorns quite easily. The access to Erutan will open automatically late in the 5th week or early in the 6th.
Erutan's forces shouldn't present any serious problem, as they only have one town for quite a long time, and only one stronger hero - about level 10-12. He will probably manage to capture the two other preserves by the time you reach him, but they will be underdeveloped and only lightly guarded. You can easily conquer two Preserves, capturing the heroes in the process. A small army of medusae placed in front of the remaining town's gates will confine Erutan to his lair forever, giving you time to attack the bonus area.
Which you should do once you are safe. The guards will supply you with the much-needed experience points, not to mention the numerous crystals, a library, and other bonuses. Water Elementals with their Quicksand, Fatigue and Ice Bolt will let you kill the Unicorns quickly and without any losses on your side. In the farthest corner of the bonus are you will find Armor of Life, Mayhem Staff and Sandwalker's Sandals, which will accompany you to the next map - a worthy bonus indeed.
When you are done with your work, return to Erutan and finish him off. By that time my Spazz reached level 15, which is the maximum level in this scenario, and became a Fireguard with master Combat and master Chaos magic.
| Comments (1) | Add comment |
- by Harukaba
To win, you must capture all towns and castles and defeat all enemy heroes. Regardless of which side you choose, the other will forever consider you a traitor. Starting Bonus: Map 1 Heroes (Fortress) or Map 2 Heroes (Stronghold)
Maps
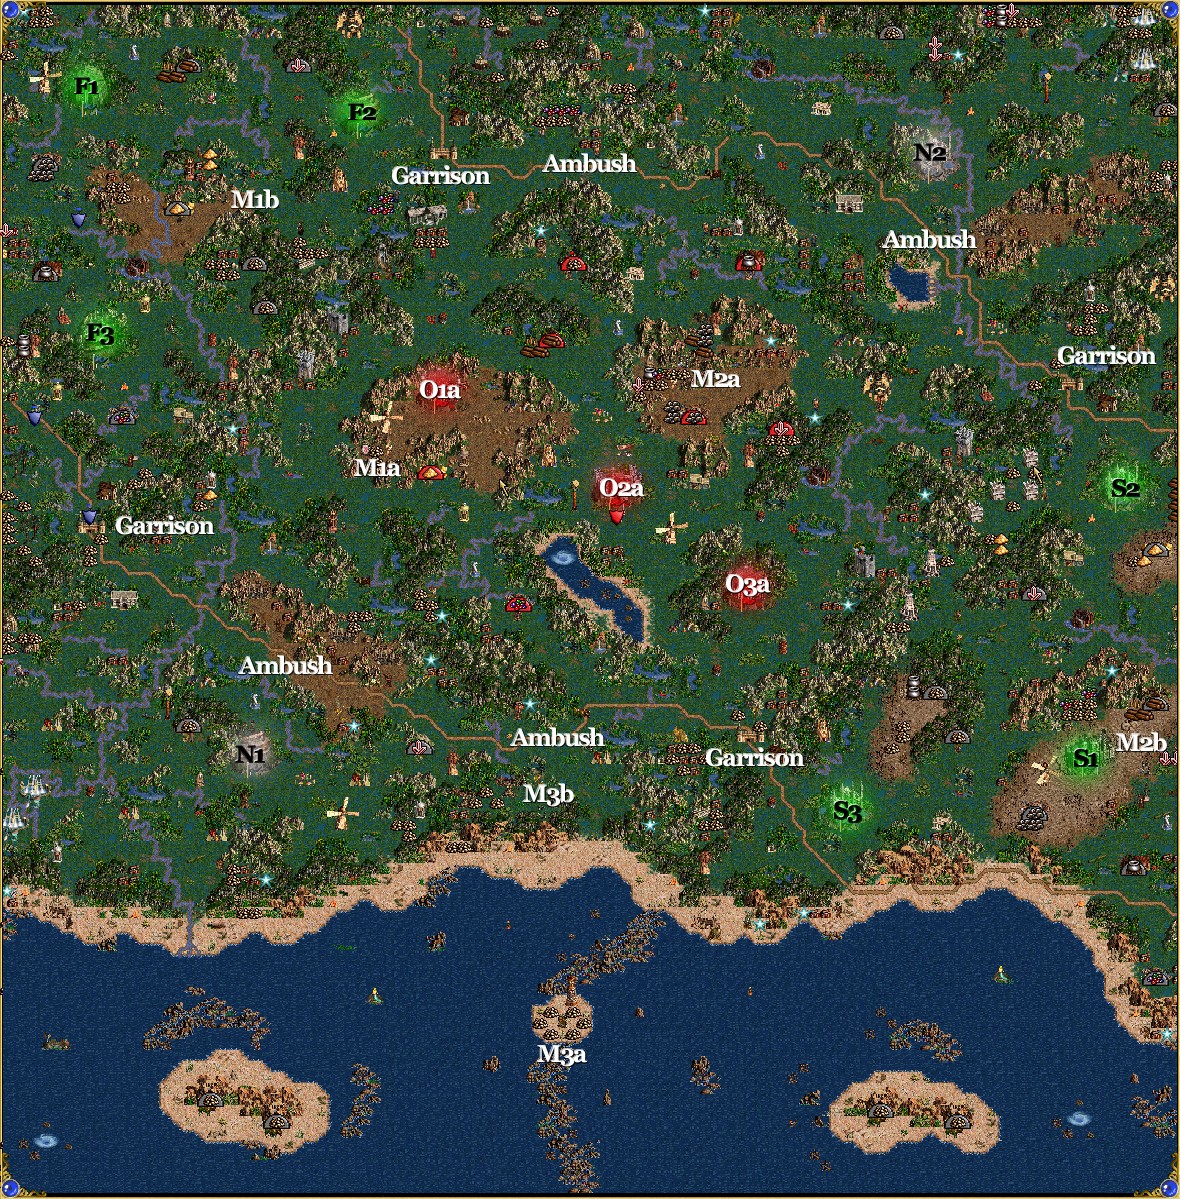
Click on a map to see a larger version.
Green - Friendly Town
Red - Enemy Town
Grey - Neutral Town
Yellow - Underground Passage
A# - Allied Towns
O# - Opponent Towns (a,b,c,d,e,f,g indicates which enemy)
N# - Neutral Towns
M# - Mirror Entrances (a) and exits (b). two-way unless stated
E# - Exit (a) entrance and (b) exit
S# - Seer (a) and the location of the item (b)
G# - Guard Tents (a) and the location of the Guard Tower (b)
J - Jail
X - Ambush
Starting Out
Now you get to use the heroes that you built up in either Map 1 or Map 2. On the one hand, the large amount of swamp will make picking the Fortress side more appealing but don't disregard the Stronghold if you can get Pathfinding and/or Logistics. I've found that it is possible to win with both sides so pick the one that you like the best. This guide will work for either side with the Stronghold towns represented by S# and the Fortress towns represented by F#.
First Leg
There is a lack of wood and ore so you will only be able to build up one of your towns (F1 or S1) and since the other two towns don't have a Fort, they will be used for gold production and Resource Silos. There are two garrisons preventing you from reaching the middle section where the Red enemy is so I recommend taking from 2-3 weeks exploring your section to flag mines and build up troops. Once you have a sufficient force, work to eliminate the Red enemy as soon as you can not only for the gold the towns will provide but the wood and ore from their Resource Silos. The other side also has garrisons preventing them from reaching the middle area so if you are aggressive, you can reach the middle before they do.
Second Leg
After you've claimed the Castle towns, you will see the other opponent very soon so it's important to not lose any of your towns. A good way to do this is by using View Air which will reveal the location of all heroes at the Advanced and Expert level. Another benefit of gaining access to the middle area are two one-way mirrors that will take you either to the Fortress or the Stronghold area. Just be careful of the four ambushes that are marked on the map since they are very strong and can easily overwhelm a scout. Therefore, I recommend avoiding the roads near these areas unless you have a strong force and want the extra experience. There are also the two neutral towns that you can capture if you want to, just make sure the enemy doesn't get them.
Finishing Up
When you're ready to finish you'll have to take over the enemy's town either by going through the one-way mirror or through a garrison. Just remember to use View Air to note where the enemy heroes are and defeat them before moving on to prevent the captured towns from being retaken. There's a good chance that there are enemy heroes on the water so you can wait them out since chasing them on the water will likely be a futile attempt. Whatever you decide to do, the defeat of the final enemy hero will mean your success and the end of this campaign.
| Add comment |
- by Harukaba
To win, you must accumulate 200,000 gold. Your Heroes will be limited to 12th level in this scenario, but your 8 strongest Heroes will be available to you in the final scenario of this campaign. Starting Bonus: 3 Thunderbirds or 2 Cyclops Kings or 1 Ancient Behemoth.
Maps
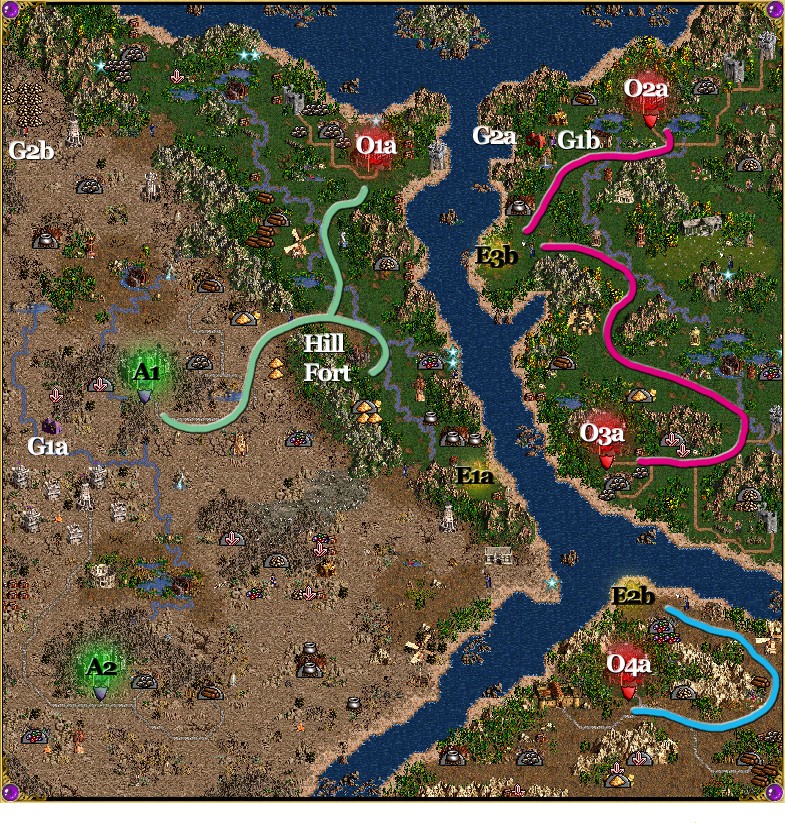

Click on a map to see a larger version.
Green - Friendly Town
Red - Enemy Town
Grey - Neutral Town
Yellow - Underground Passage
A# - Allied Towns
O# - Opponent Towns (a,b,c,d,e,f,g indicates which enemy)
N# - Neutral Towns
M# - Mirror Entrances (a) and exits (b). two-way unless stated
E# - Exit (a) entrance and (b) exit
S# - Seer (a) and the location of the item (b)
G# - Guard Tents (a) and the location of the Guard Tower (b)
J - Jail
X - Ambush
Starting Out
Take the Behemoth as your starting bonus as you will be able to easily upgrade it to an Ancient Behemoth and it will help you in an aggressive strategy to eliminate the enemy. Don't fret at the enemy having four towns because not only is the enemy restricted in what it can build while you're not, but there is a Hill Fort close to A1 that will save both time and resources.
The final map of this campaign uses the heroes either from this map or the Fortress heroes from the previous map. If you want to use these heroes then be sure to have your primary hero at level 12, and one other hero at least level 10. Also make sure that one hero has the Pathfinding skill as the swamp will slow you down too much otherwise. The only Places of Learning that I recommend visiting are the Arena north of A2, the Marletto's Tower southeast of A1, the School of War north of O3a, and the Library of Enlightenment upon reaching level 10.
First Leg
I recommend that you use A2 as a gold-generating town while building a Roc and Behemoth structure in A1 along with a Castle and a Capitol, especially since wood will be your main limitation the first few weeks. You will be able to win this map with just those two creatures and using the Hill Fort to upgrade them. Spend the first week flagging mines and building up your towns. When you're ready, give the hero of your choice the troops and have him follow the green path through the halberdiers to the Hill Fort and finally to O1a. Spend some time in the area flagging the mines and grabbing the artifacts until you can get the week three troops. That will provide you with a big enough force to make your way to E1a and to start defeating the enemy. Just remember to visit the Hill Fort first.
Second Leg
After giving one of your heroes the troops and visiting the Hill Fort, head to E1a and north on the pink path to E3a. There are two enemy towns in this area and, most likely, the toughest of the enemy heroes. It doesn't matter whether you tackle O2a or O3a first as long as you take over both towns and make sure there are no enemy heroes remaining. Once you're finished, you have to defeat the last remaining enemy town. It's a good idea to use a second hero for this as your first one has most likely already reached level 12 by now. Simply give him the troops you have, visit the Hill Fort, go to E1a and head south on the blue path to E2a. There is probably a weak hero wandering around close to O4a but he shouldn't be very much trouble and their defeat will mean the end of the Red enemy.
Finishing Up
With six towns, it won't be difficult to earn the 200,000 gold necessary to beat this map. Simply exchange the vast quantity of resources you have collected by now for gold and that will probably be enough. Optionally, you can visit both G1a, G1b, and G2a for the mass quantities of gold behind G2b but that won't be necessary.
| Comments (1) | Add comment |
- by Harukaba
To win, you must flag all mines. Your Heroes will be limited to 12th level in this scenario, but your 8 strongest Heroes will be available to you in the final scenario of this campaign. Starting Bonus: Korbac or Verdish or Random Fortress Hero.
Maps

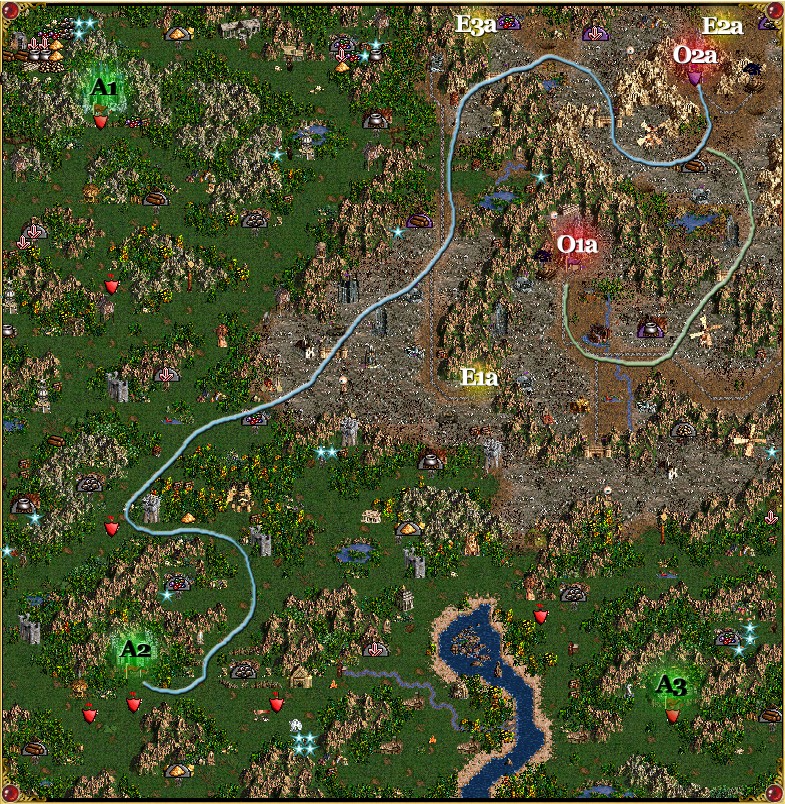
Click on a map to see a larger version.
Green - Friendly Town
Red - Enemy Town
Grey - Neutral Town
Yellow - Underground Passage
A# - Allied Towns
O# - Opponent Towns (a,b,c,d,e,f,g indicates which enemy)
N# - Neutral Towns
M# - Mirror Entrances (a) and exits (b). two-way unless stated
E# - Exit (a) entrance and (b) exit
S# - Seer (a) and the location of the item (b)
G# - Guard Tents (a) and the location of the Guard Tower (b)
J - Jail
X - Ambush
Starting Out
I recommend that you take Korbac as your hero since he increases the Attack and Defense skill of any Serpent Flies or Dragon Flies he commands for each level he attains after the third level and you are going to use these as your primary units.
The final map of this campaign uses the heroes either from this map or the Stronghold heroes from the next map. If you want to use these heroes then be sure to have your primary hero at level 12, and at least two other heroes between level 8 and 11.
First Leg
While your goal is to flag every mine, it's easier to defeat the enemy so they won't bother you. So hire another hero in your other town and flag mines with both heroes. Build up the Dragon Fly and Lizard Warrior structures, Citadel/Castle, and the City Hall in the A1 town. At the beginning of the second week, hire all of the creatures and head south on the yellow path through the garrison. There are 12 Pikeman and 10 Marksmen that you'll have to defeat but that shouldn't be very hard. Then simply conquer each of the three towns and all of the wandering heroes starting with O1a, then O2a, and finally O3a. You can defeat the enemy in about a week without losing very many troops. Two of the towns are heavily restricted in what they can build and if you act quickly enough, all the enemy will have are some Pikeman and Archers.
Finishing Up
Once you're ready to finish this map, have your heroes flag all of the mines. There is a gold mine that you have to visit either G1a or G2a to get through the Guard Towers at G1b and G2b to visit the mirror at M1a and finally the gold mine near M1b.
| Add comment |
- by Harukaba
To win, you must capture all enemy towns and castles and defeat all enemy heroes, without losing either Queen Catherine or Lord Haart. This is the final battle...good luck! Starting Bonus: Helm of Heavenly Enlightenment, Tome of Earth Magic or Spellbinder's Hat.
Maps

Click on a map to see a larger version.
Green - Friendly Town
Red - Enemy Town
Grey - Neutral Town
Yellow - Underground Passage
A# - Allied Towns
O# - Opponent Towns (a,b,c,d,e,f,g indicates which enemy)
N# - Neutral Towns
M# - Mirror Entrances (a) and exits (b). two-way unless stated
E# - Exit (a) entrance and (b) exit
S# - Seer (a) and the location of the item (b)
G# - Guard Tents (a) and the location of the Guard Tower (b)
J - Jail
X - Ambush
Starting Out
There's a fast way to win by taking the Spellbinder's Hat to get access to Dimension Door to bypass the Garrisons that block your way to the Necromancer towns. The slower way is to pick the Helm of Heavenly Enlightenment and use one strong hero (preferably might) to defeat the enemy before they have a chance to build up forces and grab the powerful artifacts below ground.
Fast Way (Spellbinder's Hat)
This is an extremely fast and comparatively easy way to beat this map. Simply give your magic hero this Spellbinder's Hat as well as all available troops and have him use Dimension Door to hop over the Garrisons. Despite there being a lot of Cursed Ground around the Necromancer towns, there is Dirt (especially right next to the mountains) that allows you to use Dimension Door. You can make your way over to the Necromancer towns so fast that even Magic Arrow or Ice Bolt and your troops will be enough to defeat the enemy.
Slow Way (Helm of Heavenly Enlightenment)
In this case give the Helm of Heavenly Enlightenment to the hero of your choosing, give him as many troops as you have and follow the blue path to take over O2a hopefully before they are able to hire the first week's troops. The first Garrison you come across will have many Zombies, Wraiths, and Liches on Cursed Ground so it will be a tough fight. Either a magic hero with good low-level spells or a might hero with the Ballista skill would be good choices here. Once you make it to O2a you will probably be low on troops so leave a hero in the town and have another hero use the Town Portal spell to transfer the troops over. You will probably see the enemy hero wandering around this area and you don't want to lose O2a if you can help it. Once you're restocked with troops, follow the green path to take over O1a. It shouldn't be a tough fight because of how strong your hero will be and the superiority of your troops. If you work fast the enemy won't even have a chance to blink.
Finishing Up
This is a fun map either way you choose to play and since your towns are mostly built up you don't have the same agony as you had in United Front of being constantly short on resources and troops. After you're victorious enjoy the movie and get ready for the secret campaign.
| Comments (1) | Add comment |
- by Harukaba
To win, you must capture all enemy towns and castles and defeat all enemy heroes. At the end of this scenario, your 6 strongest Heroes will travel with you to the final scenario of this campaign, where they will be met by Lord Haart and Queen Catherine. Starting Bonus: 35 Royal Griffins, 35 Iron Golems or 35 Grand Elves.
Maps

Click on a map to see a larger version.
Green - Friendly Town
Red - Enemy Town
Grey - Neutral Town
Yellow - Underground Passage
A# - Allied Towns
O# - Opponent Towns (a,b,c,d,e,f,g indicates which enemy)
N# - Neutral Towns
M# - Mirror Entrances (a) and exits (b). two-way unless stated
E# - Exit (a) entrance and (b) exit
S# - Seer (a) and the location of the item (b)
G# - Guard Tents (a) and the location of the Guard Tower (b)
J - Jail
X - Ambush
Starting Out
Since most of the undead troops guarding the mines are Skeletons and/or Zombies so definitely pick the 35 Grand Elves as your bonus. You will be needing a lot of wood and ore to build up your towns so flagging as many mines as possible in the first few weeks is very essential. Hopefully you have two might heroes and a magic hero all from level 8-10 ideally. The goal is to use the two might heroes to defeat the enemy's castles while the magic hero chases after any enemy hero that makes their way to your area. The reason for this is that there is a lot of cursed ground by the Necromancer castles and so the magic hero will be weakened considerably. My magic user had Expert Logistics and eventually Town Portal so she was perfect for this job.
First Leg
You should spend the first week grabbing as much of the wood and ore resource mines as you can and View Earth works perfectly for this even at Basic or Advanced level. During this time I recommend building up the level 1-4 troops plus a castle at the Castle town because of the Hill Fort to the southeast that you can use for cheap upgrades. If you work quickly you can beat most of the enemy with Halberdiers, Marksmen, Royal Griffins, and Crusaders even if the enemy gets Ghost Dragons as long as you work fast. In addition, you should build up the Necromancer town because that might hero can easily get additional troops after taking over enemy towns. If you only have enough wood and/or ore for building in the Castle or the Necromancer town then build in the Castle town first.
Second Leg
Once you have 2-4 weeks of Castle troops and upgraded them at the Hill Fort, follow the pink path to take over O1a and then north to O4a. At about the same time, take as many Necromancer troops you have even if they aren't upgraded and follow the blue path. Be sure to use View Air to watch where the enemy heroes are and be sure to attack them outside of the enemy towns to avoid facing a strong force behind castle walls. Around this time the enemy will be invading your territory so use your magic hero to hunt them down. This task is made easier if he has Town Portal so if you didn't get the spell on the first map be sure to build level 4 Mage Guilds until you get it.
There is another Castle town that you can get to by visiting the blue tent in the southeastern part of the map that is guarded by Power Liches. Your magic user can certainly visit it if not needed elsewhere although it's not necessary as I beat United Front without doing so.
If you advance slowly and defeat all enemy heroes by using View Air before heading to the next enemy town you'll be pretty much okay in this area. Make sure to defend your home area with your magic hero to ensure that none of your towns are taken over or at least not for long.
Finishing Up
I made this map sound pretty easy but it took me many tries to finally beat it and move on to the next map so don't feel bad if you find yourself overwhelmed and have to restart. All of your heroes move on to the next level but as you'll find out, you don't need powerful heroes to beat that level and finally Restoration of Erathia.
| Comments (1) | Add comment |
- by Harukaba
Song for the Father - Safe Passage
To win, the Necromancer, Nimbus, must reach the town of Highcastle with the Statesman's Medal. At the end of this scenario, Nimbus and your 7 strongest Heroes will travel with you to the next scenario of this campaign. Starting Bonus: Boots of Speed or Logistics or 2500 Gold.
Maps
 Click on a map to see a larger version.
Green - Friendly Town Red - Enemy Town Grey - Neutral Town Yellow - Underground Passage
A# - Allied Towns O# - Opponent Towns (a,b,c,d,e,f,g indicates which enemy) N# - Neutral Towns M# - Mirror Entrances (a) and exits (b). two-way unless stated E# - Exit (a) entrance and (b) exit S# - Seer (a) and the location of the item (b) G# - Guard Tents (a) and the location of the Guard Tower (b) J - Jail X - Ambush
Starting Out
he artifacts that you can choose from are Basic Logistics, the Boots of Speed artifact, and 2500 gold. Since this is a small map, you don't need the gold. Basic Logistics will help you in the next map, but Nimbus will always receive it. The Boots of Speed artifact won't transfer to the next map and since Safe Passage is such a small map, it's hardly needed. Therefore, I'd pick Basic Logistics as the artifact.
First Leg
This is a small map with no underground so it is vital for you to be aggressive and get rid of the Purple enemy as soon as possible. First build the Archer's Tower and hire all of the available troops. Then hire one or two additional heroes and give a magic-user of your choosing all of the troops. I suggest using a magic-user since they will do quite a bit of damage with Magic Arrow, especially against the Level 1 and 2 enemy troops you'll be facing.
Take the hero along the purple path, stop at the Guardhouse for some more Pikeman, and then continue until you reach O1a. You should be facing just a few Skeletons and Zombies which should be a piece of cake. I suggest taking one of the heroes you hired earlier and put them in O1a and build a Citadel just in case an enemy hero slips past you. Then go northwest to O2a and take that town as well. You might see the lone enemy hero close by and you are probably in a good enough situation to attack them. Since they don't have any towns left they won't run away and so, upon defeating them, you will have defeated the only enemy.
Second Leg
Usually that would be the end of the map but your goal is to bring Nimbus to your home town and he's prevented from traveling by three Guard Towers. In addition, you can take seven of your strongest heroes will transfer to the next map so it is a good idea to take the time and level up seven heroes by taking them to the many Learning Stones and other places of learning that's available. I'd suggest taking two might heroes and getting them up to about level 9 or 10 since the use of high-powered magic is somewhat limited in the next map. I'd get at least one magic user to be about level 8 and then level the rest of your heroes as far as possible. Build Mage Towers in every town and have every hero with Wisdom visit them because the spells will transfer to the next map.
Finishing Up
One you're done leveling up your heroes, visit all three Guard Tents at G1a, G2a, and G3a so that Nimbus can move past G1b, G2b and G3b to proceed to Highcastle. You don't have to bother leveling Nimbus since he is given a pre-set level and skills in the next map. Simply have him visit A1 and this map will be over.
| Add comment |
- by Harukaba
To win, the Necromancer, Nimbus, must reach the town of Highcastle with the Statesman's Medal. At the end of this scenario, Nimbus and your 7 strongest Heroes will travel with you to the next scenario of this campaign. Starting Bonus: Boots of Speed or Logistics or 2500 Gold.
Maps
Click on a map to see a larger version.
Green - Friendly Town Red - Enemy Town Grey - Neutral Town Yellow - Underground Passage
A# - Allied Towns O# - Opponent Towns (a,b,c,d,e,f,g indicates which enemy) N# - Neutral Towns M# - Mirror Entrances (a) and exits (b). two-way unless stated E# - Exit (a) entrance and (b) exit S# - Seer (a) and the location of the item (b) G# - Guard Tents (a) and the location of the Guard Tower (b) J - Jail X - Ambush
Starting Out
he artifacts that you can choose from are Basic Logistics, the Boots of Speed artifact, and 2500 gold. Since this is a small map, you don't need the gold. Basic Logistics will help you in the next map, but Nimbus will always receive it. The Boots of Speed artifact won't transfer to the next map and since Safe Passage is such a small map, it's hardly needed. Therefore, I'd pick Basic Logistics as the artifact.
First Leg
This is a small map with no underground so it is vital for you to be aggressive and get rid of the Purple enemy as soon as possible. First build the Archer's Tower and hire all of the available troops. Then hire one or two additional heroes and give a magic-user of your choosing all of the troops. I suggest using a magic-user since they will do quite a bit of damage with Magic Arrow, especially against the Level 1 and 2 enemy troops you'll be facing.
Take the hero along the purple path, stop at the Guardhouse for some more Pikeman, and then continue until you reach O1a. You should be facing just a few Skeletons and Zombies which should be a piece of cake. I suggest taking one of the heroes you hired earlier and put them in O1a and build a Citadel just in case an enemy hero slips past you. Then go northwest to O2a and take that town as well. You might see the lone enemy hero close by and you are probably in a good enough situation to attack them. Since they don't have any towns left they won't run away and so, upon defeating them, you will have defeated the only enemy.
Second Leg
Usually that would be the end of the map but your goal is to bring Nimbus to your home town and he's prevented from traveling by three Guard Towers. In addition, you can take seven of your strongest heroes will transfer to the next map so it is a good idea to take the time and level up seven heroes by taking them to the many Learning Stones and other places of learning that's available. I'd suggest taking two might heroes and getting them up to about level 9 or 10 since the use of high-powered magic is somewhat limited in the next map. I'd get at least one magic user to be about level 8 and then level the rest of your heroes as far as possible. Build Mage Towers in every town and have every hero with Wisdom visit them because the spells will transfer to the next map.
Finishing Up
One you're done leveling up your heroes, visit all three Guard Tents at G1a, G2a, and G3a so that Nimbus can move past G1b, G2b and G3b to proceed to Highcastle. You don't have to bother leveling Nimbus since he is given a pre-set level and skills in the next map. Simply have him visit A1 and this map will be over.
| Comments (3) | Add comment |
- by Harukaba
Sandro must defeat all of the lords who seek his position to win the campaign. However, if Sandro loses even just one battle, others will sense weakness in him and destroy all he has worked for. Starting Bonus: 5 of each precious resource.
Maps


Click on a map to see a larger version.
Green - Friendly Town
Red - Enemy Town
Grey - Neutral Town
Yellow - Underground Passage
A# - Allied Towns
O# - Opponent Towns (a,b,c,d,e,f,g indicates which enemy)
N# - Neutral Towns
M# - Mirror Entrances (a) and exits (b). two-way unless stated
E# - Exit (a) entrance and (b) exit
S# - Seer (a) and the location of the item (b)
G# - Guard Tents (a) and the location of the Guard Tower (b)
J - Jail
X - Ambush
Starting Out
You have no selection in what starting bonus you have and none of your heroes traveled with you but they are not important since with Sandro's magical ability you can use Summon Water Elemental and Animate Undead to defeat armies much bigger than your own.
First Leg
O1c (orange) should be trapped in its area so your goal is to defeat both O1a (green) and O1b (blue) as soon as possible as well as visiting all of the guard tents. I spent about two weeks by A1 building up my town and clearing out the area. I took all of the troops and traveled along the pink path, defeating enemies along the way until I went to the O1a area and defeated the green enemy. I retraced my path (or used Town Portal if you have it) to get back to E1b and then headed north on the green path to get to the O1b area and took out the blue enemy. These battles should be very easy if you make good use of Summon Water Elemental and Animate Undead. At this point I could relax and started to upgrade the towns, visit mines, and the guard tents.
Finishing Up
After exploring everywhere I waited for a few more weeks and collected as many troops as possible and traveled along the blue path through the guard garrisons through E2a into the O1c (orange) area and attacked the final hero. This battle was very very easy (especially compared to Melodia) and so just use Summon Water Elemental, Animate Undead, and your favorite attack spells and you will have won both this map and the campaign.
| Comments (5) | Add comment |
- by Harukaba
Obtain the Eversmoking Ring of Sulfur for the Kreegans to win the scenario. However, if Sandro is defeated in combat, the scenario is lost. Heroes are limited to level 24, but Sandro and three of his lieutenants will carry their experience, skills and spells on to the next scenario. Starting Bonus: Equestrian Gloves or 10 Wraiths or 10 Wood and 10 Ore.
Maps

Click on a map to see a larger version.
Green - Friendly Town
Red - Enemy Town
Grey - Neutral Town
Yellow - Underground Passage
A# - Allied Towns
O# - Opponent Towns (a,b,c,d,e,f,g indicates which enemy)
N# - Neutral Towns
M# - Mirror Entrances (a) and exits (b). two-way unless stated
E# - Exit (a) entrance and (b) exit
S# - Seer (a) and the location of the item (b)
G# - Guard Tents (a) and the location of the Guard Tower (b)
J - Jail
X - Ambush
Starting Out
This is another one of those maps which pits your undeveloped town versus an enemy with not only a town that is partially built up but with access to more troops, more spells, and has the same stats as you do. You can't afford to sit back and build up because even though you both have one town, Melodia (the enemy hero) will have many more troops than you do. Fortunately she is trapped in the area by her castle so you don't have to worry about her appearing out of nowhere.
Pick the Equestrian Gloves as your bonus as you need the speed and Skeletons and Zombies are very slow and you can't afford to leave them behind as you usually do.
First Leg
Kill the creature stacks in front of the wood and ore mine and kill the Pegasus stack to get some more Skeletons (be sure to build the Necromancy Amplifier) and head along the east path so you can flag the Vampire structures. Use the other heroes to flag mines and the two Wight structures as well as to recruit from them every week. Take gold from the chests and focus on the first week building the Wight and Vampire structures as well as the Castle. Be sure to leave a hero by the Vampire structures so you can recruit from them every week as you need every additional troop you can get. Don't bother having Sandro visit the places of learning in his first visit since he'll be returning and you can visit them then and you want to head south from A1 along the yellow path to visit the mines first. Be sure to visit the crypt because you are guaranteed to get the Skull Helmet which gives you +2 to knowledge and you also need as many magic points as possible.
Second Leg
After you've done all this you can concentrate on building up to a City Hall and Capitol in the second week and then building the upgraded Skeleton, Zombie, Wight, and Vampire structures in the third week. The garrison just before E1a suppresses magic so you need more troops then usual to make it through without many losses. There's no need to place any troops in the garrison since Melodia won't be threatening you.
You can take Sandro underground since there are many Refugee Camps and Trees of Knowledge and wandering stacks but it's very important to use your magic sparingly. You'll need every point when you face Melodia and you should be able to get by with just Magic Arrow and Death Ripple. Just be sure to not go through the last mirror until you're ready.
I gave Sandro Necromancy, Sorcery, Earth Magic, Wisdom, Intelligence, Air Magic, Offense, and Water Magic. While I was also offered Fire Magic I picked Water Magic because Melodia's castle has the spells Summon Water Elemental and Prayer were an important part of my final strategy.
Finishing Up
In Month 2 hire all of the Wights and Vampires and return to A1 and upgrade all of the troops to give to a secondary hero and transport them to Sandro. It's very important to have a second hero in addition to Sandro because you want to lure Melodia out of her castle. Give the second hero one skeleton and have him go through the final mirror and stop below the tree. Send Sandro through the final mirror and have him stop to the left of the magic shrine. Melodia will leave the castle and attack your second hero and not be able to use town portal to return to the castle. Use Sandro and have him take over the Castle which should be easy since Melodia will have left the slower troops such as the Dendroid Soldiers. Then Melodia will attack the castle on the next turn.
This will be a very tough battle and the Summon Water Elemental and Animate Undead spells will be very important. This is why you need as many spell points as possible because Melodia will have as many spell points as you do and will use Raise Dead, Sacrifice, Summon Elemental, and Prayer among other spells. What I did was not use the Wraiths and let them absorb Melodia's spell points and let Melodia come to me while I cast Summon Water Elemental and Animate Undead when necessary. You will likely have to try this battle and perhaps this map several times before you succeed but it is possible if you use magic correctly and attack Melodia in the first week or two of the second month. This is the results of the final battle and these are the artificats she had.
| Comments (11) | Add comment |
Page 12 of 23