Walkthroughs
- by maltz
Will of Asha
M5: Heart of Darkness
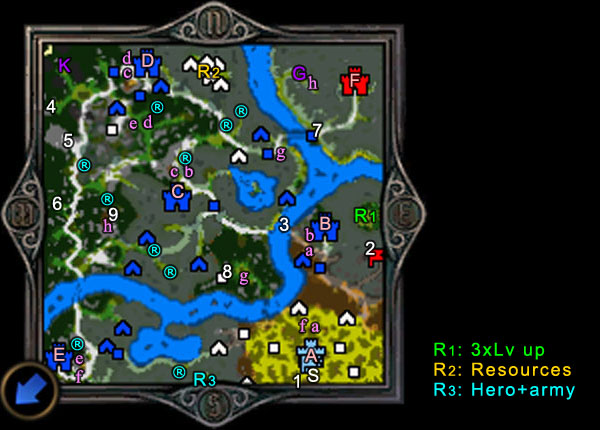
- Map Size: Large
- Level Cap: None
- Difficulty Index: 3/5
- Last Updated: October 31, 2007, Patch v3.0
The final chapter of the new Necro campaign is as exciting as Markal's M5:Lord of Heresh. There will be huge neutral stacks, plenty of towns, a map full of AI heroes and a network of two way portals connecting the world. Your Necromancer's "raise as you go" ability is utilized to the extreme. The final boss can be as difficult as Godric... well maybe not that difficult, because the AI picked the skills for him - no Light Magic!
None of the bonuses are significant, and I took 25 Mercury. Even though resources are abundant in the mission, later on you are likely to use up mercury on the tier-7 dragons.
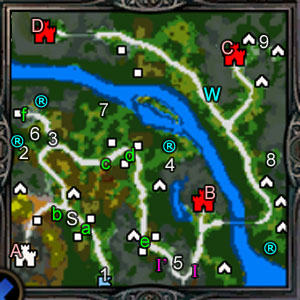
You start in the SE corner, in front of town (A) and right in the middle of your swampy rotten paradise. There is a Stable (S) right below that should be visited at the beginning of a week. There are not a lot of mines to be flagged in your area, but plenty of resource-holding structures (such as Elemental Stockpiles and Treant Thickets), so you can easily accumulate dozens of everything within the first 2 weeks. (In fact, you will be still short of Ore soon.) Loot as many treasures as possible early on will give you a very healthy town growth.
You are up against two AI players. The Blue AI owns 4 towns (B-E) at the moment, and as you can expect they will outgrow you if you don't start taking their towns fast. The Red AI owns the town to the far northeast (F), and there are scripted Red hero spawns to give you headaches.
You have almost no army, so you have to rely on your Avatar of Death and Phoenix. Spread out the 1-unit skeleton stacks to buy you time. The Mummy can help reviving them, too. Use your Dark Energy points to raise durable creatures (tier-6 or tier-3) for Arantir and Vampires for Ornella.
Just collect everything (including the resource buildings) as soon as possible with both Arantir and Ornella. I recommend sending Arantir to the east and Ornella to the west. Just east of the Sawmill Ornella can pick up a medium stack of Poltergeists (tier-3). Ignore the couple of two-way portals ((a), (f)). You can't use them yet and there is no enemy coming this way.
Around the first week in my game, a familiar Renegade (Blue) hero visits from the north east - Andreas. He is nothing to be afraid of. A couple of Curse of Netherworld will scare him back.
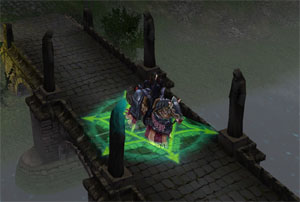
Just south of town (A) stands a stack of Champions. These Champions are not enemies, though. When you visit them, Arantir is automatically teleported to this spot (and he is not going to get teleported back), to receive a side quest about defeating an Inferno hero at (2). Looks like this hero just came out of the Volcano, or is about to jump.
Defeat the Demon hero with Arantir (who is more powerful than Ornella), and make Ornella visit the Champions. You receive quite a large stack of Death Knights. This is an awesome boost to Ornella's army. By the way, there will be a very tiny weekly reinforcement arriving from this spot (1 Lich + 1 Mummy for me).
After handling Andreas it is time to take the Blue towns. Each town is preceeded by an Outpost, which is essentially a low-level town wall harboring neutral creatures without a hero - very easy. The Blue towns are garrisoned by pretty-high-level Haven heroes, but they are nothing extraordinary, either. Just be aware of the new "Elemental Balance" skill possessed by some of the Haven heroes, though. When you summon a Phoenix, they get one at the same time! Fortunately the AIs don't really know how to use their free Phoenix.
I suggest you take down the Blue towns in a Blitz since there aren't a lot of resistance anyways. You don't need any good army to start with as each week you can gather a lot more from Dark Energy, and your power comes from the Avatar and Phoenix, or plus the Vampires for Ornella. Since Arantir is more efficient, you can give him more work. This is what I did in my game. You should be able to take all blue towns before the end of Month 2.
Arantir: Town (B)-(C)-(D)
Ornella: Town (E)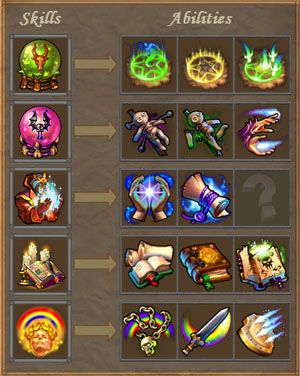
The river passage (3) from town (B) to (C) is not very obvious. Build a Stable in your new Haven town if it is not already there to boost movement at the beginning of a week. Hire a low level hero to pick resources up after your main heroes. You will be short of Ore (again!) so try to flag the Ore Pit NE of town (E) quickly.
Other than the decorative Outposts, each Blue town comes with two features. First, there are two 2-way portals outside each town. I have marked the connections with matching lower-case letters (a-a, b-b, etc.). The great thing about these portals is that you can quickly access any other towns for defense or troop transfer. However, you cannot pass through a portal unless the neutral stacks (Elementals) are cleared from the other exit, and the AI heros will not do that for you although this is clearly to their advantage. Therefore, after taking each town, clear the blocking Elemental stacks. The second feature is a large Inferno symbol. You can't do anything about it yet.
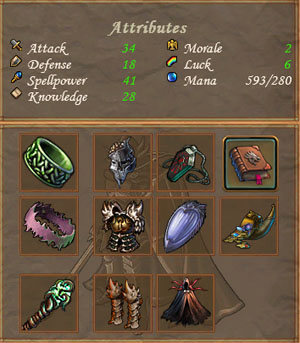
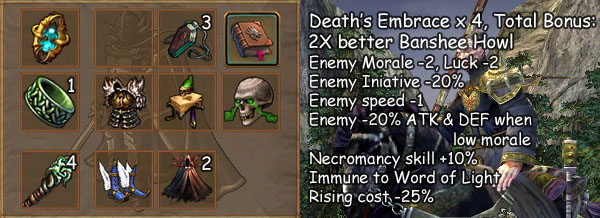
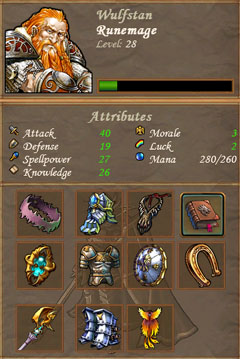
You can find a Purple Keymaster (purple (K)) just west of town (D). Visit it as it might be useful for you at the end of the mission. A Memory Mentor is hidden at (4) that you should eventually come with Arantir. I highly recommend giving up Master of Mind and aim for the ultimate Howl of Terror, because you are powerful enough not to cast Mass Slow, and the extra -6 morale will make a huge difference in the final battle. You can also trade away mana-friendly feats under Sorcery because your Knowledge point should be already very high (~20 or more) by now. I picked Luck as my 6th skill and was able to fully develop it by the end of the mission. You can use my Arantir's skill & feat selection (on the left) as a reference.
New spells in the expansion are finally available in this mission. It is likely that you can pick some up from the mage guilds. Let's take a look at the two new Dark magics:
- Vampirism - This is my favorite spell back in HoMM4. With it my chaos campaign heroin alone could solo 50+ dragons, and so can you here. You can actually cast it on the Vampires or Avatar to double the draining effect! Combined with Arcane Armor the stack just becomes invincible. Use this spell to replace Raise Dead.
- Sorrow - The melee attack of Ghost Dragons (tier 7 alternative upgrade) and a high-level Avatar has the same effect. Your hero has better things to do.
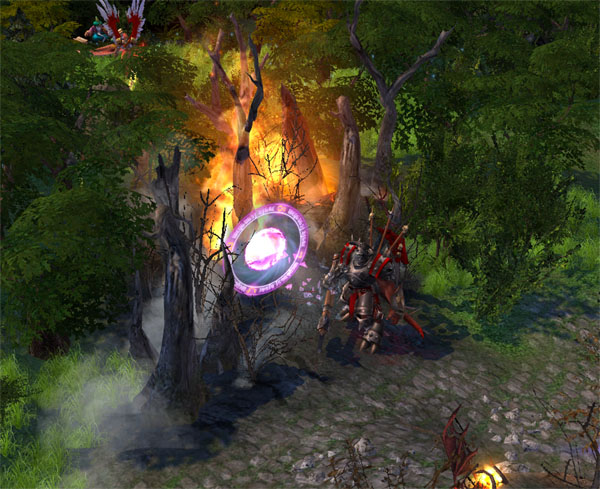
What you should worry is the Red heroes spawned from (5). The portal is operated by a stack of Succubus Mistress, which cannot be destroyed for now. The Red hereos are much more powerful than the Blue ones, and they might be able to cause major damage to your army if you cannot raise them back before the battle is over. These Demon Lords spawn roughly every week, and one after one they get stronger. Fortunately, in my game (3.0 heroic) they eventually stopped coming after the famous multi-player favorite Deleb. Oh you know what's coming with Deleb, right? (A nasty Ballista.)
The Red heroes will either go after an undefended town, or actively engage Arantir and Ornella because they usually have a much bigger army. You can't use Curse of Netherworld, so you have to fight the battle square. They are fast and their attack is powerful. They gate in a lot of units. You want to conserve army as much as possible - so what do you do?
My approach is to deploy as little but durable as possible. For Ornella, deploy only the Vampires (hopefully you have a good stack by now). Dock them in a corner and throw them an Arcane Armor. If you have learned Vampirism there is no better time to use it. This way, you don't have to take hits from multiple sides even if you are overpowered 10 to 1, and can still maintain head counts through retaliation. For Arantir dock with something very durable and deploy multiple ghosts to buy you more time, and kill everything with your Avatar.
If you need a larger army to handle the Red heroes, as soon as a new week arrives, use the convenient portal network to deliver Haven creatures to town (A) and convert them to Necro units. Your income is so high that you can usually afford to hire all available Haven creatures (skip tier 2, I will explain why). Invest your resources and money into Vampire Lords first. They are the only units needed before the final battle. With 100+ of them you should be able to suck Deleb dry!
When the Red heroes stop coming you are free to explore the map. Huge neutral stacks are everywhere, giving you juicy EXP points and great treasures. Do use a Phoenix (not the Avatar) against the Godzillas and their upgrades - or you can wave goodbye to the Avatar! (Their fire shields bites back.) There is a Dragon Utopia at (6). If you missed Vampirism, there is one more chance to pick it up here. While the artifact selection used to be awesome, now there are hardly anything useful.
Make Arantir visit as many stat boosts as you can, and progress the quest with either him or Orenall to the garrison at (7). This garrison is blocked unless you follow the ghost's instructions. First he asks you to kill a group of Assassins who claimed his live. The Assassins's hideout (8) can be reached through the two-way portal (g).
You should listen to this cutscene yourself! ...with Ornella alone visiting the Den.
The Assassins beg for mercy, and offer an alternative. If you spare their lives, they will help you destroy the demon's portal at (5) to stop red heroes from coming. I heard that you still have to kill the Succubus Mistress stack yourself, though. In my game, I got here around middle Month 2 and there hasn't been any sighting of Red heroes for 2 weeks already. So I don't see the point of the Assassins' offer - just click Cancel and kill them.
The only situation that you can use the Assassins' service is if you access this area (8) directly from your swampy HQ very early on, before touching any Blue town. You can rush to the Ghost (7) through portal (g), and come back here to use the Assassins to block Red hero spawns. No more Demon Lords, no more Deleb. You will make conquering the Blue territory somewhat easier if not all of the Red heroes have spawned already.
But I won't recommend that as the Ghost's reward is way better if you do kill the Assassins. Now you can choose one of the three rewards, marked with different colors of one-way portals here at (8). Each portal takes you to an isolated area. You can only pick ONE portal to enter (the other two will be sealed forever). Whichever portal you choose, though, you gain unlimited access to it.
- R1 (green): 3 Sylanna's Ancients, our beloved level up tree.
- R2 (yellow): A lot of resources.
- R3 (blue): Rescue a familiar Renegade Haven hero from a prison. You can convert her troops in town (A).
-
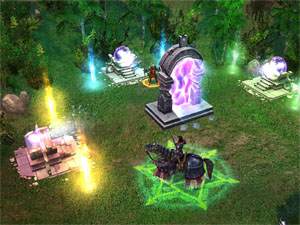
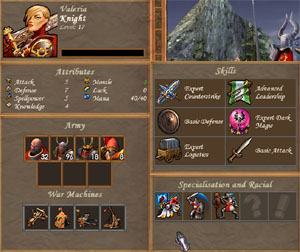
I suggest the Sylanna Ancients (green portal). Velaria is really weak compared to what she was back in Hammers of Fate C2M3, and her army is just about one extra week of growth from the 4 Haven towns - not good enough to make any difference (see the picture on the left). I don't see why you should give up three levels for her - since the majority of your army is actually the Avatar of Death! And needless to say all of the towns have been developed by now, so you have no use of the resources.
You are almost done! Go broke on army recruitment and upgrade, pass everything to Arantir (including everything that Ornella has, artifacts too), and march each of your scout hereos AND Ornella (not Arantir, Ornella plus three others) right on top of the demon symbols outside the four Blue towns (B-E). The story progresses and... Asha uses all! (We saw that coming from mission one, didn't we?!) Even better, the game developers make a timely sunset to create a heroic atmosphere. Arantir marches alone to meet his Destiny!
Let me briefly discuss my artifacts of choices for the final battle.
- Death's Embrace Set: Too good to pass!
- Urgash's Set: The ring (-2 morale) is very useful and the extra +5 Attack isn't bad at all.
- Dragon Scale Armor & Dragon Bone Greaves: I picked up the armor in M3 and the greaves somewhere in this mission. They make Avatar and other melee units slightly faster. For equipping two you get one extra stats points in all 4 categories.
- Shield of Crystal Ice: for fire protection. I picked it up just east of Town (E). This artifact was useful against Deleb, and the final boss also has a flaming Ballista.
-
I was trying to buy a Golden Horseshoe from the artifact merchant for the holding slot, but nothing good came up.
Just before you go, convert a few hundreds of skeletons into Skeleton Warriors to fill the 7th stack slot. They have the wonderful ability to shield nearby troops from ranged attacks - you will need them badly for the first round of the battle!
If you don't have a good Armor artifact (Dragon's Scale Armor is good enough), consider a little detour if it won't cost you an extra week. Go north after the bridge, and climb the mountain to unlock the Purple Gate (purple G). Pass through the last set of two-way portal (h) to reach another isolated area (9). A neutral stack offers to join (but it is unlikely you have the space for them), and here lies the best Armor artifact of the game - Armor of the Forgotten Hero (+2 for all attributes).
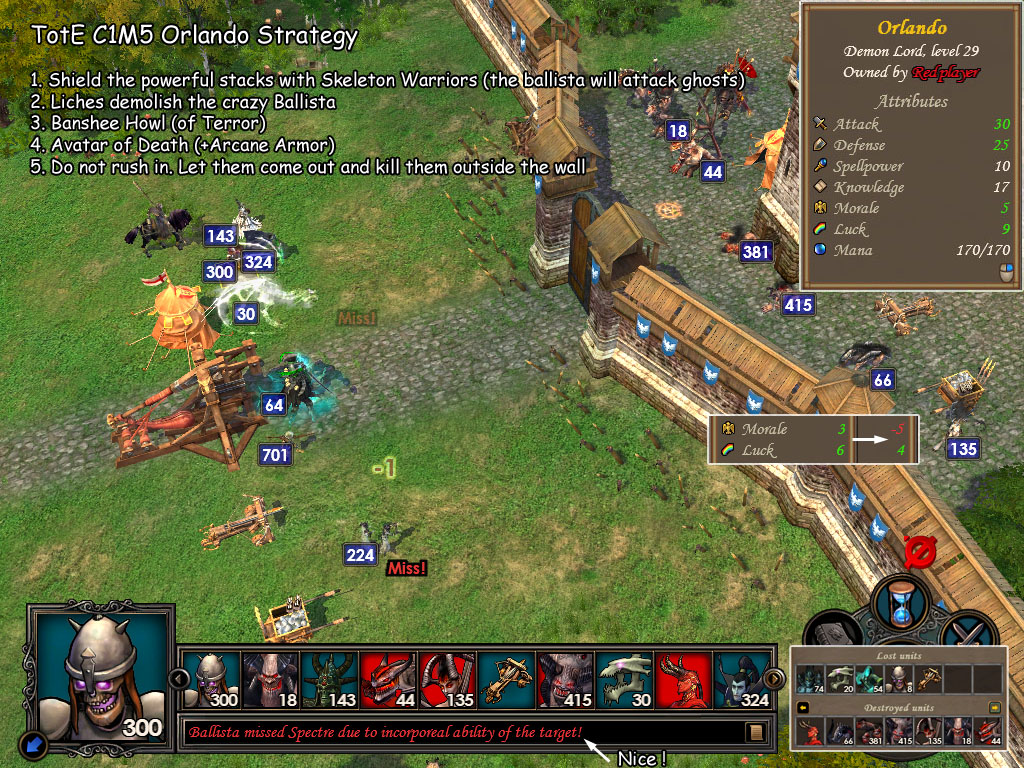
It is finally time for the final battle at Town (F)! Don't miss out FOUR morale/luck bonuses on the way. Your opponent is again Orlando, who is very different from M3. He is no longer a defensive chicken! His Attack stat is very high now. And don't be fooled by the numbers of his stacks - take a look at the crazy Morale and +9 Luck! They can deal a ton of damage! AND WATCH OUT FOR THAT BALLISTA!
First, deploy the most important stacks (Liches, Ghost Dragons, Vampires) around your Skeleton Warriors to receive the shield bonus. Believe or not, that Ballista made 4 lucky shots and killed my 30 Ghost Dragons before they could act when I didn't use the Skeleton Warriors to protect them! And after I adopted this strategy the Ballista shot at my Ghosts instead and missed 3 out of 4 shots!! Use your Liches to get rid off that FREAK BALLISTA in round one no matter what. This is probably the most important step to victory.
Use Arantir's first action to scream Howl of Terror. With the help of other artifacts I was able to bring Orlando's creature morale down to -5. (The creatures come with +7 morale, then -2 from our Ring, -2 from our Cloak, and -8 from the Howl to make it -5.) According to the manual, the effect of morale and luck are still capped at +5 ~ -5, even if they can appear to be more than +5 or less than-5. So -5 morale is as good as -100 morale! The creatures' luck is also reduced from the cloak artifact and the Howl, down from +9 to +4, which is essentially 50% chance rainbow to 40%. If Orlando's creatures do move, you can expect a huge rainbow 40% of the time.
Don't rush in. Orlando's melee units and their clones will come out fast. Summon your Avatar of Death, but don't fly the Avatar inside the wall - it can get killed by a lucky hit - even the Avatar does not have that much HP. Or at least do it after casting Arcane Armor on the nasty creature. Use your Liches' area attack to unsummon the Phantoms (aim on the real stack and the splash is a sure hit), so Arantir can cast these useful spells on the most useful stack (Avatar). It is a very fast-paced battle and the first stack who strikes usually wipes the other out! In my game the battle was over before Arantir's fourth action!
The victory is finally yours! Have fun watching the explosion and you now realize why Orlando is soooo tough. He has the entire Lion's artifact set. This artifact set actually allows the hero to move up 10% of the ATB every time a high-morale eagle is triggered among his creatures. Now you know why every professional recommends Howl of Terror on TV!
Congratulations for winning the campaign!
| Comments (1) | Add comment |
- by maltz
Will of Asha
M3: The Bull's Wake
Map Size: Normal
Level Cap: 20
Difficulty Index: 2/5
Last Updated: October 30, 2007, Patch v3.0
Our focus is shifted back to Ornella. Your first impression is probably disappointment, though. Ornella has lost all stat points, skills and spells from mission one. Her stats probably looks very ugly now, with very low Attack and Knowledge. Fortunately, this mission is very straight forward. You capture a town first, develop it, and wear down the other player.
Pick Markal's Skull as the starting bonus. This is an excellent artifact (+5 Spellpower, +5 Knowledge) that saves Ornella's low Knowledge trouble. The morale penalty does not apply to undead units anyways. Too bad this artifact does not carry to future missions.
Ornella starts at (1), with a tiny army. Head north a bit and you will be greeted by some Peasants (a), strangely standing on a Necro symbol. They are actually camouflaged Necro units left over by Ornella's ex-mentor Giovanni. Since these peasants' brains have rotted long time ago, they swear loyalty to you without asking any question.
Even better, the two nearby "Peasant Huts" are automatically flagged to you and the guarding stacks will also join. Each week you get 20 Skeletons from each hut. Throughout the map, you will see several more stacks of Necro units this way. A small Necro symbol on the ground is never a trap! For example, in (b) you will find some Zombies saying Happy Halloween fresh from their tombs.
Visit the Stable (S) and head towards Giovanni's old castle. This battle is really easy. This is the only Necro town on the map, and will be your only base for quite a while. Flag the Ore Pit and Sawmill to the north immediately - you will be short of Ore again in this mission. Surprisingly, the mines are not guarded by anything. Hire at least one secondary hero to pick up various resources after Ornella. In my game there is a great Gold Bag (+1000G/turn) artifact at (2).
Ignore the stack at (3) as they will crush you mercilessly. At (c) and (d) you will find more volunteers. Visit a mana x2 spring at (4) to make Ornella's adventure even easier. Send a secondary hero east of (4), and turn north to land on a long island in the middle of the river. You can find a decent artifact there.
There is no easy way back to your town, so it is better to hire yet another secondary hero to ship new troops to Ornella. You can make these mule heroes travel a little farther by waiting them in front of the Stable (S) at the end of a week.
In this mission you will collect the rest of the Death's Embrace set - the best artifact set for a Necromancer.
Keep going south and flag the two mines along the way. (Since there is no Mercury Lab you have to build the 5000G silo in the town.) At (e) some Zombies ask you to speak to their masters - several Vampire Princes. The Vampires give you a choice of either taking 300G per turn, or simply recruit the Zombies. By clicking "OK" you will take the Zombies, the Vampire Princes, and the two nearby huts which produce 40 Skeleton a week. Cash is not really an issue in this mission (because of the Gold Bag) so don't feel bad about missing 300G/turn.
There is a Hill Fort (5) further down the road. Convert the Vampire Princes into Vampire Lords for their no-retaliation attribute. If you don't have space for Vampire Prince to join, visit the Hill Fort first to merge some stacks. The presence of a Hill Fort in each of the first three mission completely killed the need of upgrade buildings in the towns - we are so spoiled.
Don't challenge the mission-related stack south of (5) yet - you can't win without Frenzy or Puppet Master. Yes, you know what to do now - build up the mage guilds in Town (A) and pull back Ornella to learn them all at once. If you don't get Frenzy or Puppet Master, it is probably easier to restart the map now. :P
Around this time, the Red heroes should have started pouring through the one-way portal (I') just beside the Hill Fort. Fortunately, they are very weak. Let them flag your buildings and mines for now. Ornella has more important tasks to deal with.
After learning the lv4-5 Dark Magic spells, Ornella is powerful enough to crack the stack at (3). If you can predict the Battle Griffins' battle dive route (they usually aim at your strongest stack, which is usually Vampires), you can win this battle almost unharmed. The three Windmills is a great visit for a secondary hero. The little necro symbol in front of the Haven creature building (f) gives you the best reinforcement in this map. The building also produces nice high-level creatures. Also in this area don't forget to pick up the third Death's Embrace artifact at (6). Next, head straight to (7) to collect the fourth.
It is finally the time to swat the little red flies! Watch them flee in horror! Next, challenge the stack south of (5) to trigger the arrival of Ornella's idol, Arantir. Notice that the night has come and the map becomes foggy. You have two great heroes, plus four Death's Embrace artifacts and other goodies - now go on and resume world domination! The evil undead empire strikes back!
Your goal is to defeat the Red Player of Renegade Haven, currently owning town (B), (C) and (D). The mission becomes very easy from this point on. I will just mention a few scenic attractions along the way.
You face Orlando in the final battle of town (D). In my game he is a level 15 hero with stats 5/11/2/3 or something equally funny. If you think this is an exciting battle with thousands of damages flying across the sky... you have played too much Dungeon and Haven campaigns. The opposite is quite the truth here. Both you and Orlando have low Attack but high Defense. Orlando actually specializes in Defense. If you right click on his units you can see a complete selection of damage-reducing feats!
It is aggrevating to see large stacks scratching each other for a dozen turns. Even your mighty Avatar of Death and Phoenix does mediocre damage. However, a slow battle actually gives you more turns to cast magics. First, throw a Mass Confusion to completely abolish Orlando's ranged power, followed by Mass Slow, turbo Banshee Howl, Mass Weakness, Mass Suffering, Avatar of Death, Phoenix, Curse of Netherworld, Raise Dead... With the Mark of Necromancer you have infinite mana. You should be able to win this one blind folded, right?
| Comments (1) | Add comment |
- by maltz
 The Will of Asha campaign is the first campaign of the Tribes of the East expansion, following a brief tutorial. It tells the story of Ornella, a fallen knight who is guided by Giovanni the vampire hero.
The detailed walkthrough written by our resident expert maltz starts with an overview of dark energy, for those of you who have not played with the new necromancy yet and are unfamiliar with the "nerfed" necromancers. Next comes the usual section about skill selection and the step-by-step instructions to complete the level... and get a little surprise.
More articles should become available during the next few weeks. But remember that finishing a scenario on your own is more fun, even if we try not to include any major spoiler in our articles.
Read on: Tribes of the East → The Will of Asha → Last Soul Standing
| Add comment |
- by maltz
Mission 5 - The Decoupling
Map Size: Normal
Level Cap: 30
Difficulty Index: 3/5
Primary Objectives:
- Reach Horncrest within a week
- Raise the siege of Horncrest
- Seize Tor Hrall in two months
- Ylaya, Isabel, Freyda, Wulfstan and Duncan must survive
- Stop the Demons' raids

The last mission! The size of neutral creature stacks finally reaches the "swarm" level, and there are a couple of large battles to keep the challenge up. Your well-built heroes will have a fun time blasting through them, too!

Wow, look at the corpses they left behind.
Since there will be five good heroes under your control (Ylaya, Isabel, Freyda, Wulfstan and Duncan), there are many ways to play this mission. Depending on your heroe's specialty, they are good at different tasks. For example, against a large army you probably want to use a Might hero (Freyda). Against a well-developed town Ylaya seems to be the ideal choice, since she can harm whoever hides inside without penalty.

Below I will just give an example run. First, your heroes will start with quite a big army, so the unit bonus isn't really generous at all. Golden Horseshoe is quite nice especially for Ylaya's Warlock's Luck.
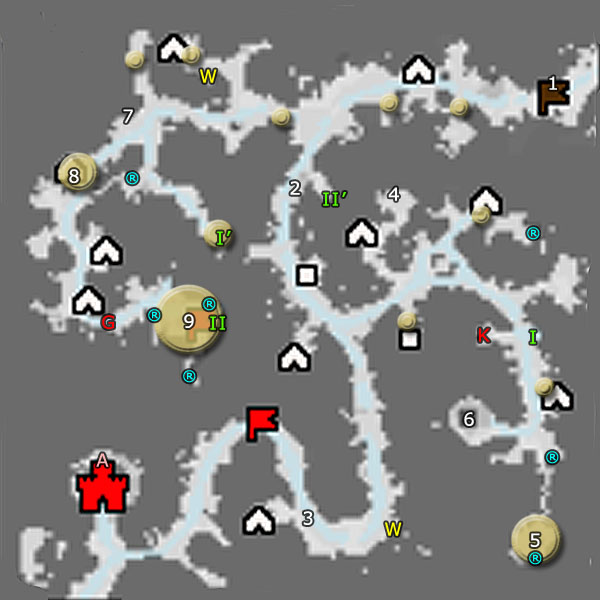
You start in the NW corner of the underground part (1). Your first objective is to reach Horncrest, (town A, currently under siege by Renegade armies) within a week. You don't really have to reach its gate, but have to be generally close to the castle until the game tells you "objective completed".
Even without logistics, Ylaya or Isabel can rush there within 5 days and half. I took a little time to break through the Inferno Garrison at (G1) and occupy Inferno town B. With Resurrection I was able to keep the loss down to 0. I built a Capital in Town A and started cash income right away. Isabel flagged the mines surrounding it as well.
The Inferno faction down here has a total of three towns. They are supposed to keep you busy while you are gathering army on the surface. However, right now the Inferno heroes are completely dormant, so you can freely take whatever you want. However, if you march a weak hero (like Isabel, starting with almost no unit) too close to a castle, their hero will rush out and make you lose the game.
Note:There is another garrison that Ylaya can attack (G2), but then Ylaya will not be able to reach Horncrest in 7 days. You can come back later for it.
Take the stairway (2') to go to the surface. You actually still have the time to flag the Mercury lab just on the south. Resources are not very useful in this mission, because almost all towns you take over have been well-built. But since you might get a fair number of towns later, you can sell them for quite a lot of cash to hire / train more units.
The surface again looks familiar... yes, it is the same map recycled again! I was too lazy to visit all the stat boosts for all 5 heores, as I've lost faith since the last mission. These heroes probably will not appear in a future expansion pack.
From (2), go towards Horncrest, marked as Town (A). Different from Freyda's C1M1, you now have to wipe out these stacks one by one. None of these fights are difficult. The main Renegade hero (guess who?) is laughably fragile in front of Ylaya. Also, when you hit end turn, Duncan will help clean up some stacks as well. As soon as all stacks are gone, you gain control of Honrcrest as well as Duncan, Wulfstan and Freyda! They all come with a nice army, too.

Yes, there will be 10,000 enforcers!
Your next (and last) primary objective is to take Tor Hrall (town C) within two months. This is the Dwarven capital that has been repeatedly featured in previous missions, so you must know where it is. From here you have a lot of freedom in deciding who to do what next. Here are my recommendations for a semi-complete run:

First, you can make Freyda, Wulfstan and Ylaya visit Horncrest for the Stable bonus. (My Isabel was still in the dungeon flagging mines and picking up resources.)
The best army to challenge the Dwarven King is a Haven army, since there are Two Haven towns available nearby. The other Haven city, Town D, is in the east. However, there is one new garrison (G3) that features exactly 10,000 Enforcers. Pick your best Might hero (in my case, Freyda) for this job, with all Haven armies from Duncan. Cast a lot of mass spells (Mass Haste, Mass Slow, Mass Confusion if you have them) and enjoy a one-sided massacre! The Renegade hero (Andreas) guarding town C is at a miserable level of 2.
There is also a secondary mission objective -- stop Demon armies. You have to take over all three Inferno towns (B, E, F) down there. Ylaya would be the best candidate (if you gave her Resurrection). March Ylaya back to the dungeon, break through the quite big garrison (G2), and take town D and E in a row. Problem solved! There was no demon army ever made it to the surface. However, you receive no reward for eliminating the Demons, either.
There is yet another town, a Dungeon, neutral town (town G), hidden in an enclosed area. The entrance is behind a Blue Gate (blue G), and the Blue Keymaster Tent (blue K) is behind the first Dwarven garrison (G4). I recommend Wulfstan for the job, since he is probably the weakest among three main campaign heroes, and this garrison is also the smallest among the five.
Occupying this Dungeon town serves no benefit to your campaign, and there isn't really anything interesting in this small area. Note that just before the two-way portal lies a large stack of Grim Raiders.

You could have rushed Tor Hrall directly after taking Horncrest. Your starting army was large enough, so it won't be a real problem. Another good time is the start of Week 3. By then you should have occupied all Haven and Inferno towns, so you have enough cash to buy / train units from both Haven towns. This brings you a larger edge in the battles coming ahead.
If this is what you wish, right after taking the Haven town in the east, pull back Freyda and march her towards the 2nd Dwarven garrison (G5), which is significant larger than the first one. Town portal Isabel back to Horncrest, and leave Duncan in Lostdale (Town D). On Day 1 Week 3, hire and train whatever you can afford (after hiring the Archangels sell all of your resources, you no longer need them), and let Duncan and Isabel catch up with Freyda to give her two-week worths of Haven troops. Fredya will suffer very little loss against the garrison G5 and the Dwarven capital, Town C.
The Dwarven capital town C is guarded by no others than King Tolghar himself. Although the Dwarven King he has a quite-large army, but he is truly dwarfed by Freyda's stats and Mass spell galore. You will have an easy time against him.
Your victory against King Tolghar also brings the end of the mission, as well as the Hammers of Fate expansion campaign trilogy. Good job, and thanks for reading the walkthrough!
| Add comment |
- by maltz
Mission 4 - Dragons
Map Size: Normal
Carry Over: Ylaya, Isabel
Level Cap: 26
Difficulty Index: 3/5
Primary Objectives:
- Ylaya, Raelag and Isabel must survive
- Keep the town from being seized by the enemy
- Defeat the army of Thralsai
- Ylaya must find the Dragons' hideout and enlist their support

This is a busy mission. There are waves after waves of enemy heroes, and the mission boss, which spawns at a given date, carries the largest army ever seen in HoMM5. You will be working against time to visit all the stat bonuses.

In order to prevail in the mission, you will also gather a huge army. If you follow the plot and find the Dragons (a secondary objective), you will be granted a LARGE stack of Black Dragons, which pretty much guarantees your victory.
Also, Ylaya is joined by two familiar heroes - clanlord Raelag and Queen Isabel. It seems that they have developed some... advanced relationship since the end of the original game. Raelag and Isabel joins as lv 25 heroes, with set stat points and skill choices. In order words, they are no longer the Raelag and Isabel you used to know.
If you built a powerful Isabel and Raelag in the original game, you may be extremely disappointed at the first sight. My Raelag lost 39 stat points, and Isabel lost 32 points. They also picked up a few completely redundant / useless skills, and missed one of the most useful skills for their class (happens to be Luck in both cases). Also, Raelag does not know Meteor Shower and Implosion, the two mostly used spells of a Warlock!
To compensate for your miserable loss, there are some little benefits of the new Raelag and Isabel. First, the new Raelag can actually cast a couple of spells that is outside his skill set (Frenzy, Resurrection and Summon Phoenix - he only has advanced Summoning Magic). Resurrection is especially useful, but since he does not have any skill point in Light Magic, the effect is rather limited.

Er... why did they wear full armor in their love nest?

Isabel's special ability also changed to a "Dragon's Blessing", replacing her 250G/day bonus. Her troops now receives an automatic Expert-level bless (always max damage) on the battlefield. But you probably won't use Isabel at all, since the Warlocks are just way better.
Although the mission objective does not specify, you are actually under a time limit. In my game, the mission boss Thralsai spawns on Day 3, Week 3, Month 2 (Day 44), and reaches the town on Day 1, Week 4, Month 2 (Day 50). This means that you have exactly 50 turns to prepare for the final battle, plus to send the two girls (Ylaya and Isabel) to visit as many stat boosts as possible. It is not very easy to visit all stat bonuses before Day 50, since they are scattered all over the place, and traveling on snow slows your heroes down.
Note: Raelag will not show up in the campaign finale, so you don't have to worry about him.
To spice up the 50 turns you have, enemy heroes from the Soulscar clan (Green Player) will attack you, six at a time, every 8-9 days, starting on Day 1 Week 2. Depending on your game, you will have to defeat 2 to 4 waves of them (it seems that the faster you push out, the sooner they stop coming). Their spawn spot is marked by the light green Gs.
These heroes are not powerful individually. Their spell book is very limited - most of the time they just cast Ice Bolt. Their army only consists of about one-week growth of creatures of Tier 1-6 (on lower difficulties the number and tier-level is even lower). These heroes spawns with stronger army later, though.
If these green heroes spot a nearby weak hero, they will attack. Otherwise they will rush straight to your town (A). If you lose the town, you lose the mission.

Don't hire from caraven when your hero is in town, or is about to Town Portal. They will get stuck at the gate and waste the turn.
Also, these green heroes will try to join army. The ones without army will retreat and disappear, and you will have to deal with a more powerful hero with double, even triple army size. If you fight them with Isabel, you will lose a lot of troops to their spells. On the other hand, Ylaya and Raelag can dispatch them easily with area-attack spells and some resurrection at the end. These hereoes are very juicy in experience as well.

Besides the Green player there is also a Brown AI, as a Fortress faction. Their hideout, the only other town (B) of this mission, must be accessed through the surface. The Brown AI is completely dormant, and even if you assault their town, you will be facing an army without hero. It is for your benefit to attack them. You not only gain 2000G per day from the Town Hall, but also harvest a complete set of Dwarven King artifact! In this mission you will have more troops to hire than you can afford, so gold is very much needed in this mission. You may as well take Town B as soon as possible.
There are a lot of creature buildings in this mission. Since they all increase the creature growth rate of your Dungeon town, your town will have some monstrous creature growth at the end. There is really no need to rush flagging all the creature buildings, since you won't have enough cash to hire them all anyways. Actually, as a hindsight I think it is better NOT to bother with the dragon building at all, because (1) You will pick up a large stack of them; (2) You will still use up your cash from buying and upgrading Teir 1-6 creatures. I have marked with light blue Ds the high-tier creature buildings (tier 4-7).
At the start of the mission, pick the Gold Bag artifact. After 50 days it nets you 12500 G, which is way better than the cash bonus (but it is still not a lot). Your starting location is just outside your headquarter, Town A. There are a lot of different ways to play this mission. In the following walkthrough I will just make an example, which focus on efficient stat-bonus visiting within the time limit.
=1= Make Raelag attack the gargoyle building, flag the Orepit, and pick up the artifact at (2). It boosts fire spell damage by 50%, which is very handy later. Give that artifact to Ylaya.
=2= Give Isabel's Haven units to Ylaya, and all Dungeon units from Raelag and Ylaya to Isabel. Ylaya can survive with that tiny Haven army, while Isabel cannot do well without good troops. Raelag will be left with almost nothing, but soon he will pick up a lot.
=3= Immediately send Raelag out to the surface through stairway I'. Your top priority is to capture the Gold Mine (yellow G) to the north, and the Dwarven town (Town B). The extra 3000G per day is a great help. Hire a low-level hero to clean up resources after Raelag (ideally a Dwarven hero, since the surface is covered with snow), and another to clean up after Ylaya and Isabel. There are a lot of resources on the ground, and it is not worth your main hero's time to collect them.
Neutral, smaller Dungeon stacks, usually offers to join Raelag. Don't miss the useful artifact Boots of the Open Road (no movement penalty) at (4). Just north of (4) you can loot some great Dwarven Treasure and pick up lots of resources on the ground. Also, make sure you touch the Red Keymaster Tent (red K) - it will save you quite a few days later. Flag the Sawmill and Ore Pit on Raelag's way down.
Note: You can make Raelag visit the map maker at (5). However, since the map is now revealed to you and I will go over everything you need to know, you may as well save that 4000G to hire more units.
=4= At the same time, send Ylaya directly north, to capture a good cluster of mines. Send Isabel east, to flag some creature buildings. Let Isabel collect the Garrison units (yes, you can swap them down to become yours). Don't challenge the black dragon. They will weaken the first wave of Green heroes quite a bit. Send Ylaya and Isabel to the left next, pass the garrison (swap units again) and flag creature buildings and visit both stat boosts.
=5= When the first wave of Green heroes arrive, massacre the left, and town portal Ylaya back to defend the town from the Green heroes who made it through the black dragons. (Hopefully you have visited all stat bonuses on the left.)

=6= Make Isabel visit the Arena directly north. March both Ylaya and Isabel to the east, and turn right (east) at the first branch to visit the Knoweldge + 1 bonus.
=7= At this time Raelag should have captured the Dwarven town (B). Pull Raelag back via the one-way portal (6) beside the Dwarven town, and run him back to defend from (6'). At the same time, send Ylaya and Isabel out to the surface.
Raelag will be your defender from now on. His power is more than enough to handle all of the subsequent Green heroes. Just give him Deep Hydras and Minotaurs. It is much easier than what Raelag has seen in The Conquest (C4M3), but you have a crappy build here so the challenge still exists. From now on I will omit Raelag and just talk about what to do with the girls.
Note: Pass the Boots of Open Road to Ylaya. You can sacrifice Isabel's chance of stat bonuses since she won't be used (Freyda is better) in the campaign finale anyways.
=8= On the surface, march Ylaya and Isabel all the way north. Just north of (4) is a stat boost. Enter the stairway (II), which is connected to (II'). Go north along the underground passage you emerge at (III). There is a stack of Fire Dragon right in the east. Defeat it, and you can access a two-way portal (7) that brings you to a small area (7') with two stat boosts.
=9= Return Ylaya and Isabel to the main road, and go east. You can unlock the Red Gate (red G), revealing a good shortcut. Keep going SE, and you will see a stairway (IV) guarded by Fire Dragons. There is a hidden trail in the forest to the south leading to a small grassland area (8), with a Sylana Ancient (level up tree) and a Library of Enlightenment (Spellpower and Knowledge +2). Great!
=10= If you go down the stairway (IV), you can pick up the LARGE stack of dragons (marked with red X). After the cutscene, the mission boss Thralsai instantly spawns at the NW corner of the map, if he has not already. You can take the one-way portal (9) just beside the Dragons back to your headquarter, or cast Town Portal.
=11= Before Thraslai reaches your town (he is usually distracted by various buildings), you have a few days to visit one more stat boost (that's why I left the mercenary camp unvisited in the first place). Buy out whatever you can afford, equip the best artifact you own, and you should be able to knock out Thralsai easily!
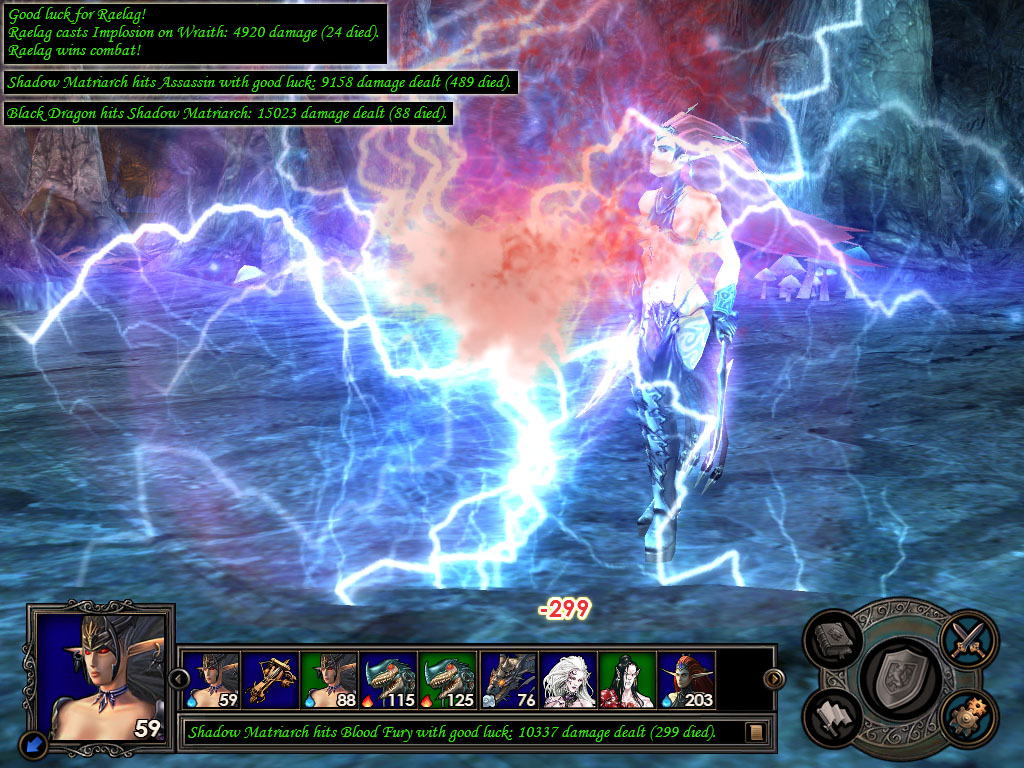
This Thralsai battle is a huge army clash. Thraslai's army varies with difficulty. From the mission script Thraslai will have the following number of troops ranging from easy to heroic:
- 515-840 Assassins
- 235-410 Blood Fury
- 155-280 Minotaur Guards
- 75-125 Grim Raider
- 44-86 Deep Hydra
- 58-88 Shadow Matriarch
Congratulations!
| Comments (24) | Add comment |
- by maltz
Mission 3 - The Meeting
Map Size: Normal
Carry Over: Ylaya
Level Cap: 22
Difficulty Index: 3/5
Primary Objectives:
- Reach the portal leading to Raelag's secret asylum
- The Daughter of Malassa must survive
- Ylaya must survive
- Collect the eight Dragon artifacts
- Return dragon's artifacts to Seer Hut

Finally, there are towns for Ylaya to learn magics. Actually, there are five towns in total, and you control a Dungeon town from the start. You are up against the other four!
Does this kind of unfair disadvantage remind you of Raelag's C4M3, where you were 0 against 7, and formidable Warlock hero rush you non-stop? Indeed, that was certainly the most difficult HomM5 mission on heroic. However, here your situation is not as bad, because:

- There are only four towns against you. Each of town is controlled by a different AI player, and they are divided into two teams. Sometimes, they will go against each other.
- The neutral stacks are still quite small in this mission, even smaller than mission one (duh).
- There are lots of artifacts to boost your stats, and the AI never picks them up (for your sidequest's sake). Back in Raelag C4M3 they usually comes with loads of artifacts already, especially Lethos.
- The AI heroes are much lower in level and stats than Ylaya. Their starting army is far from impressive. You can win even with quick combat all the way through!

You start in the SW corner (1), with Town A under your command. Your ultimate objective is to reach the NE corner (2) to meet Raelag, the Warlock hero you mastered in the original game.
Theoretically, you can rush to point (2) non-stop, since your starting army can be split into numerous 1-unit stacks to buy you the time to blast through the enemy. For the walkthrough purpose let's do it the normal way.

Hopefully, you start this mission with some nice skill and feat choices. If you took my recommendation and went with Destructive, Sorcery and Luck, with useful feats such as Warlock's Luck, Mana Regeneration, Erratic Mana / Arcane Training, nothing is going to stand in your way. You army are merely a "HP pool", which buys you time to finish off the opponent with powerful spells.
Troop conservation in this mission is quite easy, since you have a Black Dragon to start. This black dragon is the Daughter of Malassa, and you cannot afford to lose it. The Black Dragon has a lot of Defense and HP, and it is magic-proof, so it does not die easily. Therefore, often you can only deploy the Black Dragon and blast your way through the quite-small neutral stacks. Don't deploy it when there is an eney hero. The enemy hero usually directly attack the Black Dragon, and it can't last many rounds.
Your first priority is to take the Red Haven town (B) just north of your territory. Start by flagging the Sawmill and Ore Pit close to your town, and go to spot (3) where you can flag three resource mines. Your job in your own quarter is basically done, and you can now start rushing towards Town B.
In the meantime, build up your Town A with the emphasis on Deep Hydra and Minotaurs. They have a lot of HP, and are ideal spell damage sponges. The Assassins are also nice cannon fodders.
Between every town there is a Garrison (yellow G1-8), guarded by a small set of tier 1-6 Necro units. You should have no problem passing them.

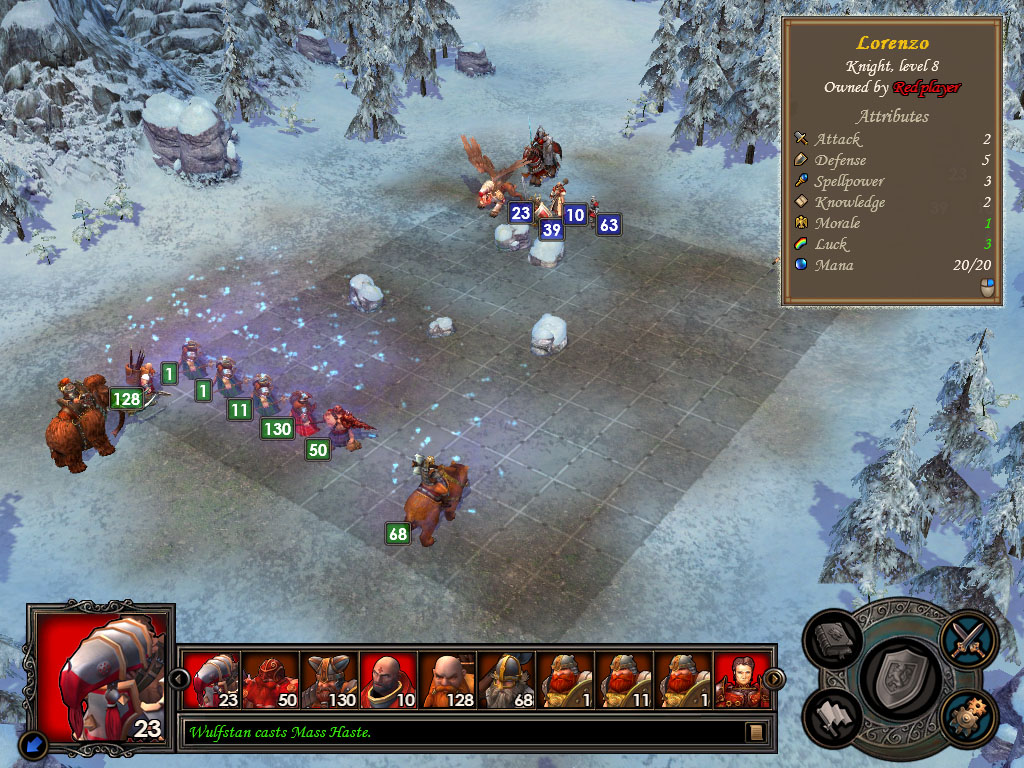
Town B is guarded by Renegade heroes. By now you can probably spell their names by heart - Valeria, Lorenzo and Andreas. Valeria is the main hero (much weaker than HofC2M3), while the two guys have been miserably demoted to very low levels.
Depending on your game, Valeria may actively seek you out (and lose horribly to your spells), or get stuck too far away to protect her Haven town. Sometimes, you can also see the Brown or Green main hero here. They will also attack you if the AI think it stands a chance (yeah right). They are not challenging at all.
When you take Town B, it will be around the start of Week 2. Ship new units to Ylaya, from your own Town A with a new hero. This way, Ylaya can immediately set out to combat more heroes and occupy more towns.
Very soon, you will face the main heroes from the other AI players. However, somehow the Orange player's AI hero always remain dormant in his Inferno castle. This also makes them the hardest to beat, though, since you cannot kill their main hero before hand.

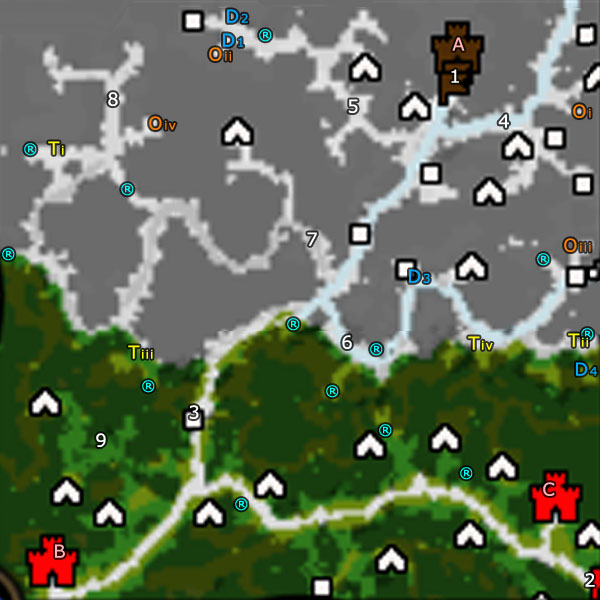
Your closest next target is the Dwarf town (C) north from here. You can reach it by going through garrison G2, spot 4, and then garrison G3. On the right mission map above you can see blue letters a to h. They are the locations of Dragon artifacts that are involved in a sidequest to be revealed later. If you come close to these artifacts, pick them up. They are all quite powerful.
Besides each Dragon artifact there will be some neutral Dungeon and Fortress creatures fighting each other, and make lots of noises. You can choose which stack to fight. When the fight is over, both stacks disappear (so you can't really "rescue" the Dungeon stack).
On your way to Fortress town C you can already pick up the first two Dragon artifacts. I have numbered them in the sequence you can pick them up.
Still, depending on your game the main Dwarf hero may be already defeated by you, or are still hiding in the town. It is also possible that the green player have sneaked onto the town when the Dwarf's main hero was away! Since you now have a lot more troops to soak up the damage, the castle assault shouldn't be any problem for you.
Now you own three towns, and there is no way you can lose. When you collect Dragon artifact c, d and e, ship the new batch of fresh troops to Ylaya. The new hero can meet Ylaya at some point west of (5), where you can visit a Stable right on the beginning of the next week.
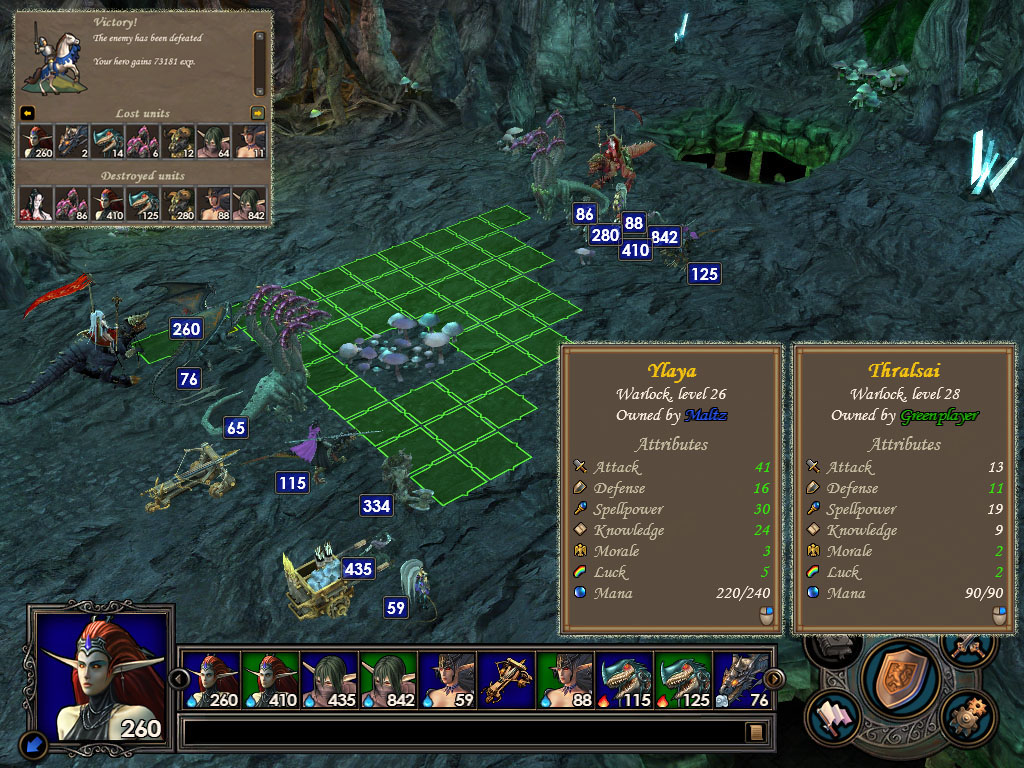
Needless to say, with that huge army you can now run over the Green player's domain (Town D) with ease. The Green town is also a dungeon town, and chances are you will instantly pick up some high-level magics when you step into it. Great!
When you march south to take over the last AI Player, orange Town E, it is also around time that you start building up Mage Guilds in all your towns. You might skip the Haven town mage guild since it will only have Light and Dark. In my game I started to develop Light Magic in mission 3, and I learned Resurrection in the Haven / Fortress mage guilds. Resurrection will be very handy in mission 5. More on that later.
You are almost done! Now gather all your army and approach Garrison G4. There are three more Dragon artifacts to collect here. Behind the garrison G4 you can visit a Seer's Hut (6). The Seer will ask for all your dragon artifacts and it will "teleport you" to Raelag. You will be immediately transferred to (2) the exit, where you only need to fight one small stack of tier-7 creatures. If you want to explore yourself, step in the One-way portal at 7.
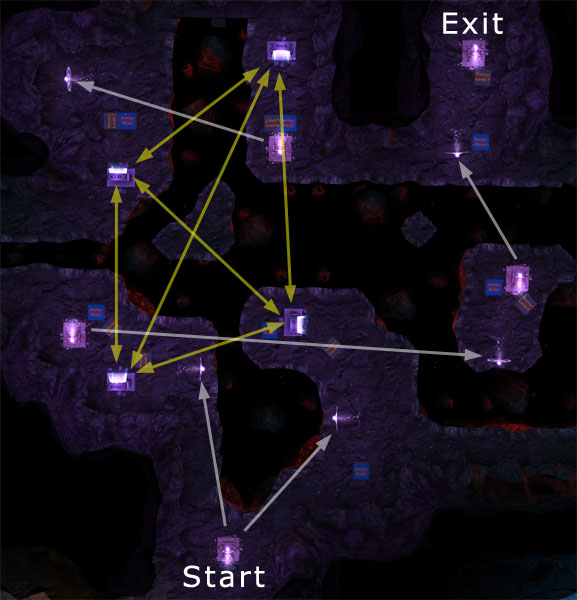
The teleporting patterns are a little complicated. There are two kinds of portals you will see, the One-way portals and the Two-way portals. All of the Two-way portals are randomly connected to each other. The One-way portal will eventually lead you to spot (2). The enemies featured in this area are all tier 6 and 7 stacks (still, small stacks), but the artifacts on the ground are also top-quality. Too bad you can't keep them.
Whenever you touch the One-way portal at (2), the mission ends. You can see Raelag and his suprising mistress in his secret hideout. In the next mission they will both join you, and you will have three high-level heroes to play with. Congratulations!
| Comments (14) | Add comment |
- by maltz
Mission 2 - The Break
Map Size: Normal
Carry Over: Ylaya
Level Cap: 16
Difficulty Index: 2/5
Primary Objectives:
- Ylaya must survive
- Pass the first frontier garrison in two weeks
- Pass the second frontier garrison in three weeks
- Pass the third frontier garrison in four weeks

The second mission of Ylaya's campaign brings you back to day time, or dusk more precisely. This is also the easiest and shortest mission of the campaign.

The mission can be broken down into three similar parts. In each part, Ylaya has to defeat a destination Garrison (yellow G1-G3) before a deadline. When the deadline comes a powerful enemy hero spawns, and might catches up with Ylaya (and defeat her).
However, since the map is relatively small, and you will hit the level cap at 16 (only 4 more levels than mission 1), there are not a lot of important things to do. You should be able to pass the Garrisons long before the enemy heroes spawn.
Note:Once you pass a garrison, you will not be able to return to the previous section. So before reaching for the garrisons make sure you visited the stat boosts, etc.
As a full-time spell caster, you can pick the Tarot Card artifact as the starting bonus. One extra knowledge point gives you 10 more mana, and 1 (or 2 if you have the Mana Regeneration feat from Sorcery) point of mana regenerated per day. Your starting army size is tiny, but soon you will be able to recruit neutral stacks, and the unit starting bonus will soon become insignificant.

Depending on what you have in the spell book, the difficulty of this mission can range from moderate to extremely easy. By the end of this mission you better have Expert Destructive Magic, Empowered Spell, Warlock's Luck, and Mana Regeration ready for mission 3.
Yalaya starts in the SE corner (1). Follow the road north, and you will see a Hut of Magi on your right (2). Visiting the Hut reveals all three Garrisons that you will have to pass through.
Instead of reaching for the first Garrison (G1) directly, you can turn south and explore a little bit. There are a few low-tier Dungeon creature buildings. Since there is again no town in this mission, you can skip most of the resources on the ground. They don't sell for a lot of gold. Just pick up the gold, if you can do it without losses. There will be high-tier creature buildings in the last section, but you can also do well without hiring from those.
There is a Witch Hut (yellow W) that might teach you something useful. You can also visit a Red Keymaster Tent (Red K) just SE of the first Garrison (G1). The Red Key gives you access to a good, but not very useful artifact in the second area.
At the end of Week 2, you will get a warning message that the enemy hero is going to spawn. In this section the enemy hero spawns in your Day-1 location (1). By the way, the enemy heroes cannot chase you across the Garrisons.
Every Warlock loves to take a sip from the mana spring, but somehow Ylaya is pinned on her steed...
The first Garrison is very easy. Your spells should be more than enough to handle them in a few rounds. Right after passing the garrison, there is a stack of Blood Maiden on your NE (3) that will offer to join. Another friendly stack of Blood Maiden (marked with another 3) is waiting NW from your position, close to an Redwood Observatory pole.

The second area is quite large. There are quite a few creature buildings, and two resource mines that does not mean too much. You can pick up the Axe of Mountain Lord in the middle of the lake, after passing through the Red Gate (red G). There is also a Blue Keymaster Tent (blue K) hiding in the NW corner; the Blue Gate is in the third area, again guarding a nice artifact that has nothing to do with magic. The stack guarding the blue tent is quite powerful, so you may as well skip the Blue key.
At the end of the 3-week deadline (counting starts when you pass G1), another enemy hero will spawn at the NE corner.
The second Garrison (G2) is significantly tougher than the first. Here is what I saw:
- 3 Hydras
- 15 Grim Raider
- 15 Dark Raider
- 20 Minotaurs
- 15 Blood Furies
- 90 Assasins
The third area is the largest and the most rewarding. It is unlikely that you will see the third hero spawn in this area, since there are still not very much to do. The first thing you see from the third section is a cluster of Peasant Huts. The Peasants don't mix well with Dungeon units, but they are tax payers, and can be discarded as cannon fodders. There is also a Trading Post in the area, guarded by a stack of Tier-4 neutrals.

Your first priority should be to pick up a good stack of Minotaur from (4). If you have enough cash, you can flag and hire from the high-tier creature building just SW of it. There is also a very good stack of Shadow Witch waiting to join you at (5). In my game there are 12 of them - the value of this stack is higher than all resources combined on the map!
Keep going south and you can see a Hill Fort at (6). Don't waste your money upgrading the Witches. The basic ones work well, and your moeny can be used on buying new units, such as from the high-tier creature building just west of the Hill Fort (8).
There is a pair of Two-way Portals between spot (7) and (7'). The mission designer probably tried to help you save time, in case you decided to come back here to upgrade more units.

Behind the Blue Gate (blue G) lies the Unicorn Horn Bow. It is not a very useful artifact for a warlock, since most of your damage comes from hero's spell.
Just after visiting the mercenary camp, you can find a little shortcut at (6) that leads you to the third and final Garrison (G3), through (9), If you try to grab the aritfact in the west, you will be ambushed by a small group of Mummy.
The final Garrison (G3) is again quite bigger than the previous. Here is what I saw:
- 4 Shadow Matriarchs
- 12 Deep Hydras
- 20 Dark Ripper
- 85 Minotaur Guards
- 20 Blood Furies
- 125 Assasins

The Dwarven King... will be a pushover. Let's talk more about it in mission 5!
| Comments (6) | Add comment |
- by maltz
Mission 5 - Laszlo
Map Size: Normal
Carry Over: Wulfstan, Duncan
Level Cap: 29
Difficulty Index: 2/5
Primary Objectives:
- Seize Horncrest, the capital of the Stag Duchy
- Eliminate Laszlo
- Wulfstan and Duncan must survive
If you think this map looks a little familiar, pretty much it should! This is almost exactly the SAME map used back in Freyda's C1M4 (the Negotiation). However, as a dwarf, you are going to play it backwards - start by exploring the north, and take over the humans - Laszlo to be exact.
So how hard is Laszlo compared to Andreas and Lorenzo? (You are still going to see them here!) I have heard about people complainig Laszlo to be too hard, but I didn't find him half as challenging as valeria back in mission 3. However, since Laszlo has two towns, and you only own one, given enough time Laszlo will theoretically grow out of your control.
Should you rush him at the beginning to create a 2-to-1 advantage? That will certainly help, but it is not necessary (because most of Laszlo's strength come from his quite-large starting army. You can't take that long exploring the north, too.
Note: I heard that the Red Player, particularly Laszlo, would attack you unexpectedly in the original HoF. It seems that patch 2.1 has eliminated Laszlo's early aggression by confining him to a corner for two weeks.
So... you start by exploring the north. Since this is the same map as C1M4... is there also the entire set (4 pieces) of Dwarven King artifact? Yes! Are there also 15 points of stat bonuses to collect? Yes! Plus, you will be able to dig up the first Tear of Asha in the Hammers of Fate campaign!
On the other hand, some features are gone for good. The one-way portal that Fredya used to escape has broken. The two-way abandoned mine portal is also non-functional now. Also, the eastern stairway leading to a small underground region has been sealed off. You can save your time and not bothering with those.

Which starting bonus to pick? There will be lots of good artifacts in this mission, so this Hammer won't be helping much. If you don't have the spell Resurrection yet, it is a really good pick. Otherwise, get the 10K gold bonus as you can always use extra cash.
Both Wulfstan and Duncan start in front of Town A. Eventually, you need to take over Town B (Town C is optional), and defeat Laszlo, who is at (2) on Day 1. Laszlo is temporarily blocked by a HUGE stack of Phoenix, so he can't get anything done yet. In my game Laszlo gains freedom some time in week 3.
In order to reach Town B and Laszlo, you need to break through a neutral garrison (3). The garrison features a wide array of Dungeon units, but they are not nearly as big as what you saw back in the other campaign finales. Actually, this Fortress finale probably features the smallest stack size I have ever seeen in any mission 5 so far... the players should have become more skillful when they are playing the expansion...
Anyways, if you wish to rush through this mission, you can directly take Garrison 3, then Town B, and finish Laszlo as soon as he gets freed from the Pheonixes.

Laszlo is not the talktive kind. In fact, he has exactly 0 lines in this mission named after him.

Since both Wulfstan and Duncan should be quite powerful by now, you can split them up to explore the surroundings. The NE branch at (4) contains 3 mines, one Dwarf Warren (random-resource mine), and an Obelisk (orange Oi) that reveals 1/4 of the Tear of Asha map. You can see the other orange letters (Oii-iv) for the location of other three Obelisks. The NW branch at (5) eventually leads you to two pieces of Dwarven King artifacts (blue D1 and D2) and another Obelisk (Oii).
You might know where to look for the Tear by just seeing 1/4 of the map. I have made your life easier here by marking all of the four possible treasure locations with Ti, Tii, Tiii and Tiv. You can click on the picture for the actual landscape view.
As soon as you figure out where to dig for the Tear, quickly send over somebody to dig it up. Ship it back as soon as you can (or just cast Town Portal) and build the special Forge structure, so you can get 5000 extra gold per turn. This is a huge bonus , and your one town actually out-produces Laszlo's two towns!
In the meantime, you can keep on exploring. The SE branch at (6) contains many stat points, and two more Dwarven King artifacts (D3, D4). Don't miss out the library guarded by the familiar Phoenix stack (no insane Godzilla this time!).
Finally, go down the NW route (7) and make a round trip. In the far north (8) you can pick up more high-quality artifacts if you can defeat the powerful guards (shouldn't be a problem for you at this point).
Whenever you are done with the north (took me about 1 month), gather all armies you have in Town A, and march south. Run over the garrison at (3), and look for Laszlo. In my game, Laszlo hides in Town C. You can take Town B first and then Laszlo, or the other way around.
At this point, your Wulfstan build should have matured, and the dwarf must have become be a walking museum of artifacts as well! (There is an Artifact Wagon just before Garrison (3), in case you have spaces to fill.) Although Laszlo's army is also significant (for a mission 5 boss he is still Size S, though), your town should have developed to full, and it is likely that your army is even bigger than Laszlo's. This fight is a one-sided slaughter!
When Laszlo is gone, you are presented cutscenes that you probably have little clue about. Somebody was using an anti-Word of Light artifact, but he was apparantly immune to Implosion and Meteor Shower coming from nowhere. And Word of Light hurt him eventually... Hm... Anyways, you'll probably remember the familiar "NOOOOOOO!" part. After taking down both Town B and Laszlo, you finish this campaign!

Video games are wonderful education tools. Die! Humans!
In the memory of a legendary hero:
Godric will be remembered as "the most-leveled hero", and "the hardest custom-made campaign boss" ever! Here is a screenshot of my end-game Godric in the original game.
| Comments (27) | Add comment |
- by maltz
Mission 4 - The Brothers
Map Size: Normal
Carry Over: Wulfstan, Duncan
Level Cap: 26
Difficulty Index: 2/5
Primary Objectives:
- Wulfstan must survive
- Meet Duncan's army
- Seize Tor Hrall
- Repulse Rolf's attack
- Reinforce the army with Dwarves
As the mission name suggests, you are going to fight Wulfstan's half brother, Rolf. Is Rolf going to be as tough as Lorenzo and Andreas in mission 2, and Andreas and valeria in mission 3? No. The main objectives can be completed in several days, but the sidequests can drag on for quite a while.
Start by picking the 6 Thanes as the bonus. They have good speed, initiave, defense, and gropu attack power.

Wulfstan starts in the NE corner (1). Your eventual goal is to take Town A in the opposite corner. The game designer probably wished you to spend time picking up Fortress units, but your starting army is already quite powerful. If you have a good Wulfstan build by now, it is totally plausible to rush straight to the end without picking anything up. Let's talk about this fast route first.
Follow the main road west, and turn south. As soon as you reach (2), Rolf teleports in. Rolf is relatively the weakest mid-mission boss in the Fortress campaign. A few fireballs are enough to send him packing.
After taking care of Rolf, keep going south and you will hit a large stack of Champions. 10 Thanes + Fireball + Resurrection = perfect victory. (You can hide a stack of shooters in the corner to enjoy the "right-between-the-eyes" accuracy.) Keep going south, and you need to face a large stack of Fallen Angels. 10 Thanes + corner shooters + Fireball + Resurrection = another perfect victory!

Even 3 Rolfs can't beat valeria in mission 3. Shame on you... Nival!
Keep going south and you can see a Witch Hut (yellow W). This is the first Witch Hut of the Fortress campaign, and there are only three in total. Follow the road west and north. As soon as you hit (3), an old friend - Duncan rushes in a join you!

Duncan has a powerful Haven army with him, and a lot of them are shooters. Give all shooters to Wulfstan (or Duncan if he is a better hero), and run straight for Town A. Mission ends right here!
If you wish to fully explore the map, there are a lot more to do. Right after taking Duncan, back track to the last intersection, and go east (where the Observatory is). If you gave Duncan enough fighting experience back in C1M5, Duncan is probably level 26 or above already. You only need to work on Wulfstan's experience gain. There will be enough experience points to level Wulfstan to the cap as well, due to the sidequest that I am going to describe next.
Try to flag all mines, and pick up every single resource you encounter, because they will be needed in the sidequest. You can buy a mission map with 4000G at (4). You can not only see where the roads are heading, but also spot something out of place at the NW corner of the map... Nice smoke effect, by the way.

When you approach a neutral Dwarven stack, they will either join you for free, or ask your to pay a welcoming fee. The request can be any of these: 25 Wood, 25 Ore, 15 Mucury, 15 Crystals, 15 Sulfur or 15 Gems. If you don't have the requirement, or don't want to give, choose Cancel. The creature will then ask you whether you want to fight them; choose Cancel again. Now you can approach the stack once more, and the creatures may ask something else.
I have marked the neutral Dwarven stacks on the map with yellow buttons (hopefully I didn't miss any). The larger the button, the bigger / more useful the stacks. In order to complete this sidequest you need to gather a total of 10 stacks, which is not difficult at all. (The largest button actually contains 7 stacks.)
You can also make Duncan to visit these stacks and make deals. The Fortress troops will automatically go to Wulfstan. This is very convenient, except that Spearthrowers don't mix with Skirmishers, and Wulfstan already reaches the stack limit of 7. You can always temporarily swap army between Wulfstan and Duncan to create rooms.
After buying the map, head east and then south. On your west you can see a Red Keymaster Tent. Grab the key (important), and continue south. You will soon see a a Two-way portal (green I), which connects to the west side (green I'). Don't take the portal now becuase you still have important business down south. Keep going south, and look carefully, there is a hidden pine trail of the forest! At the end there is... a sun-sweet berry of the earth, in the form of... a good stack of Thanes join you for free! Wohoo!
With this large stack of Thane you can now tackle a large dragon stack on the road side, and the Dragon Utopia close by. With resurrection, the tactics are basically the same.

Now take the two-way portal (I) (and pick up a large stack of bear blocking the portal). You are now on the other side, at (I'). Go north first to collect more troops and visit a Witch Hut (yellow W).
If you were too weak to handle the tier-6 Champions south of (2) at the beginning, you will end up being here first. You can now use the portal I' to go to the east side for the Red Keymaster Tent. The rest of the walkthrough should be the same. You may want to pick up Duncan as early as you can, so he can visit stat bonuses as well.
Next, come back to (7) for the Mage Vault. Further south there are some Godzillas (Magma Dragon) guarding a gold mine at (8). You can buy them as you do to any other Fortress creatures.
From the gold mine, follow the road south and east, and you will see the Red Gate which you already have the key for. Pass the gate, and you will hit the Million JACKPOT of this mission at (9) - with a total of 8 neurtal stacks (7 for purchase and 1 for free), 3 stat boosts, and a Hill Fort to spend all of your now-useless cash! At this time, you must have collected more than 10 neutral stacks. Your get a nice EXP reward, which pushes Wulfstan to the next level.
When you rob this jackpot area clean, take the one-way-portal at II, and emerge back on the main road at II', just like Rolf did earlier. You can now finish this mission - taking Town A. The AI garrison in Town A was already weak at the beginning, and now your army has grown 10-fold. So...
Yes, there is no mission boss. Yes, this mission is way too easy. (Still, congratulations!)

Rolf was actually part of the Jackpot on Day 1. It will be more fun that way...
| Comments (9) | Add comment |
- by maltz
Mission 2 - The Ambush
Map Size: Normal
Carry Over: Wulfstan
Level Cap: 16
Difficulty Index: 2/5
Primary Objectives:
- Seize Asbrand within two weeks
- Liberate the Dwarven dwellings within two months
- Repulse the Imperial attack
- Wulfstan must survive
- Seize all (4) gold mines

If you like the gorgeous Treasure Hall hidden underground in Freyda's mission 5, you have an entire mission made out of it now! The Ambush features a large and beautiful Dwarven macro-structure, containing mines, creature buildings, even a five-story-Fortress town in the middle. The town is not even 1/5 as tall as the wall!

So far, we have always recommended taking the creatures as starting bonus, but we will make an exception here. Although 10 black bears sound good, they are insignificant compared to your large starting army. They also don't merge with your existing Bear Rider stack, thus leaving less room for your 1-defender stacks. The less 1-unit stacks, the more casualties you take! You will be better off by taking the Armor of Valor artifact, which offers 1 point of defense (about 5% reduction in damage), and 1 point of morale (extra 10% high-morale bonus).
Your first objective is to capture the the only town in this mission (A) within 2 weeks. This deadline is very easy to meet, since Wulfstan has the logistics skill by default, and the road leads to the town is very straight-forward.
From Wulfstan's starting location (1), pick up a small stack of cannon fodders, and follow the snowy path south. Three stacks of wolves are mandatory, and their number may pose a threat. If you can't kill a wolf stack completely (which is very likely since HoF Dwarves are bad in the offense department), when the wolves' turn comes up, they will run beside your stack, call forth the same number of wolves, and attack you simultaneously. This can be devastating if a large stack does that to you.

If you have built Rune Shrines back in mission 1, you probably have learned the Charge rune magic. By using up one unit of Wood, your unit doubles its speed (traveling distance, not initiative). You can use this Rune to enable your Bear Rider units to reach enemy shooters in round one, for a cheap price of 1 wood!
The Berserk special ability of Berserkers is quite powerful. All you need to do is to pull Berserkers away from your other stacks (start off the battle with them in another corner). When the Berserks are closer to an enemy stack (within striking range) than a friendly stack, choose the Berserk command, and the Berserkers will attack with greatly-enhanced power. The more defense they have, the more attack points they gain by sacrificing all defense points.

This virtual studio set is also used in a spider chase scene in "A Bug's Life 2".
The garrison at (2) is manned by some long-ranged Renegade units. Try to use your Bear Riders to rush the shooters, so you won't lose many vulnerable Berserkers.
Right after the garrison, you can see another stack of wolf in the west. This stack is larger than the previous, and it guards an artifact Boots of the Open Road. This artifact is not very useful for Wulfstan, though, because Wulfstan already has the Path Finding (-50% movement penalty) feat. Also, in this mission you will spend the majority of time on paved ground, which does not impose any movement penalty anyways.
Once underground, you have to fight a Necro stack, consisting of Wraths and Archliches. Note that the battlefield contains a 2-tile narrow passage in the middle, so you don't want to have your units stuck for good and make them easy area targets for the Archliches. Fortunately, the Archliches love to waste their turn casting Weakness on the Berserkers. I don't need to tell you how to kill 6 Wraths with 2 Defenders, right? Plus you can instantly reach the Archliches with another pile of wood. Nice!
After the liches are taken care of, follow the path south to enter the magnificent hall. Keep going west towards Town A. On your way you can easily flag an Ore Pit, and rescue a stack of Skirmishers from Vindicators. The Gem Mine is guarded by Crossbowmen. If you have the Rune of Charge, this is a perfect time to use it.
Town A is guarded by a Renegade hero with a familiar name - Lorenzo. Lorenzo has gained some levels in the meantime, and his army is also quite large.

If you have conserved troops well up to this point, you can win this fight even on Quick Combat. However, you can cut the loss down significantly fighting it yourself. The Zealots will blind your most powerful stack (bears). You can dispel it with Wulfstan's Cleanse, if you acquired it from mission 1. Don't let your Berserkers cross the half-field too fast, or they will suffer huge losses from Lorenzo's Zealots and Crossbowmen.
If you are low on mana, and have quite a few good difference-making magic to cast (such as Igniting-Fireball, Mass Haste / Righteous Might / Deflect Missile), there is a mana well at (3), with a easy-to-flag Sawmill half way. You only need to defeat a small stack of Zealots to gain access to it. Alternatively, you can directly go north after the Ore Pit on your way in. After flagging a Dwarven Warren, go west and you can see another mana well, plus a hidden boost at (5)... more on that later.
These round trips cost you several days, but you can still meet the 2-week deadline easily. Another good news is that Lorenzo will not hire from the town at all, so you can attack him after Day 1, Week 2 and still hire two-week growth of troops afterwards.

After taking Town A you get a new objective - to liberate all Dwarven creature buildings within two months. They are the little squares on the minimap, except the Dwarven Warren (to the north) is actually a random-resource mine.
Starting from your town, you now have two months to explore in different directions. You can probably get everything done in just one month, though. Here comes a list of the more important things to do:
- Hire lots of Skirmishers and (Black) Bear Riders. They are very useful in this mission. High-tier creature buildings are nice to have for the mission boss. You will have more than enough cash to hire them all.
- Flag both Sawmills and both Ore Pits. You may as well flag all the other mines on your way. The Crystal Cavern is useful for Thane (tier-6) building. You will be short of Sulfur, but there is no Sulfur pit. Hope for the best on the random-resource mine or trade for it.
- Build a Capital ASAP (requires lv-15 town), gives 4000G / day.
- Flag all gold mines. There are 4 in total, marked by yellow Gs above. There are no sweet reward for completing this side quest, but more cash is always welcome.
- By the end of the mission, try your best to advance your Light and/or Destructive magic schools to Expert level (Rune Magic as well if you can), and max your Magic Guild. 50% you can get the Resurrection spell, plus Armageddon or Implosion.
You will see nothing but Renegade units guarding the creature buildings and mines - Zealots, Battle Griffins, Vindicators and Crossbowmen. Zealots give pain, but Crossbowmen are relatively easy when you rush them with Bear Riders + 1 wood. Griffins can be easily blocked with a bunch of 1-unit Shieldguard stacks. The slow Vindicators are ridiculously easy.

In the NW region of the dungeon, there is a skeleton lying on the snow (4). You might pick up something interesting, or nothing at all.
There is a well-hidden chest lying in the middle of some strange murshroom landscape at (5). On my way there, Wulfstan was suddenly surrounded by mysterious green gas. I thought he was poisoned, but he didn't lose troop or anything. On the other hand, his Morale and Luck are all boosted to 5, and the effect lasted through the entire mission !! This is some crazy boost!
If you feel like trading troops for an artifact, there are optional surface areas blocked by nasty creatures. The two-way portal at (6'), which links to a small opening of (6), is guarded by Fire Elementals (shooter). The two-way portal at (7'), which teleports you to (7), features Water elementals (caster). The stairway at (8') takes you to 8, leading to a Tomb of Warrior (temporary morale penalty for one artifact), but you have to bear through Phoenixes. They are all completely optional.
Steadily build up your town, gathering troops and learning new Runes and Magics. As soon as you occupy all creature buildings, a new objective is triggered - to defend against another Red Hero. (guess who? Hint: These are only two full-time Renegade heroes so far.)
Andreas' army actually grows weekly, roughly at the same rate of a full Haven town's weekly production. For example, you will face 16 Champions by spawning him during Week 4, but you will see 20 Champions when he spawns in Week 5. Fortunately, Andreas has been demoted down 10 levels since your last encounter with him in the Freyda campaign. There will be more powerful Andreas and Lorenzo coming ahead, though.
By the way, the level cap of this mission is set way too low. I reached level 16 just two battles after defeating Lorenzo!

Gimme back the innocent (and not so bright) Lady Isabel!
| Comments (13) | Add comment |
Page 7 of 23