 Jorgen: "Wait a second... isn't Slava wearing full-plate armor?"
CLASS
While the game intro movie suggests that Anton is a Paladin (Might + Tear), we have the luxury to build Anton differently. Since we already had a good time with a magic Anastasya in the Necropolis campaign, here we will make Anton to follow the Might path, just to try something new.
 The Might path plays very differently from the Magic path. Without those versatile spells such as Time Stasis, Blind, Meditation, Summon Elemental, etc., we will have to carefully plan our expansion path in order to avoid any difficult opponent (and lose a good chunk of our army). Fortunately, most Haven units use Might Power to attack, so the damage output will be quite stellar even if we end up with a smaller army. And if you pick your opponent starting from the weakest, you will hardly lose anything from the beginning to the end anyway.
The Tear path sounds like a rational choice for Anton, since it focuses on defense and healing, definitely the keys for unit conservation, although foregoing the Blood path's damage bonuses also means Anton will more frequently get hit. Besides, Paladin's hero special ability (Martyr and Divine Justice) are not very useful (if you find them useful, you are taking too much hits!).
This walkthrough will actually make Anton a Vindicator (Might + Blood) on hard difficulty. While forgoing Counterstrike III (counterattack before being attacked for up to 3 turns) is disappointing, it really looks like overkill for easier battles that do not drag over 3 turns. Besides, going Blood also grants Anton two useful hero skills - Anathema and Hour of Judgment. The former is a decent mass debuff. The second is a one-turn-only 40%+ damage boost. If you anticipate action during a particular turn, bring out the judgment hammer! In addition, there is one very good Dynasty Weapon to convert increased damage into increased healing - Arache (obtained from Necropolis mission 1 - this walkthrough follows the order of campaigns as presented in the game)! At level 4 (requires 3.5M EXP), all friendly creatures will carry a constant Life Drain, converting 15% of their dealt damage into healing that far exceeds your own healing spells. Wow!
Note: Currently (patch 1.2), Arache's 15% Life Drain is still bugged so that it could drain a lot more than 15%. More like... 1500%. Using this weapon above level 4 instantly turns your campaign into a farce (unless you are battling undeads). Let's hope it gets corrected soon.
UNIT CONSERVATION
The core of unit conservation especially for a Might hero is to only fight a battle when we can win with no or little loss. But will the AI outgrow us while we wait to get more army? The simple answer is NO as long as you don't purpose camp for several game months. There are two kinds of scripted AI armies in Heroes6:
(1) Stationary army (boss and mini-boss fights). These scripted armies do not grow at all, or grows by a fixed percentage every week. These armies can be much larger than yours if you face them too early. However, when you come back a few weeks later with a much more buffed force, you might find the challenge completely non-existent.
 (2) Raider army - these are the heroes who invade you again and again. The AIs actually have nearly unlimited resources and army pool for these guys. So whenever you beat one down, another (usually the same guy) will re-spawn with the same, if not a little more units. They could split away some units from a scripted army, but not much.
From experience, if I attempt a rapid expansion, I am destined to run into very tough scripted armies that are intended for a lot later. However, if I clean up the town area every time after taking a town or fort, I am usually very ready for the next challenge when the new week's reinforcement joins the army. Blackhole really wants us to clean up those neutral stacks in the area. My mission score actually won't get hurt too much thanks to an ungodly kill/loss ratio.
And don't forget to use the special ability Guardian Angel to absorb the counterattack. This almost feels like cheating.
ABILITIES
What are the good abilities for Anton? Based on what I read and experimented, here comes the wish list. Welcome to experiment different abilities and share with us!
Unit conservation tools
- Reinforcement I, II. Awesome for daily encounters. Currently (v1.1.1) it is bugged so don't use it when the stack already suffers casualty, or you will lose those units forever.
- Heroism, Mass Heroism. A lot of your damage prevention comes from the Guardian Angel special ability (invulnerable for 1 turn), which refills quickly upon high-morale triggering. In earlier missions, the extra morale from the mass version can make a big difference, and you also gain Blood reputation from each shouting.
- Heal and Regenerate. Only used in tough fights. In daily encounters, healing will be handled by Sisters/Vestals (Tier 3) - remember to split them into at least 2 stacks to get better coverage. Mass regenerate could be useful, but Mass heal is not necessary.
- Tactics I so your Marksman can be deployed to a corner, and, along with your Vestals, protected by Praetorians. Later on, you might want Tactics II so your Blazing Glories can instantly slap down two stacks (along with Cleave) to open a battle.
Boss fight buffs/debuffs
- Mass Inner Fire (Fire magic). Very powerful damage buff. Useful for later missions, where you actually have extra mana to spare. You really don't need Mass Stoneskin, as your Might Defense will be godly anyway. (You do lack in Magic Defense, which could be a problem in the campaign final boss fight. But sadly there is no mass buff that improves this category.)
Passive abilities
- Logistics, Path Finding. To speed up the expansion.
- Archery I, Counterstirke I, Giant Slayer, Rampage, Cleave. Increase damages dealt.
- Parry, Resilience. Reduce damages taken.

CREATURES
A Might-oriented Anton has a solid army especially powerful on melee. No particular unit stands out as the primary damage dealer (as they are all pretty good).
Sentinels/Praetorian (tier 1). They are best used as damage soakers, standing beside multiple important stacks to take part of the damages dealt to them. The upgraded variety will join the counterattack if the aggressor happens to stand beside them. They are very solid cannon fodder, but not a high priority if you still have higher-tier creatures to hire.
Crossbowman/Marksman (tier 2) are the only official ranged units for Haven. Being a low-tier creature, its effectiveness is nowhere near the Liches or the Spiders, but when your Might Power gets very high, they again become your damage leader. While suffering no ranged penalty, they don't perform particularly well during castle sieges due to wall shielding. Probably for this very reason, Blackhole robbed the AI of their wall-building ability in most missions. That really feels like cheating! The upgraded Marksman are notorious for hitting friendly units with their piercing bolts. So start them at the front corner of the battlefield. Be very careful while moving around your melee units this turn because your Marksman will shoot quite early next turn.
 Sister/Vestal (tier 3). These ladies are the army's primary medics in most battles until your Arache reaches level 4. They are popular gang violence victims, so always guard them with your Praetorian stack (then the AI will very predictably go after unguarded Griffins). In most battles you can split the sisters to 2 stacks for double healing coverage. Vestals' attack could Blind living creatures for 2 turns, which is extremely useful in earlier missions. The success of the Blinding effect is related to the relative stack power - it won't work if they attack a stack much stronger than themselves. They deal magical damage, so don't expect too much from them offensively.
Griffins/Imperial Griffins (tier 4). Thanks to their unlimited retaliation perk, this endangered species is great for soaking up damages. The AI loves to focus on them. So slapping them a Reinforcement II to open up a battle keeps you casualty-free for a long way. (Let them wait first on Turn 1 so they do attract the attacks.) Their Battle Dive also makes them a "ranged unit" every 3 turns, and if you make them wait before diving, they can actually act one more time right after the dive (feature or bug?). Important: Currently (v1.1.1) Imperial Griffins' Battle Dive is broken, so stick with the normal ones. You can still build the upgraded building, just switch to the normal ones when hiring.
Radiant/Blazing Glory (tier 5). You probably remember them from Necropolis mission 1. These ladies can be viewed as ranged units thanks to their teleport and no-retaliation perks. The upgraded version's high movement (8) enables them to hit from very far away. They also cleanse away negative effects on your own units and positive effects on their targets, which will come in handy. Unfortunately, they deal magic damage, so their contribution won't be as big as you wish. But since they go first, you will still see lots of their actions.
Sun Rider/Crusader (tier 6). Their damage is supposed to increase based on how many tiles they traveled until hitting the enemy. However, currently (v1.1.1) only the upgraded Crusader gets the increased damage. Besides, as long as the Crusaders attack after moving 1 or more tiles, their attack does not attract any retaliation. Very powerful indeed.
Celestial/Seraph (tier 7). The angels are back! The make it to the cover again, too! But now that all healing abilities resurrect fallen units, the Angels don't look so necessary anymore. In fact, you should be able to pull through endless perfect victories without them anyway by splitting up the Vestals. In this campaign, you won't be able to even use them until mission 3, and no Seraph until mission 4.
UNIQUE BUILDINGS
Haven towns can build an "advanced market", which is essentially an artifact shop. Six randomly selected artifacts will be put on display every time when a new save file is loaded (cough). This little building gives Haven a unique advantage - we can browse the artifacts as much as we want until we see something worth the investment. Specifically, we are looking for the following top items:
Emerald Yumi Bow (20000, Off hand). This is the "upgraded" Unicorn Horn Bow (which is useless for Haven, by the way). Ignores range and obstacle penalties. Marksmen deal full damage on those inside the wall (although the game still shows you the broken arrow icon). Massive, massive damage! You have to see it to believe it. You probably only need to buy it for mission 2's optional boss, though.
Gauntlets of the Cyclop (16000, hand). +8 Might Power, which is more than any other gloves in the game. Your Griffins, Marksmen, Riders, Praetorians and Angels will all thank you for it.
Ring of Haste (16000, finger). +10 initiatives to units. Free and powerful Mass Haste!
Crest of Honor (16000, pocket). +8 Leadership for more Guardian Angels.
The other unique Haven buildings are nowhere as awesome. Angel Watch seems to only add the extra Guardian Angel gauge within the town's border. The Statue of Revelation has the practical function of revealing some fog of war. But if you are reading this walkthrough, you will know what's in the dark anyway. The Choral of Believers, which gives battle bonuses in the town's border, is too passive. (Those invading heroes will be more like pests than threats.) Finally, the Resurrection Altar, revives only tier-3, -6, and -7 units. The building is more like a "life insurance" package - just in case. Better be more careful in battles and save the cash to buy more units.
Haven Campaign Mission 1
Level cap: 10
Difficulty Index: 2/6
Last updated: December 20, 2011 (patch 1.2)
WALKTHROUGH
Dynasty Traits: The Acclaimed Leader (Iron rank) Dynasty gives +5 morale after a perfect victory, which propels the happy circle of more Guardian Angels and more perfect victories. Another useful trait here is to increase Core creature growth (Iron rank), as the majority of your army will be Core creatures.
Mission 1 is scripted in a very relaxed way for you to enjoy the tremendously beautiful scenery - your opponents will never overpower you if you follow Blackhole's intention. You can use this mission to practice your troop conservation skills for a Might hero. Being a Might hero doesn't mean that you expect to lose units. Try to start the battle with Reinforcement on the enemy shooter's favorite (Sisters, then Griffons), follow up with Mass Heroism, and use the ample supply of Guardian Angel ability to soak up counterstrikes.
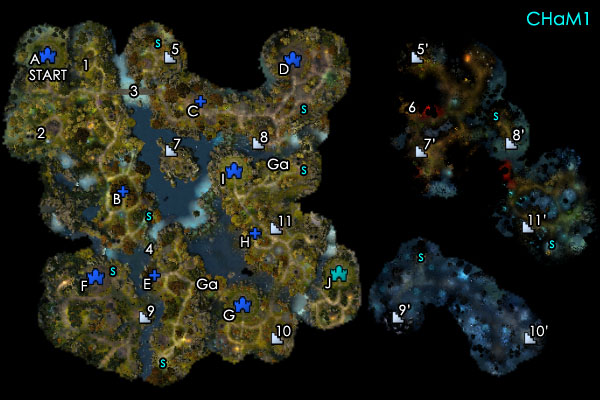
 You start in the NW corner of the map in front of Town A. This is a peaceful neighborhood with a few stacks of friendly creatures that will join you either for free or for some affordable prices. You can mouse over them to see if they are "friendly" (willing to join) or not. Flag the Sawmill, pick up the Sisters to the east, and go north to flag the Ore Pit (1). There is another group of friendly creatures just north of the Ore Pit. Before trying to take the next area, there is a small area directly south of Town A, where a creature building can be flagged at (2). You should be able to do this before the end of Week 1.
Next head south down the road with the conflux with your week 2 creatures and take/flag everything on your way. Before the end of Week 2, capture Fort B and the creature building southeast of the fort. You should be able to pick up some Lightning elemental after clearing a Ruin. The elementals are pretty helpful early on. Throughout the campaign, you will have more chances to recruit various creatures by clearing such structures.

After securing your home base, you now have a choice of where to go next. You can either cross the bridge at (3), or cross the river at (4). Blackhole obviously hints you to cross the bridge to the north, because the stack guarding (3) is much weaker than those guarding (4). Also, the enemies beyond (4) are much tougher than you at this point, although in my first run I accidentally ran them over with a Magic Anton (not possible with Might).
Let's follow Blackhole's intention: go north and cross the bridge. The defending neutral stack should be merely Trivial compared to your power. From here, you again have a choice: you can either go east to conquer the Orcs' Fort C and Town D first, or go north to solve the Griffin quest first. It doesn't make a huge difference as both of them are quite easy. Let's pick up the Griffons first since they are more fun to use than the low-tier trio. Head down the stairs at (5).
 The underground area (5') has a few attractions. There is a friendly stack to the east to pick up, a gold mine to the north for flagging, but most important of all, the little mad-or-desperate thieves who stole the Griffin eggs at (6). You also get a lot of Blood/Tear points. (By the way, if you manually fight every fight and frequently use the corresponding Blood/Tear ability, you should be able to reach the first level of Blood/Tear before the mission boss fight.) After picking up the eggs, take stairs (7) to the surface and meet with the Griffons. You get some Griffons to join your army and unlock the Griffin building in your towns.
Completing the Griffon quest also gives you a Might-restricted Dynasty Weapon, the Iron Feather. Since this walkthrough is based on the idea that "increased damage converts to increased healing from Lv4+ Arache", we will not bother with Iron Feather (and this weapon isn't nearly as good, anyway).
BUG ALERT:: A lot of people reported that their Iron Feather disappeared from their Dynasty Weapon list. This also happened to me - twice already! Before this problem is patched (current version v1.1.1), there seems to be a way to make sure any of your new Dynasty Weapons aren't lost: Right after you obtain it, save the game, exit to main menu, go to My Dynasty, and associate this new weapon with a hero. Good luck!
Back track to the underground area and return to the surface using stairs (5-5'). By now you might see a weak Orc hero crossing the bridge (3), trying to invade your territory. Since you likely don't have enough crystals yet to build an Advanced Town Portal in Town A (you might never have to, actually), you can camp a secondary hero with all your new week's growth in the town. The enemy hero is likely to back away from Town A, but go after Fort B. In my game, Anton made his way back just in time to reclaim Fort B before another new week comes.
Let's finish the weaker half of Orcs (Fort C, Town D) now. With all your accumulated units, there should be very little resistance. Flag/collect everything along the way. You can descent from Stairs (8-8') to collect a stats boost, too. The Arena nearby may be too tough for you right now, but you can always return to it later (the neutral stacks in the Arena do grow exponentially like others on the map, so don't drag too long.)
 Now we can cross the river at (4) and take on the stronger half of the Orcs (Fort E and Town F). Be prepared to see two fairly-powerful enemy heroes - these are probably the toughest fights of this mission. If you are just a day or two from getting the next week's growth, maybe it is a good idea to wait for these extra days. Just fight more neutral creatures to pass time. Besides, you might have the rare and exciting opportunity to defend Fort E if the AI thinks he has a chance.
After capture Town F, two gates (Ga) that separate you and the Haven faction are opened. Although you may expect invasions, in my game, I did not see any enemy heroes charging out. The opposing Haven faction has three Towns (G, H, J) and one Fort (I). At this point, the garrisons might be too large to handle. So take a week or two to tour your newly acquired territory, flagging/collecting everything. In terms of mission score, you can afford the extra time as long as you don't lose anything to neutral creatures.
You can also descent to an underground passage using stairs (9-9'). Other than a stat boost and interesting scenery, there is nothing much of interest. You can follow the watery passage to emerge in the enemy Haven's territory at (10-10'). However, you might be better off using the paved road on the surface. When you finally have enough units, you should be able to sweep Town G, Fort H, and Town I in rapid succession.
Almost done. There is one more underground area at (11-11'), where a LARGE group of Marksman waiting to join you. (The friendly stack also grows with other neutral stacks. So the later you claim them, the more you get!) Also around this time, I was able to buy the Emerald Yumi Bow, for 20K. My bloated Marksman stack could one-shot almost any stack from now on, which makes the rest of the battles jokingly easy.
When you are ready, gather all you have and crush the boss defending Town K. He is not particularly powerful. But he will be back.
