Kristo's School of Quality Mapmaking
I originally wrote this school for use on my Heroes II page, and some very good maps came out of it. Unfortunately, the quality of some Heroes III maps has been lacking in my eyes, so I think it's necessary to adapt it for Heroes III. Please feel free to This email address is being protected from spambots. You need JavaScript enabled to view it. if you have any questions. All the pictures used here were taken from various maps that I've made.
 Utopia of Greed
Mapmaking, in my opinion, is as much art as it is designing a challenging and fun scenario. Personally, I spend way too much time on the art part and thus my maps take forever to finish. (which would explain why I've only made two maps!) If you look at the maps that came with the game, you'll notice that each of them looks as though the land could actually exist. This is the biggest key to a high quality map, unless you're going for one of those wacky-looking "maps of impossibility", in which case the weirder it looks, the better.
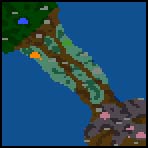 Terra Firma
Step One: Draw the map
The very first step in any map design is drawing the landmass itself. Anything square looks too "man-made" so be sure to make any islands/continents have jagged and irregular edges. Do this even in divisions between two types of terrain. The more random it looks, the better, as it looks more natural. If you're planning on a two level map, do the subterranean section now too. Don't skimp here.I've seen some maps with an excellent looking top half, and then the underground section is a couple of big squares.
Follow the same rules here as you would for the topside. I advocate limiting yourself to the underground terrain type and water for the subterranean half of the map, although it's not absolutely necessary. And, if you have Armageddon's Blade or Shadow of Death you can use the random map generator for this. This is probably the easiest way to create a landmass. Let the computer generate one for you, erase all the objects, and edit the land to your own tastes.
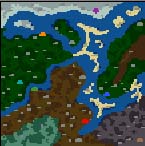
 Unfinished Map: Step Two
Step Two: Place towns
After drawing the map, you need to place most of the towns, owned and unowned. It's not necessary to get all of them placed before moving on; just place enough to have a general idea. You'll probably go back and change a few anyway. Try to fit each town to its native terrain, or at least to "user-friendly" terrain.It's usually necessary that all players have an equal opportunity to get started, so placing someone in a harsh terrain would be a great detrement to their survival. Fit the towns to the land, not vice versa. Some town types look better when placed in a small pocket of trees or mountains, but this is purely aesthetics and isn't vital that you do it.
I've put together a collection of map files as an example of how all this works. An explanatory text file is included. Download it here.