 The Wulfstan's Defiance campaign is the first Heroes of Might and Magic V campaign centered on the new faction of the expansion pack. The first maps can be a bit of a problem as you must defend a castle and get familiar with a new hero type and a new kind of magic. Fortunately, maltz comes to our rescue with a great pair of walkthroughs.
The Border Zone includes a basic explanation or rune magic, a list of the new feats with their descriptions and a town building sequence. Since the scenario is about defending a town, maltz tells you from where the attackers come from and what their armies are made of (at heroic). The Ambush is an opportunity to revisit the beautiful Dwarven underground, which you briefly saw during the final scenario of the first campaign. The walkthrough is a step-by-step tour of the underground that also includes a building sequence.
"So far, we have always recommended taking the creatures as starting bonus, but we will make an exception here. Although 10 black bears sound good, they are insignificant compared to your large starting army. They also don't merge with your existing Bear Rider stack, thus leaving less room for your 1-defender stacks."
We're halfway through the Hammers of Fate campaigns already. More articles will be published in a couple of days.
Welcome to the new white world! The second campaign in Hammers of Fate expansion features the long-anticipated Dwarf race (Runemages). Here are a few quick facts about this race:
Primary Stats: Spell Power, Defense
Pros: Powerful skills and Rune magics, High unit defense
Cons: Low Unit speed and initiative, generally poor attackers
Although Dwarves are typically Might heroes in contemporary mass media and games, here in Hammers of Fate they are more mages (high Spell Power) than fighters (low Attack). Of course, if you are patient enough, you can restart the mission until you get alternative stats growth pattern, and build them into other interesting types of Dwarves.
Note: Random seed used in stats point distribution is decided at the beginning of a mission. If you are not against using the console code, you can take a quick look at what is coming ahead.

Rune magics are not conventional magics. They have separate structures, containing another set of "spells" to be casted when a unit acts, so it does not require hero's action. Not mana, but resources are used to cast Rune magics on units. Most of the Rune magics are supporting magics, and some of them can be very powerful if used at the right time. In the following walkthrough I will attempt to cover the more useful ones.
Note: Rune magics are severely bugged in Patch 2.1. All but two end up inactivated forever. If you are using Patch 2.1, spend the skill points elsewhere.
Besides, there are quite a few special feats worth trying for a Dwarven Runemage. Here are a few very interesting ones:
- Empathy (Leadership): Every time your unit gets a high morale, the hero's ATB bar moves up 10%. This can be potentially the game-breaking feat! Is it worthwhile to trade 12 skill points for it? Maybe yes, because there are other nice Dwarven special feats in Enlightenment. However, the hardest part in this campaign comes in the middle, and you better pick something that really matters. By the time you finally get Empathy in later missions, you probably won't feel a good difference.
- Swift Mind (Logistics): The Dwarven hero starts the battle with a 25% bonus charge of the ATB bar. This feat usually allows the Dwarf hero to act first. Works great if you have some nasty magics to cast. The difference is not very large in a tough (and long) battle, though.
- Tap Runes (Enlightenment): You may recall the fight between Markal and a manually-optimized Godric in C3M5 of the original game. Spirit Link made a large difference there. Besides Spirit Link, this is the only other way to recharge mana during a battle. Very useful in a long battle where your mana is likely to run out. Each mana recovery = 1/2 of your Knowledge points. If all 7 stacks cast some Rune magic, your hero gains a lot of mana back quickly!
- Mentoring (Enlightenment): Raises another hero to 25% of the EXP the Mentor has. Due to the insane EXP requirement for later levels, you can easily have a lot of level 20+ pupils later in the campaign. For the future 10,000 years only the Siths can match this deal! However, since you are not going to fight with pupils anyways, this skill is not a big boost in the campaign.
- Ignite (Destructive Magic): The target receives more fire-spell damage after the original cast, for 3 rounds. The game description is misleading here, though. The Ignition damage is not "100% for the next 3 rounds", but only 33.3% to be added up to 100%, over the next 3 rounds. Even though this is only 1/3 as good as it sounds, they still help in a long battle.
- Dwarven Luck (Luck): Double Magic Resistance (30%). This is cheating against Warlocks and Wizards! However, in this campaign you only fight Haven heroes.
- Absolute Protection (War Machines, Logistics, Destructive Magic, Defense): Enemy attacks are always unlucky (1/2 damage). Getting hit is never this enjoyable especially for a sadistic Dwarf. However, same as all other ultimate abilities, you can't get it when you most need it, and you can customize a much better build otherwise.

Having 3 copies of the No.7 chromosome, Dwarves end up with a short statue but awesome Magic Resistance.
Destructive Magic is a necessity on heroic, which this walkthrough is based on. A Runemage's spell damage is far below than a Warlock's, but in mission 3 your starting army is so weak and your opponent is so tough, that there is little chance to win without damages contributed by your hero. Light Magic is always very useful in a campaign, for the sake of troop conservation. These two magic schools happen to be featured in a Fortress town (same as a Sylvan town, duh).
In my game, I picked Destructive, Light, Leadership and Enlightenment. It worked out quite well, but I was one point short of Empathy and 2 points away from Swift Mind when the campaign ends. This campaign has only 3 Witch Huts in total, and the neutral stacks in the last mission are way too small even on heroic. If I replay the campaign later, I will swap Leadership for Sorcery, go for 100% magics and fireball my way in and out.
Mission 1 - The Border Zone
Map Size: Small
Carry Over: Wulfstan
Level Cap: 12
Difficulty Index: 2/5
Primary Objectives:
- Hold at least two towns
- Build a certain army (300 Shieldguards)
- Wulfstan must survive
- Build a Runic Shrine of first circle
February 22, 2007, Patch v2.1
Your main hero is Wulfstan, who made an appearance in the previous Freyda campaign. Wulfstan starts with Logistics and Path Finding, which is very helpful in a campaign with quite a few "must do this within X days / weeks" objectives.
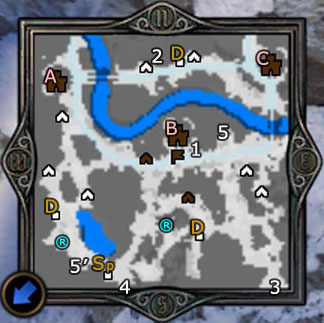
Three undeveloped towns are already under your control (A to C), and Wulfstan is outside Town B, which is one-level higher than the other two. Your job is to defend these towns against Red Haven armies, and build up a proper army in the meantime.
You might recall a similar situation back in Findan's first (Sylvan) mission. Now, you have 3 towns (not just one) to start, and the invading heroes will be significantly weaker. The neutral stacks featured on the map are very low in level, and your army will be dominated by low-tier units, too. There are also far less stat boosts (just two) to visit, and no tough Biara in the end. This is "C5M1 Lite"!
Actually, the mission ends whenever you gather 300 Shieldguards (upgraded Defenders). Since you have 3 towns, and can flag up to 3 Defender creature buildings (marked by the coffee-colored Ds), you should be able to achieve this goal during Week 3-4. The Caravans are a great help.
I would recommend the Bear Rider as the starting bonus. They have great defense and HP, making them very effective damage-absorbing tanks (without dying) for your first several fights.
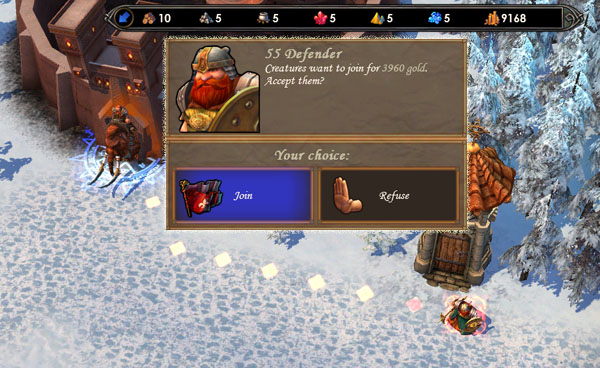
The larger the power difference, the more likely a neutral stack will offer to join (for money).
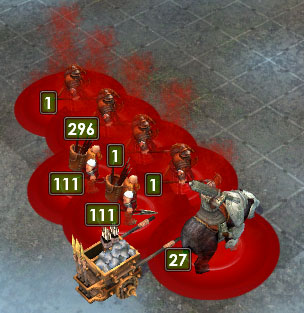
Wulfstan starts outside of Town B (1). First, let's get Wulfstan back home and build a Shield Barracks, to recruit 18 Defenders. Right outside your starting location, there is a stack of Defenders (See the picture above). Approach them and see if they would like to join you (for money). On heroic, whether they join you or not makes a HUGE difference. The neutral stacks in this mission are quite large to start with!
Just south of Town B, there is a stack of Peasants. It is a good starting point to practice 1-unit stack tactics. Essentially, you want these 1-unit stacks to:
- Block the advance of un-targeted enemy stacks, and waste their next turn by getting mauled by them. You can easily block large creatures with a couple of 1-unit stacks.
- Attack your target first, and die from a powerful retaliation, so your powerhouse stack will not be retaliated when their attack takes place.
- Protect your ranged units (fill in the holes) when your real stack goes away fighting.
- Ensure regular chances for high morale bonus when you only have a few stacks left.
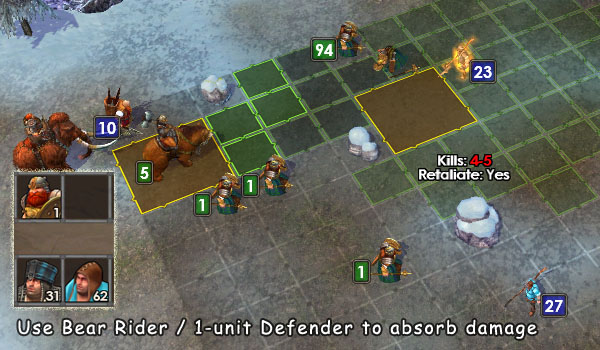
Idealy, your tank will absorb so much damage so they will almost die, but won't.
So what should you build in the towns? Here is a brief list of the most useful buildings for this mission:
- Shield Barracks, for a lot more Defenders. They are the powerhouse in this mission because the opponent usually has very low defense. Get one Shield Barrack setup in each town before the end of Week 1. Upgrade the barrack in Town B to Shield Hall, and upgrade as many Shieldguards as you can before fighting first Red Hero (around 11 Days into the game).
- Blade Barracks, for Spearthrowers and Skirmishers. Build them right after the Shield Barrack as soon as you have enough resources.
- Town Hall, for more cash. Requires a level-6 town. The investment pays off after 4 days.
- Citadel (requires Fort first) in Town B only. 50% more troop production, and extra defense against invading heroes. However, you probably won't use it except for the first fight.
- Runic Shrine Level 1. This is a secondary objective of the mission, with no reward. Some rune magics are useful, and you should learn them when you still own towns.
- Magic Guild (Level 3 in Town B, Level 1 in others): What to do with that high Spell Power? Cast some nasty magics! Your aim is Fireball (Destructive) and Deflect Missile (Light).
On your second day, build a Mage Guild Level 1 in Town B, and make Wulfstan visit it. You should be able to learn one damaging spell. (If not, try another town.) A simple Destructive spell can help you further reduce unit loss.
Your next priority is to flag the Sawmill and Ore Pit at (2), because Wood and Ore (especially Wood) will be in shortage. You can make a round trip through Town A and C, and back to B, to collect the starting armies in the northern towns. The tier-1 neutral stacks guarding the Sawmill and Ore Pit there are completely random. You may be greeted by incompetent Peasants and Conscripts/Enforcers, or you may get simultaneous-face-slapping Sprites and poison-you-to-restart-mission Assassins. Flagging these two mines will make your victory much easier, but it is not required.
After the round trip it is pretty much your freedom to explore. Just make it back to Town B to face the Red heroes that spawn weekly. Here is a list of them in my game:
Vittiro
- Spawn Spot: 3
- Time: End of Day 1, Week 2
- Lv 1
- 20 Crossbowmen
- 8 Battle Griffins
- 90 Enforcers
- Spawn Spot: 4
- Time: Beginning of Day 1, Week 3
- Lv 3
- 20 Crossbowmen
- 15 Vindicators
- 80 Enforcers
- Spawn Spot: 3
- Time: Beginning of Day 1, Week 4
- Lv 5
- 40 Crossbowmen
- 30 Battle Griffins
- 8 Zealots
You can reveal Vittiro's spawn area (3) with the Hut of Magi just beside Town B. Spawned heroes require 4 days to travel to Town B.
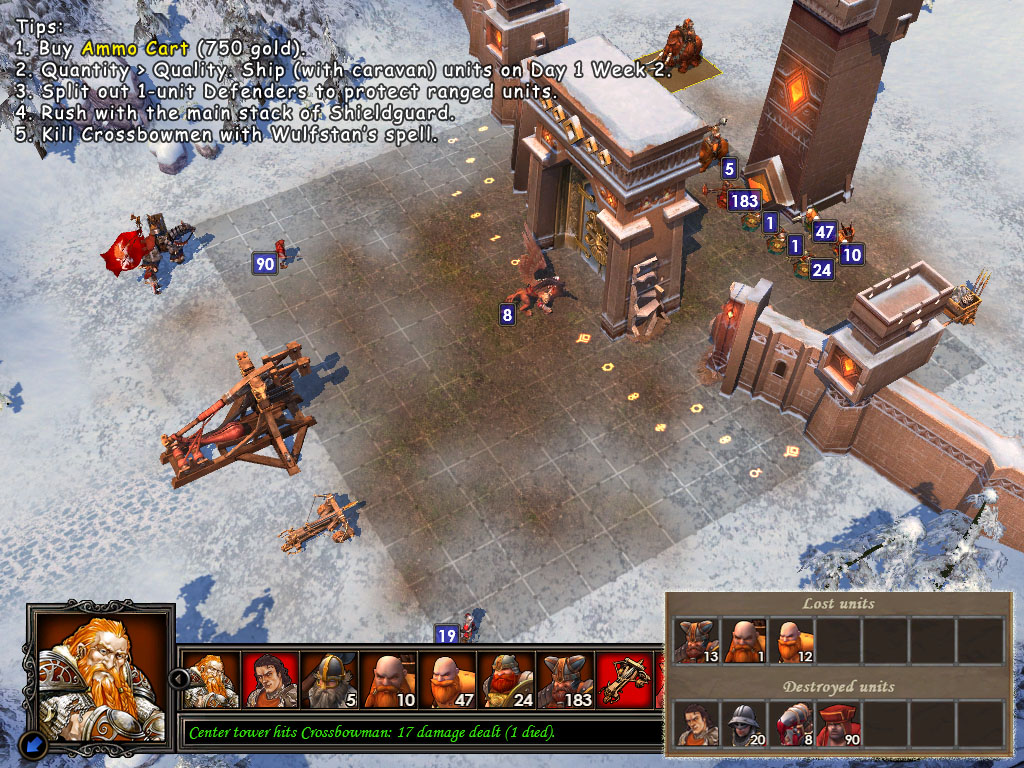
When Vittiro gets close, get back to Town B and defend. Purchase an Ammo Cart so your shooters don't run out of ammos in 10 seconds. Neutralize the Crossbowmen as fast as possible (spells, flying spears), and use your main Shieldguard stack for the rest.
After handling Vittiro, you pretty much have the victory in pocket. Meaves is even weaker than Vittiro. Dougal is quite powerful, but by that time your army should be large enough to run over Dougal with little trouble.
There is a one-way portal entrance at (5), just east of Town B. It takes you to the SW corner of the map (5'). There are two creature buildings nearby. However, you will have to walk back from there. Don't take this portal when the Red hero is on the way! There is another pair of portal, but they are not really saving you any time.
The mines are not really worth flagging if they are defended by shooters. You can already pick up lots of resources on the ground.
Before collecting 300 Shieldguards and finish the mission, you can level up Wulfstan to the level cap (took me a total of 20 battles since Day 1). On heroic, you should concentrate the skill points on Destructive and Light magics. You will need them very soon.
