

By Lwaren, Lord Evenshade
--Preface--
Welcome to the Cartographer's Tower. You have entered the humble abode of a cartographer and watcher of the ways of the world, and it is I, Lord Evenshade, that will attempt to guide all comers along the difficult yet rewarding path of creating maps in the varied and fantastical realm of Axeoth.
This section has three primary goals. First, learning to use the Map Editor for Heroes of Might and Magic IV is essential. Full of new and unusual wonders, the Heroes IV Editor may at first be a challenging medium to overcome. Secondly, I will share some of my techniques for creating maps with ambience, intrigue, and in some cases beauty. Making a map that sets the stage for mighty events can be more difficult and sometimes more enjoyable than creating the layout for the story itself. Finally, I'll describe some of the processes that go into creating the foundation for single-player maps, multiplayer maps, and intricate story maps.
--Using the Map Editor--
The Basics
STARTUP SCREEN
Always a good place to start. Upon opening the Heroes IV Editor, the very first "dialogue" (the official name for message/option boxes) that appears is under the header of "New Campaign" and gives you a number of options to select from. Please note: you do NOT have to start out making a new map every time you open the Editor. You can simply close this box as soon as you get without making a map by pressing the X in the upper right (as with every Windows dialogue box). The New Campaign options may be somewhat unusual compared to previous Heroes Map Editors.
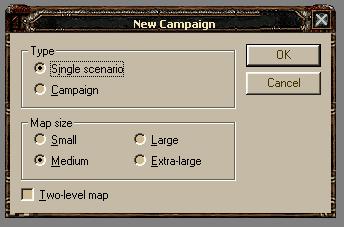
First note that you can choose at the offset whether to make a Campaign or a single scenario. Also, a checkbox down in the left corner allows you to choose whether or not to include an underground in your map. Unlike in Heroes III, you cannot remove or add an underground to an already in-progress map; you have to make the decision at this point -- take it or leave it, essentially. The last choices for this dialogue are fairly obvious to a Heroes player, as here you can choose the size of your map. If you choose to make a Campaign, the size you choose here will be that of the first scenario in the Campaign. We'll deal with Campaigns in greater detail later.
OBJECT PALETTES
Heroes IV, like all other Heroes Editors, has a section of the map separated for use as an object "palette". Note that there are in fact numerous palettes, each of which has sub-sections. The four palettes that appear are Adventure Objects, Artifacts, Landscape Objects, and Characters.

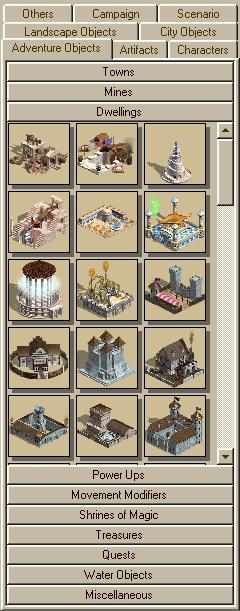
-Adventure Objects-
Possibly the most important palette in the eyes of most gamers and mapmakers, the Adventure Objects palette includes all those objects which you visit on the map (excluding creatures and artifacts). Towns, Mines, Dwellings, Power Ups, Movement Modifiers, Shrines of Magic, Treasures, Quests, Water Objects, and Miscellaneous objects can be found here. Take some time to shuffle through these and see what the various sub-sections have in them. You may also note that a number of objects have two facings; they are indentical in every other respect. Also, without any modifications done to the palettes (dealt with later) the only towns found in the Towns section are Fort-level.
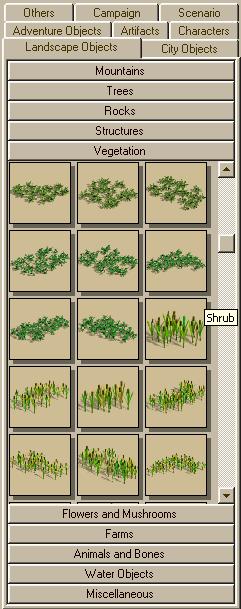
-Landscape Objects-
This is what gives your map its feel and flavor. One thing that has to be kept in mind when making Heroes IV maps is that, at this time (before the addition of The Gathering Storm), there is no copy/paste function in the Editor. This makes placing terrain at first a very tedious business, as you have to place every mountain, every rock, every tree individually. Eventually, you'll probably develop a fast method of flashing your mouse back and forth from the palette to the screen; still, we can hope that NWC will fix this lack sometime in the relatively near future. A number of nice surprises await in this section. First off, Heroes IV has added "animals" to the scene, everything from tropical birds to deer, crocodiles and whales to chickens and pigs. Also, there are quite a few piles of bones to choose from; icebergs that reflect in the water; waterfalls; burned-out town buildings; and a wide selection of farms, rocks, and vegetation. Heroes IV has an incredible wealth of "eye candy", and effective use of this bounty is one of the many tricks a mapmaker should work on.
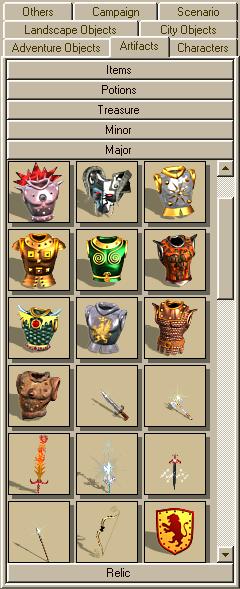
-Artifacts-
Heroes IV may lack in AI, but in other areas it is wealthier than Solomon. Artifacts, for example; the heading of the palette is pretty obvious, yet inside you'll find almost any artifact you could possibly think of. First off, Items are a new introduction into the Heroes setting; mundane equipment with no special magical properties whatsoever such as Longbows, Plate Mail, and Shields. Next is the newly-introduced Potions section, which add a bit of magical flavor to even the most might-based battles. Treasures are the weakest of the "ordinary" artifacts, followed by Minors and Majors. Relics, however, deserve a special clasification. They are similar in many ways to the Ultimate Artifacts of Heroes II. As Heroes IV also has the Grail, it can therefore be said that Heroes IV has the largest and most incredible artifact selection of any Heroes game (especially once The Gathering Storm is released, adding combination artifacts).
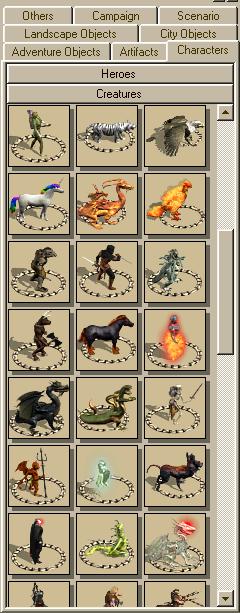
-Characters-
Divided into two very important sections, Heroes and Creatures, this is the tab you click to populate your map. Every Hero class have placeable male and female versions. Modifying characters will be dealt with later. When you place a creature, you may notice that if you do not assign it a player it will feature an unusual circle of stone-like objects. These serve no purpose except to accent their presence and make them more visible. The same holds true with Heroes (yes, you can place Neutral heroes in Heroes IV!).

TOOL SELECTIONS
The top of the Heroes IV Editor screen has two levels. One is used for the common set of Windows options such as File, View, Tools, and Help (although the last of these is rather useless at this stage of the game's development). The second level is used more often. It includes the New, Open, and Save buttons we're all familiar with, followed by permanently grayed out Cut, Copy, and Paste functions. Next we have Undo and Redo, then Object Properties (grayed out until you have selected an object), Delete Selected Object, View Underground, View Grid, and View Passability. View Underground does exactly as it says, changing the view in the main screen to the underground (if there is one). View Grid and View Passability allow you to see the locations of all the squares on the map and whether or not they can be passed through.
IMPORTANT: In Heroes IV, Heroes/Creatures CAN NOT move diagonally between two objects that have impassable squares touching at one corner. Invariably, this makes forest-making easier to do, but it's easy to make a mistake and provide players with a passage through a place that you had meant to be impassable. Next in line are the Player selector (all ownable objects placed while a player is selected here are automatically given to that player), the Object selector, Object Eraser, and the Terrain placing tool, all of which are rather self-explanatory. Next we have some of the cool new additions provided by Heroes IV. First, we have the Road Placing tool. In Heroes I, II, and III, roads were straight-line things that were incapable of completely covering an entire square. In Heroes IV, this is not so. Roads (Cobble, Stone, and Dirt) may be placed exactly as terrain, making it easy to create a large paved area. Next up is the Rock Terrain placement tool, which comes with the normal Cave walls as well as the new Stone walls that make it possible to create realistic dungeons. Lastly, we have the totally new Elevation tool. Handling Elevations will be explained later.
-Advanced Options-
I highly suggest that for this section, you open your Heroes IV Map Editor and follow along while I point out the various sections. You may also want to stop now before continuing and familiarize yourself with the features I've already discussed, if you haven't already.--
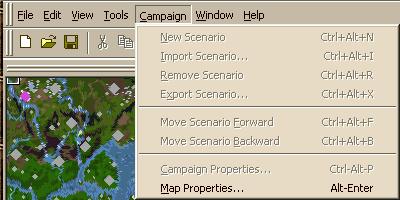
CAMPAIGN/MAP PROPERTIES
Possibly one of the most important window pairs of the Map Editor is that of Campaign Properties and Map Properties. Campaign Properties only becomes accessible when the map you are working on is part of a campaign, in which case the Campaign Properties window allows you to set the name and description of the campaign as a whole. Map Properties, however, is considerably more active throughout the creation of a map. By clicking on Map Properties, you'll have access to a wide variety of options and settings that essentially give your map the difference between one that's alive and one that looks nice.
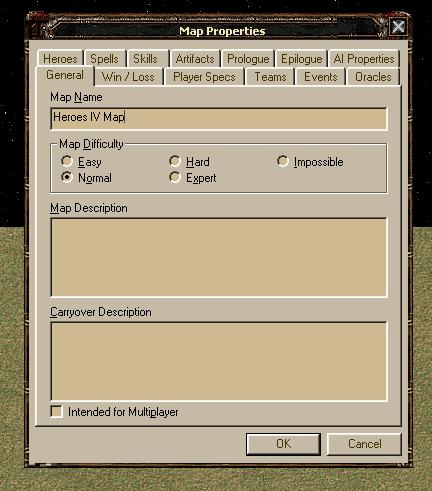
-Map Properties-
The first screen you'll see is fairly similar to its cousin from the Heroes III editor. At the top you have a wide selection of tabs that allow you to do in-depth customization of your map. Below these is the map's name, then the Difficulty selection box, then the Map Description. The Carryover Description is only used when you're making a Campaign, and what you type here will inform players as to what will "carry over" from one campaign map to the next. Currently, the Carryover options are only found in the Campaign Properties window, and at this time there are only two options. This will be explained later. Now, the tabs. Map Properties is broken into the following sections: General (the starting screen described a moment ago), Win/Loss, Player Specs, Teams, Events, Oracles, Heroes, Spells, Skills, Artifacts, Prologue, Epilogue, and AI Properties.
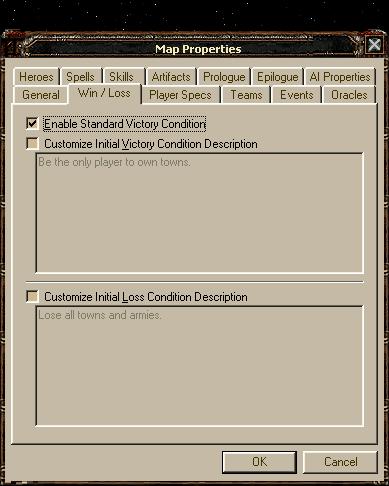
WIN/LOSS -- One of the handy new features in Heroes IV is the ability to type up your own Win/Loss conditions. You can select to Enable Standard Victory Condition, as well as the Customize Initial Victory Condition Description and Customize Initial Loss Condition Description. If you de-select Enable Standard Victory Condition, you'll have to include a script at some point while making your map to provide special circumstances for the Player to win. Otherwise, the players will continue duking it out forever, with no side winning! If you do choose to make a custom victory/loss condition, clicking on the Cutomize Initial Victory/Loss Condition Description buttons will give you a chance to tell the Players what changes there are. At a later point, I'll tell you how to change these descriptions while in-game.
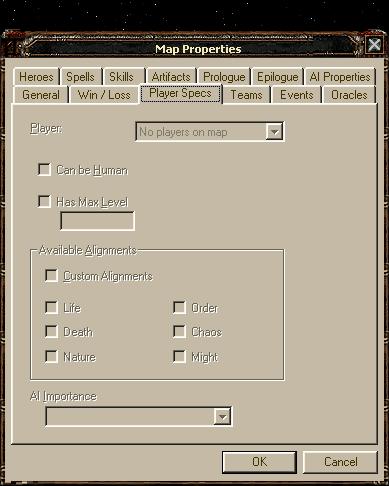
PLAYER SPECS -- A relatively simple dialogue box, Player Specs gives the mapmaker access to information about the various players on the map in much the same way previous Heroes editors have. At the top is a selection box, listing all possible players; after selecting one, you can check a box as to whether or not they can be played by a human; whether or not they have a maximum Hero level limit (usually only used during Campaigns); in situations where the player's town(s) is random, you can use the next selection area to choose what alignments are possible for that player; and lastly, you may choose the importance the AI will brand on that player; vital tends to make the AI more aggressive, normal is obviously what most maps are set for.
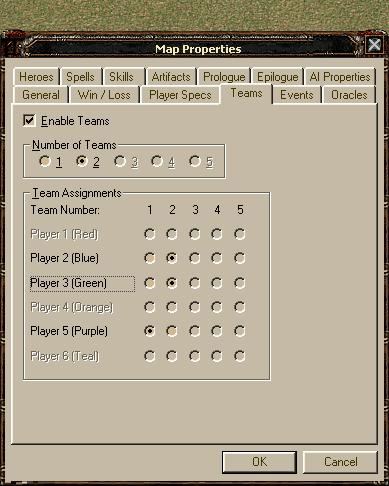
TEAMS -- A fairly straightforward sections. First off, you check the box at the top saying "Enable Teams" and this will allow you to set how many teams are on your map and what players are on them. Obviously, if you do not "Enable Teams", then all players will be against each other.
EVENTS -- This section is anything but straightforward. Undoubtedly the most powerful new feature of the Heroes IV Editor is the addition of a controlled scripting language system, which allows far more in-depth development of stories and quests. I won't go into how to create scripts just yet, but there are a number of important features here in the Events tab that you must understand before toying around with this powerful new tool.
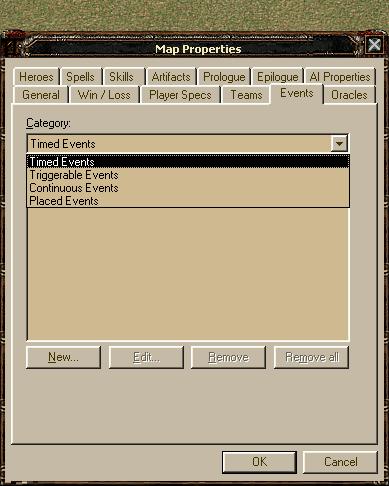
First off, there are four types of events in Heroes IV. First, you have Timed Events (which should be fairly familiar to anyone who has played Heroes III), allowing you to set up messages and scripts that occur on a particular day or as a result of said Timed Event. Next, Triggerable Events, commonly referred to as Triggers, which activate usually as the result of some unseen string of events caused by either a Timed Event or a Placed Event. Triggerable Events are very powerful, and can also be set to trigger when a unit accesses a particular adventure object (see the section on Scripting for more information). Placed Events, on the other hand, are very similar to the normal Events that you encountered in both Heroes II and Heroes III. However, there is an important difference: all Placed Event actions are handled in the Events tab in Map Properties, not as a result of double-clicking the Placed Event itself. Double clicking the Placed Event will allow you to set or select a name (selecting is easier), and in the Events tab under the category "Placed Events" you must then type in the name of that Event. Why it is easier to type in the name under the Events tab first? Because when you type in a name on a Placed Event on the Adventure Map, the Events tab does not recognize it unless you spell that name correctly in the Events tab, as well. If you type in the name first in the Events tab, the Placed Event object will allow you to select that name from a number of choices (i.e., all the different Placed Event names you've created). Finally, you have Continuous Events; these are considered to be more difficult to get a handle on, as the Event itself will continue to check to see whether its conditions have been satisfied. Still, a nicely handled and intricately created Continuous Event can make for some interesting and engrossing stories.
ORACLES -- Here we have the newest rendition of the popular Obelisk theme from previous Heroes games. Oracles come in twelve different colors, each of which can have its own buried artifact. Also, as Heroes IV includes both Relic-level artifacts and the Grail, one might say that Heroes IV includes both the Ultimate Artifacts of Heroes II and the Grail from Heroes III in one, smoothly created format. Once you've placed an Oracle or a set of Oracles, you can go to the Oracles tab in Map Properties and set a variety of options for that particular Oracle color.

Firstly, Oracles have a default Ultimate Artifact (e.g., Gold has the Grail, Green has the Bow of the Elf King, etc.). You can change this, however. The four buttons along the side of the Oracle screen, Add Artifact, Add Material, Edit and Delete are fairly self explanatory. You're going to find that "Material" is the word used by the Editor when referring to what are commonly known as "Resources". You can pile up as much treasure in the Oracle as you want. Lastly, you have to choose how many Oracles of that specific color you want the player to have to visit before they can see the entire puzzle map. And before we continue: once you've placed an Oracle, it is imperative that you place its correspondingly colored "X" somewhere on the Adventure Map. This "X" can be manipulated to increase the radius of its possible random location based on where you placed it. Both the Oracles and their "X"s can be found in the Quests section of the Adventure Objects palette.
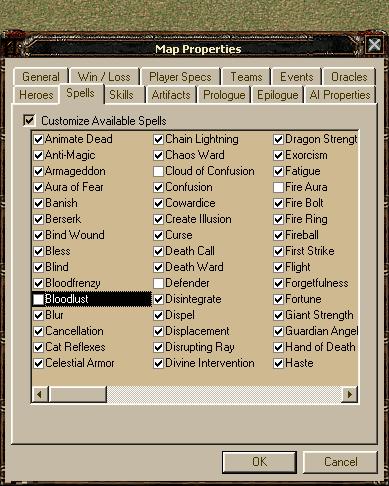
HEROES, SPELLS, SKILLS, and ARTIFACTS -- These four sections are perhaps the most obvious, and don't require much explanation. By clicking on the corresponding "Customize..." box, you have access to which Heroes, Spells, Skills and Artifacts are available in the map. I'm fairly certain that these limits only appear when random chance is involved; if you were to specificly place a skill in, say, a Library, and then remove that skill from the Map via the Skills tab, I believe that skill will still be available in that particular Library -- you can be assured, however, that it won't pop up anywhere else that a choice or random chance is involved. Similar circumstances occur with Heroes, Spells, and Artifacts.
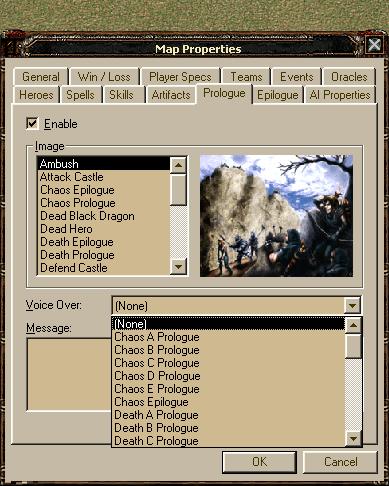
PROLOGUE and EPILOGUE -- Also very simple to comprehend, the Prologue and Epilogue boxes are identical in appearance and very near so in function. Simply enough, the Prologue section allows you to set a picture for the map as well as a message and voiceover (if you've played any of the Heroes IV Campaigns, you'll have seen Prologues and the occasional Epilogue in action). The same goes for the Epilogue, only the Epilogue plays after (I'm assuming) a successful completion of the map. Please note that, like other options, you have to Enable Prologues/Epilogues by checking the box at the top left of the dialogue screen. Everything else is fairly straightforward and self-explanatory.
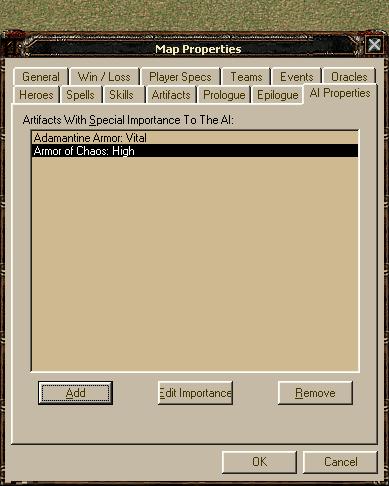
AI PROPERTIES -- Currently a very limited section, this tab allows you to set particular Artifacts from your map that you want the AI to pay close or very close attention to. Click "Add" to add a new Artifact to the listing, and at the same time you'll be asked to provide an "Importance" to the Artifact. High and Vital are, unfortunately, the only two options; Vital being greater than High. We can only hope that more possibilities are added to this section in the future.
There you have it for the Advanced Options! You shall hopefully by now have a fairly good working knowledge of the layout of the Map Editor and the functions of the various sections and dialogues. The next installment of the Cartographer's Tower will include a detailed description of two of the primary resources available to mapmakers who want to add "life" to their maps: the ability to edit object properties, and the powerful and expansive scripting system.
Read full article...