Mission 2 is actually a recycled and expanded map 1, while Irina has to work on the reversed order.
Setting on the Sanctuary "Ha island" ("shima" means island in Japanese), this mission has a lot of neutral Sanctuary creatures that has an attitude of Passive (instead of the usual Hostile). If your army overpowers them, they often join for free or for gold, which you will have plenty. You can beef up your army significantly through collecting these neutral creatures.
Dynasty Traits: Free first generic hero is always good as it provides extra creatures to start a mission. Another very good trait is "Core creature +3", as Priestess and Kappa will be your main damage dealers (now it has become a self-fulfilling prophecy).
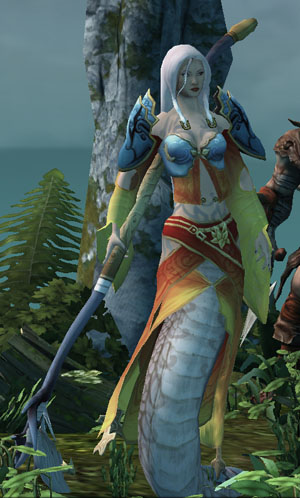
 Sanctuary Campaign Mission 2
Level cap: 17
Difficulty Index: 3/6
Last updated: December 5, 2011
You start outside the last town of mission 1 (Town A), given four weeks to prepare an army to capture Fort C to the south. Before you start picking up resources, hire a new hero, who preferably has Coral Priestesses and Kappa and give them to Irina. You can make the pair flag the Saw Mill and Ore Pit. The creatures surrounding Town A is weak, but don't touch them yet - rush Irina to capture Fort B as early as possible.
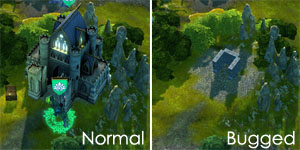 Currently (v1.1.1), there is a bug that makes Fort B disappear (into a "C" shaped remain, see picture to the right) if you do not occupy the neutral fort early but fight the nearby neutrals instead. This happened to my first run of this mission as well. If this bug occurs to you, you won't be able to complete the quest of "capture the eastern fort" and receive the additional units from the tier-6 creature building south of Fort B.
Now we can sweep clean the surroundings of Town A and Fort B. You can send another secondary hero (there will be lots of resource gathering on the sea) to the ocean north of Fort B. What the map above reveals is a good indication of the range where you can find floating resources - everywhere.
A good time to finally push south is to wait for your Week 3's creatures. Defeat the army guarding Fort C and convert the creature building just beside it. You will see the second closed gate (GA1). They won't open yet.
 Kill and collect everything in the area and continue south. You will see a group of Sharks standing in front of Town D. As soon as you talk to them (you can use any other hero who leads at least 1 creature) to do the conversation, a Haven hero spawns northwest of Town D. This Haven army will land on one of the two beaches north of Town D to fight Irina. This fight shouldn't be difficult if you did not push south too early. (As usual, Blackhole likes you to finish one area before moving to the next.) After the battle, Town D is your reward.
Getting Town D also activates quite a number of new quests. Your ultimate goal is to go to Town J and replace Hiroshi, the Teal Sanctuary faction. But you have to first solve a bunch of quests. Let's start with the most important quest - Kirin.
The Kirin quest takes place southeast of Town D at (1), and is essentially two sub-quests combined, the Spring Spirit quest and the Snow Maiden quest. When you complete both sub-quests, the Kirin quest is completed automatically. Completing each quest enables you to build their corresponding structures in towns. Completing the Kirin quest also enables you to skip the last battle of this mission.
 Also, since we are going on the Tear path, these quests do not really involve any mandatory fighting. So you can bring a secondary hero along to run errands and eventually pick up scattered resources. However, the quest givers (the Kirin, the Spring Spirit, and the Snow Maiden) have to talk to a hero who leads at least 1 creature. It just does not have to be Irina. (On the other hand, Heroes travel a lot farther per day if they do not lead any creature.)
The Spring Spirits are behind the two-way Portal (2-2'). Their request is very simple and easy - just march some hero north and cross the stream. This is where you started mission 1! Now you only need to donate 20 wood for their home renovation project. You should naturally have a large excess of Wood at this point, since Sanctuary buildings use lots of Ore.
The Snow Maidens are behind the two-way Portal (3-3'). This one involves a little bit of walking - you have to make somebody walk all the way east to the two-way Portal at (4-4'). Then go south a bit to locate the lost priestess. There are also many resources to be picked up in this area.
There are a few changes happening in the world at the same time. First, two closed gates (GA1) are opened, leading to hostile Teal territory. The invasion never came in my game, but I have heard people complaining about them. Second, there is a one-way portal exit (6') just east of Town D. The entrance of that portal is south from here at (6), east of Town E.
The under-volcano passage (7-7') to (8-8') has also been opened (as there is no longer gas coming out of the dragon's mouth.) If you feel like adventuring, you can use the passage to ambush the Teal faction. But the garrison could be too difficult for you at this point. (Remember what Blackhole likes you to do - finish one area before moving to the next.)
 Town E is the closest and most reasonable next target, but it also guarded by quite an impressive army. The enemy hero there will punish an ill-prepared Irina. I took it with an army including almost 200 Pearl Priestess, some good artifacts and scrolls from Advanced Market, and a secondary hero that bait the garrison hero out of her town. This is probably the most difficult battle of this mission (the rest of the garrisons aren't much bigger compared to this, but Irina will be.) If you find this battle too difficult, wait for another week or two until you are powerful enough.
You really don't want to see the AI's priestess cast Wave of Renewal on themselves or anybody else - they revive a truck load. A useful tactics to disable enemy priestess at a low level is to use Serenity on them: (You need some artifact that boosts your initiative ahead of the enemies'. The Soulreaver staff on level 2 will do the trick.)
Turn 1: Our priestess shoot enemy priestess. Irina casts Serenity on enemy priestess, who loses turn. Turn 2: Our priestess wait, the enemy priestess loses turn and recovers from Serenity, our priestess shoot enemy priestess Turn 3: Our priestess shoot enemy priestess.
Now if you have a blind scroll, you can disable the enemy priestess for two more turns. And when Blind is over, your Serenity can be casted again. Later on, your Serenity is extended all the way to 6 turns, making it extremely powerful against a single horror stack. If you don't give the opponent's priestess a chance to act, you will have a good time breezing through these siege battles. After level 15, you can pick Petrify and use it on those immune of Serenity. In the meantime, the enemy melee will storm out, and you will have upgraded Snow Maiden to setup a perfect trap at the castle gate (grin).
Taking Town E also opens another gate (GA2). But you can't go anywhere meaningful from here, since the other two gates are still closed. There is a Seven Dragon's Shrine (SD) just northwest of Town E. Same as mission 1, there might not be enough enemies to fight to push you to the level cap of 17.
 No matter whether you have taken care of Town E or not, it is a good idea to finish the Ronin quest early on, as the enemies are very weak there. You can go through the whirlpool (works like a reliable two-way portal) of (5-5') to take Fort F and its surrounding buildings. You might recall this
island as the "treasure island" back in mission 1. You should receive a free secondary hero, who will be carried over to later missions. If you have extra ability points, you might consider the Mentor ability to make this guy (a might hero) a very effective side kick.
No matter whether you have taken care of Town E or not, it is a good idea to finish the Ronin quest early on, as the enemies are very weak there. You can go through the whirlpool (works like a reliable two-way portal) of (5-5') to take Fort F and its surrounding buildings. You might recall this
island as the "treasure island" back in mission 1. You should receive a free secondary hero, who will be carried over to later missions. If you have extra ability points, you might consider the Mentor ability to make this guy (a might hero) a very effective side kick.
If you can beat the hero defending Town E, your army should grow fast enough to take down Fort G, Town H, and Town I in the following week or two. The game gives you free hero for occupying Town E and Town I (you have to go to a Tavern to claim your free hero). So you can again send them out to gather resources. There are plenty on the water.
After taking Fort I, which is partially revealed during the Snow Maiden quest, the gate close by (GA3) will open. If you have completed all other primary quests up to this point, the final gate (GA4) will also open, giving you the chance to finish this mission immediately. If you have previously defeated the Necro stacks in the sea south of the final gate, you can just walk up and win (otherwise Hiroshi will ask you to, thanks to Naki).
But you may as well take some extra time to visit the stats boosts (s). By the way, finishing the mission grants you an interesting artifact - the helmet worn by Hiroshi. However, since it is not a set artifact, it does not carry over. The same nonsense will happen again at the end of mission 3.
It is a good idea to save a few ability points before hitting level 15. Irina will be able to defeat enemies many times of her size with key spells like Summon Earth Elemental, Time Stasis, Petrify, and Meditation combined with her Tide Master's Serenity and Tsunami.