To Honor Our Fathers
M5: Hunting the Hunter
- Map Size: Large
- Level Cap: none
- Difficulty Index: 4/5
- Last Updated: November 9, 2007, Patch v3.0
The mighty Stronghold campaign reaches its climax in a one-against-all fashion. Your opponents are three allied AI players with a total of 6 towns! Can you survive?
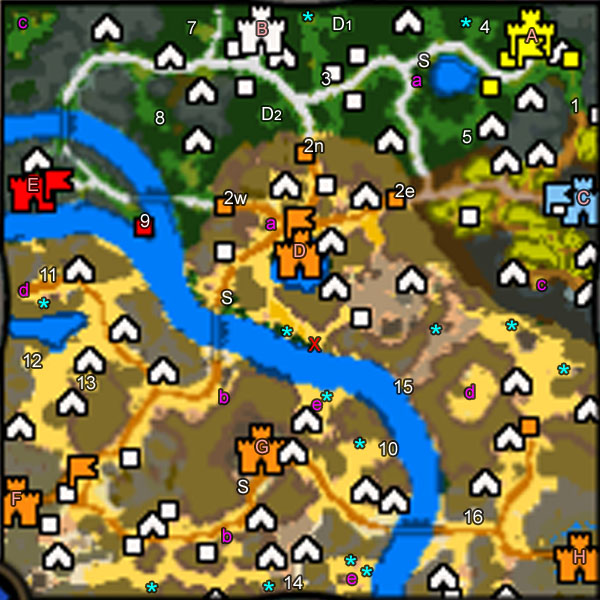
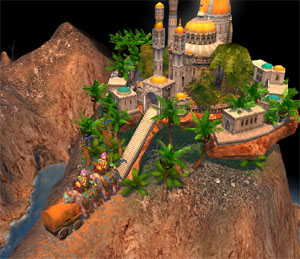
Your starting town (A) is in a relatively safe corner. To your west is a neutral Stronghold town (B) that you have to develop sooner or later to shift the balance of power. There is also a Tear of Asha to be dug up to beef up your creature growth and bank account.
To your south is a Teal, Necro AI player based in town (C). You might recall that Kujin has cleared doubts with Arantir, so the Necromancers should be your trusted new friend. Nah. They are here just to make your life miserable, and you can expect a Teal army backstabbing town (A) as soon as Gotai goes away. Although there are some huge neutral blocking stacks separating you two, the AI heroes start with pretty high level and their town builds fast. So they usually have no problem knocking on your door early on. By the way, all neutral stacks are huge in this mission, which is quite exciting.
On the opposite end of the Teal Necro is the Red Haven based in town (E). If you think Kujin has also talked to the Knights so they should be at peace, wrong again. The Red fraction has no territory to distract their attention to, so they have to come after you!

Alaric's head is actually out of Gotai's strike zone. Better swing low!
In the dead center of the map is town (D), one of the four towns of the Orange Academy. Its strategic location allows the owner of this town to threaten all others - or to be threatened. There are three Orange garrisons surrounding town (D) that the Teal and Red players have full access through - not you, of course. The Orange has three other towns (F), (G), and (H) south from here along the paved road. Your eventual goal is to take town (H).
It doesn't look too bad, you might think. You've got Gotai and Kujin, right? You built a versatile Kujin during mission 2 and 4, and picked up nice artifacts such as the Lion's set, the Runic set, the Enlightenment set and various pieces of the Dragon set. Kujin also has Triple Flaming Ballista so she does not need a large army to thrive. You can make her a reliable home protector. You can pass on the war cries that Gotai missed...

Actually, mission 4 was the last time that you ever see Kujin in the Orc campaign! To think back, Gotai was all alone in the campaign since mission 1. I hope you did spend some time with Gotai to pick up the good artifacts (especially the Lion's set and the two Drwaven King pieces), and gave him Triple Flaming Ballista. Plus you did win a coin flip to receive Fear My Roar back in your only town in two previous missions. They are all very useful in this mission, especially early on.
Here is my Gotai's skill setup later in the mission. Pretty standard Might build and I gave up the ultimate in exchange of theTriple Flaming Ballista and Aura of Swiftness. Shatter Dark, which is recommended by many forum users, was completely wasted with my strategy of the last battles, so I could have kept Shouting, or gone with something more useful, probably Logistics + Path Finding to speed things up a little bit.
This mission is quite difficult to boot. At first, I followed the conventional approach to flag nearby mines and gather scattering treasures. However, since each AI is given a decent hero on Day 1, all of them (as well as any other new recruits carrying fresh troops) immediately rushed me in a constant stream from two directions. The main Teal, Red and Orange hero all approached my town during week 1. (This is quite similar to Raelag's "The Conquest".) I was destined to defend the town forever 1 against 6. So I restarted the mission and took an ultra-aggressive approach that the walkthrough is based on.
To follow this walkthrough your Gotai must have Triple Flaming Ballista (very useful early on) and preferably Fear my Roar. There should be other ways to win this mission, so have fun discovering them yourself!
By the way, it is normal that the Orange AI takes very, very long turns. Even on a fast PC it might take half a minute.

Nival tricked us! We want Kujin!
First off, pick the 2 Cyclop bonus. Go to your tavern and hopefully you can hire the guy with ~ 30 Centaurs for 2500G. Give everything you have to Gotai and attack the neutral stack blocking between the Teal and you at (1). Your Ballista is doing all the work here, and in my game I actually deployed 6 x 1 Goblins to win this one. We are aiming at Teal's town (C), so rush straight to the castle. The Teal hero might come directly to you thinking you are weak, but he forgot that you have The Ballista. You should be able to take town (C) around Day 5 even without Logistics. One down, five more to go!
Around this time the Orange and Red should be coming your way. In my game I did not give any Centaur to Gotai to fit for one more stack of Goblin, so an Orange hero actually attacked Gotai in Town (C). I had only 50+ Goblins with Gotai and had to completely rely on the Ballista. The two Dwarven artifacts cut down a lot of spell damages for me and prevented the Goblins from switching sides. (I should have given Gotai all the Centaurs!)

Note: In the real world, X-proof is even more powerful than X-resistant. Now everybody is confused by the spell "proof" term used in Barbarian Luck (5% proof per Luck) and and Dwarven King artifact set (40% proof when you equip 2). Spell "proof" here actually means damage reduction. This is totally different from spell "resistance", which means a spell won't work at all, and in the game it usually comes with a chance for it to happen. For 100% resistance the game calls it "immunity".
At the same time my Stronghold town (A) was threatened by another Orange hero, and a decent Red army was still coming towards town (C). I decided to give up the new Necro town and Town Portal Gotai back to save the HQ. Interestingly, the Red hero decided to just flag the Skeleton buildings in front of town (C), ignored the town and went after Gotai in town (A). Needless to say The Ballista took care of both heroes. Even if you do lose town (C) to Red, you can take care of the Orange army first, and come down again to reclaim town (C) from Red.
Your next goal is to take down town (D). There are two routes to it; you can either go west through the grassland and pass the north garrison (2n), or return to town (C) and head west, to pass the east garrison (2e). I picked the latter to better protect town (C), my double Gold Mine. Send a secondary hero after Gotai to flag the resource mines and collect stuff on the ground whenever safe. The Mercury Lab just west of the garrison (2e) is very useful. With the Ballista and some 1-stack Goblins you should have no problem.
You should be able to take town (D) during week 2, with some reasonable loss of your Centaurs. Two down! Temporarily the Orange heroes are not coming anymore, so you can concentrate on Red.
There are roaming Red heroes around, so let's take care of town (E) immediately. Rush straight to town (E), which is probably poorly defended because all the armies are out there. While you are rushing towards town (E) the Red heroes could be a threat to any of your other towns, but fortunately they all somehow tried to run back to defend the town instead of claiming one of your own. Of course, they will be late. Three down!
The problem actually comes after you take town (E). The Red heroes are now free to chase your weak heroes, even occupying your undefended towns. I sacrificed a weak hero to lure away two Red armies into the Orange territory to buy Gotai a few turns to return to Town (D). The AI took the bait, and even better, if an AI is town-less when the new week comes, they are considered to have lost the game and all of their remaining heroes are erased. Goodbye to Red!
You are now a happy owner of 4 towns in three weeks. Your income should be 10000+ G/turn, and even if you have not flagged the rare resource mines, the 5000G silos from each town should cover it. There is a nearby Sulfur Pit east of town (E).
With a healthy income and bottle neck defense, your nail-biting days are over. Run Gotai to take the second Stronghold town (B) now, flag the high-level creature building (3), and ship new units to Gotai with some mule heroes. Troop shipping is critical early in the mission, and you should establish a constant stream of supplies with multiple low-level heroes. I have marked the Stables with (S), which are conveniently located along the way. Here are my recommended upgrades:
Tier 1: Goblin Trapper. You will kill the casters before they can act anyways, so there is no use of the Witch Doctors.
Tier 2: Centaur Nomad. Again, if you let a stack reach them you have made a mistake.
Tier 3: None Use the non-upgraded Warriors early on. When you have Chieftains free up this slot for them.
Tier 4: Sky Daughter. After Hasting the Cyclops and Centaurs or slowing a key stack, your battle is usually over. No need for close-range melee power.
Tier 5: Chieftain. When you have more than 50, split them up into two stacks. Their only job is to whip your Centaurs or Cyclops.
Tier 6: PaoKai. Since you have so much cash you may as well buy them all. They are not terribly useful, though.
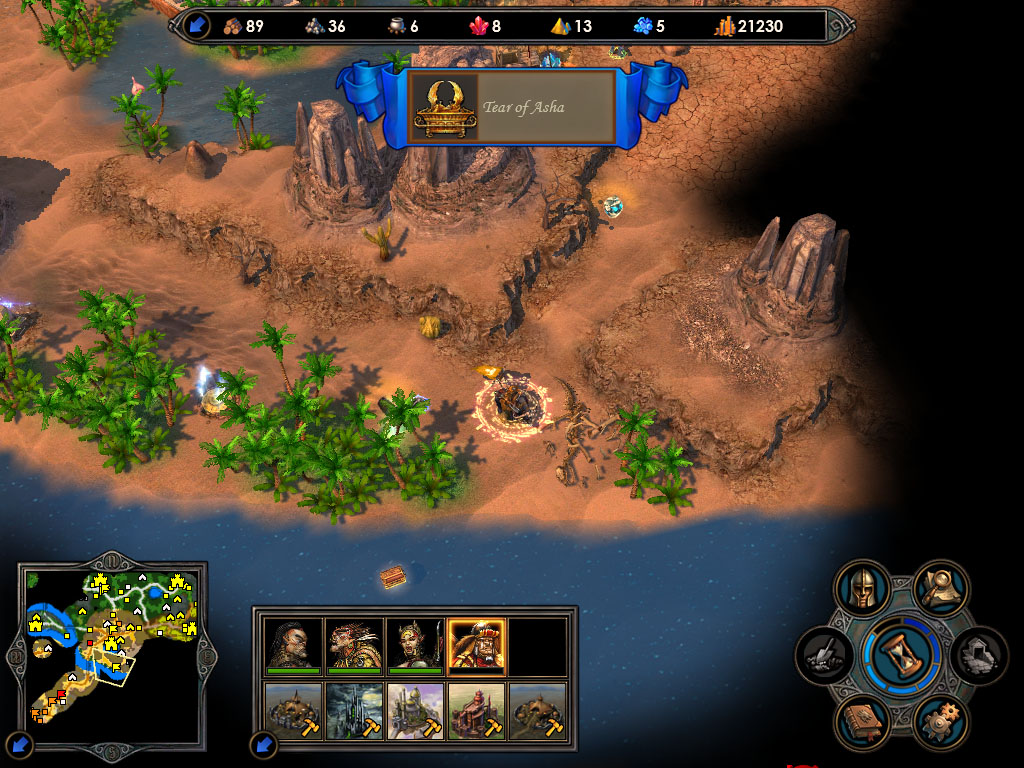
Tier 7: Untamed Cyclop. With unprecedented crude power, this is the most crucial creature in the final battles.It is also now a good time to dig up the Tear of Asha. You probably have visited quite a few obelisks so far, so where is it? You can click on the picture below to find out. The location is actually fixed (at least in the current patch, v3.0) so you will find the tear at exactly the same spot. Ship the Tear back to your starting town (A), not (B), to build the Grail structure there. There is an obvious reason for this later.

Since the Orange still owns three towns, they remain a potential threat. When Gotai receive the next shipment of units, with about 200 Centaurs, you should be able rush town (E) and (F) in a row. The AIs are more powerful now and their Divine Vengeance can usually kill a large portion of your Centaurs. There is nothing you can do about it (remember to equip two Dwarven King artifacts) - so just bite it and gladly take over the new towns. (By the way, you can sell unwanted artifacts in the Market Place of Academy towns. I never knew about that!)
Now the Orange has only town (G) left and you are holding them to the throat. The Orange AI will still send out scout heroes to annoy you, but more often than not they will get stuck by their own caravan right in front of their town - for weeks! It is time to explore the map and pick up the goodies, and allow your speedy town production to give you the superior army.

It is very tedious to ship troop to town (G) all the way from town (A). It is possible to cut it short significantly with two sets of two-way portals (a-a, b-b). Each set is guarded by a very threatening group of creatures (like 80 Titans) that you probably don't want to fight until your army size has grown up significantly.
After witnessing how powerful Cyclops + Chieftains are back in mission 3, you can take the tactics to extreme here. Deploy nothing but Untamed Cyclops and Chieftains, and split up the Chieftains into 6 equal stacks. The Chiefs do nothing but to whip the Cyclops repeatedly. Now if you ever doubt how useful this tactics is, you can take a sneak look of what's happening in the final battle. Convinced? Now rush up your Cyclops to bash the Titans non-stop! Use the area attack well and you can damage two stacks at once. If Gotai's turn come up, either throw a Call of Blood to the Cyclops, or whip them yourself if a huge Titan stack's turn is coming up next. You will be amazed by how fast these Titans go down!
As usual here comes a list of attractions. You don't have to visit them in this order and I actually skipped almost all of the fights that does not lead to an useful artifact or a stat boost. You will end up at around level 30 and it is more than enough to win.
Around town (A): There is a Boots of the Open Road at (4) to speed up your desert trip later on. The Boots of Swift Journey, which is also very handy, is found at (5) just beside a useless Hill Fort. Note that the movement bonus from these boots is added to your hero at the beginning of each turn, so you have to end the previous turn with the appropriate boots already equipped. However, after the new turn starts, you may remove the boots and put on your "battle boots" to receive the bonus from both!
Around town (B): If you took town (B) before the Haven town (E), you would receive a secondary objective of taking town (E). Otherwise no such objective is given at all. In (D1) you should be able to pick up the Dragon Scale Shield (of the Dragon set). The Dragon Flame Tongue (weapon of the Dragon set) is found at (D2). There is an artifact merchant at (7), which I picked up a good Ring of Speed (+20% Initiative to all units). The treasures that your Goblin friend tells you about is the area with a Sylanna Ancient at (8).
Around town (C): There is a two-way portal at (c), which takes you to an isolated area at the NW corner with some random artifacts.
Around town (D): The Tear of Asha is marked with the red X. There is a large desert area to the east, where you can find a Pyramid but you can't learn spells anyways. To the very east part of the desert you can find the Robe of Sar Issus, which is completely useless to you so I am not going to mark it. There is also a Sphinx just south of the bridge, but when I approached it with Gotai, it was not interested in playing games.
Around town (E): Flag the Lighthouse (9), which speeds up your journey on the river. You can build a ship in the shipyard just east of town (G) at (10). With the ship you can access a few areas off the river shore.

Around town (F): There is a large optional area north of Town (F). In there you can find a Memory Mentor (11), and another two-way portal (d) leading you to a treasure area in the middle of the desert, where more random artifacts can be collected. There are just so many artifacts in the mission, and 95% of them are totally useless. But if you ever feel you want more, there is a Dragon Utopia directly below town (F).
At (12) hides a sidequest about recycling machine parts. Come here with at least 1 Gremlin (upgraded or not, does not matter) to repair the scattered golem torsos and limbs. The Golems are repaired, and to show their gratitude they will all offer service to the Skywalker! By the time I took them during month 3, I collected a grand total of 2550 Iron Golems! I spent a lot of cash upgrading them, but since they are so slow (initative = 7) I didn't use them at all. I guess if you are seriously screwed in one of the final battles, these guys can survive long enough to save your day. Just SE of the Golems (13) you can find two interesting artifacts, the Crown of Sar-Issus and the Cloak of the Death's Shadow (enemy's morale, luck -2, as featured in Arantir's campaign).
Around town (G): There is another artifact merchant to the south, at (14). With the ship (or the Instant Travel spell) you can access the two-way portal at (e). Just north of the portal (e) lies the Staff of Netherworld (enemy creature initiatives -20%) of the Death Embrace set. The portal leads you to yet another isolated treasure area with some stat boosts and an Astrologers Tower.
Around town (H): You can attack town (H) via an alternative route by landing at (15) and go around the desert to collect three more stat boosts. There is another Memory Mentor (16) just before town (H).

Let's talk about the artifact setup a bit. There are different approaches to the final battles, and the way I like the best is the non-stop whipping action from Cyclops + 6 Chieftains. Therefore, all I need is high Initiative and Attack. You can use the Lion's Spirit set if you have all three, to give Gotai the Empathy effect, even if your Morale and Luck is already shooting through the effective cap of 5. (Empathy: Whenever a friendly stack has a high morale, the hero's ATB is moved up by 10%.) You can also let Gotai whip the Cyclops although it is going to hurt much more. Well, long pain is not as good as short pain!
The two Dwarven artifacts are pretty decent for their magic damage reduction and immunity to Slow. Also, you can equip quite a few pieces from the Dragon's set that you have been collecting here and there. Its set bonus statement might be misleading - the HP and stat bonus only applies to Tier-7 units (Cyclops), not all 7 tiers of units. Since we are using the Cyclops to bash everything up, this bonus is actually quite nice! You can easily buy other useful artifacts to fill up the rest, either from the merchants or the Academy towns.
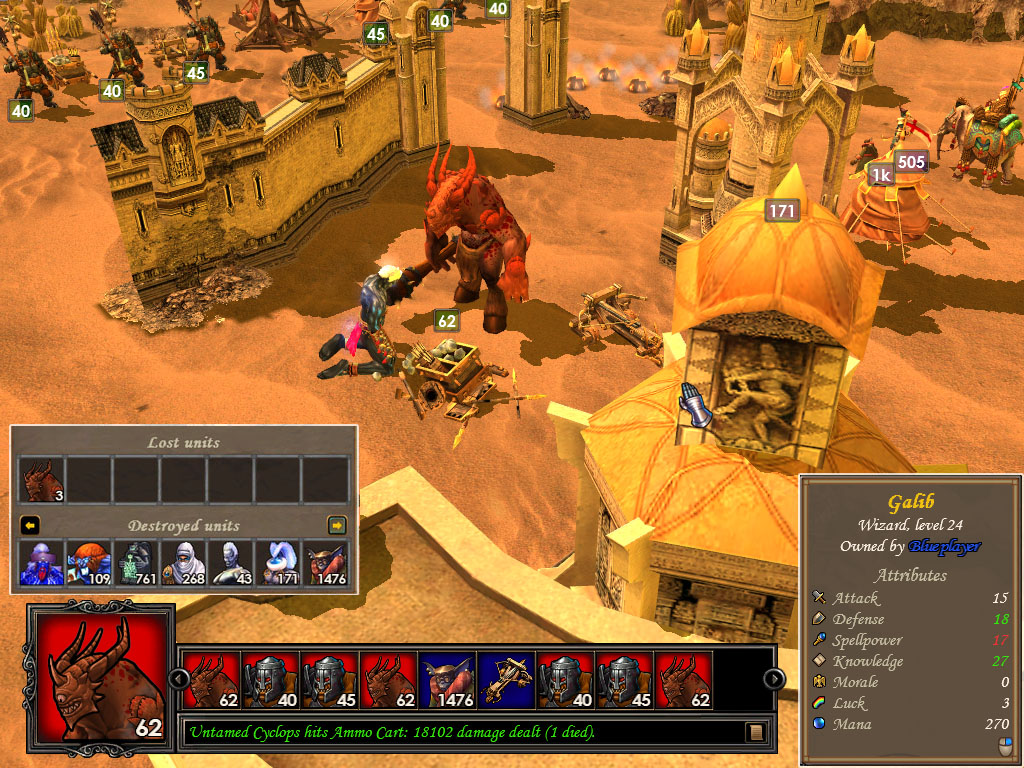
Take your time to accumulate a powerful army. The ideal timing to attack town (H) is when you have about 250-300 Chieftains, and you should have 60+ Untamed Cyclops to go with it. So what about the rest of the army? You really don't need them. Keep whipping the Cyclops, and they will smash the world for you! I have seen people reporting the wizard hero in Town (H) casting annoying Frenzy / Puppet Master non-stop. With this Cyclop + 6 Chieftain strategy, the enemy hero hardly has a chance to cast anything. In my game the battle was over before the enemy hero even acted! You can download my replay here.

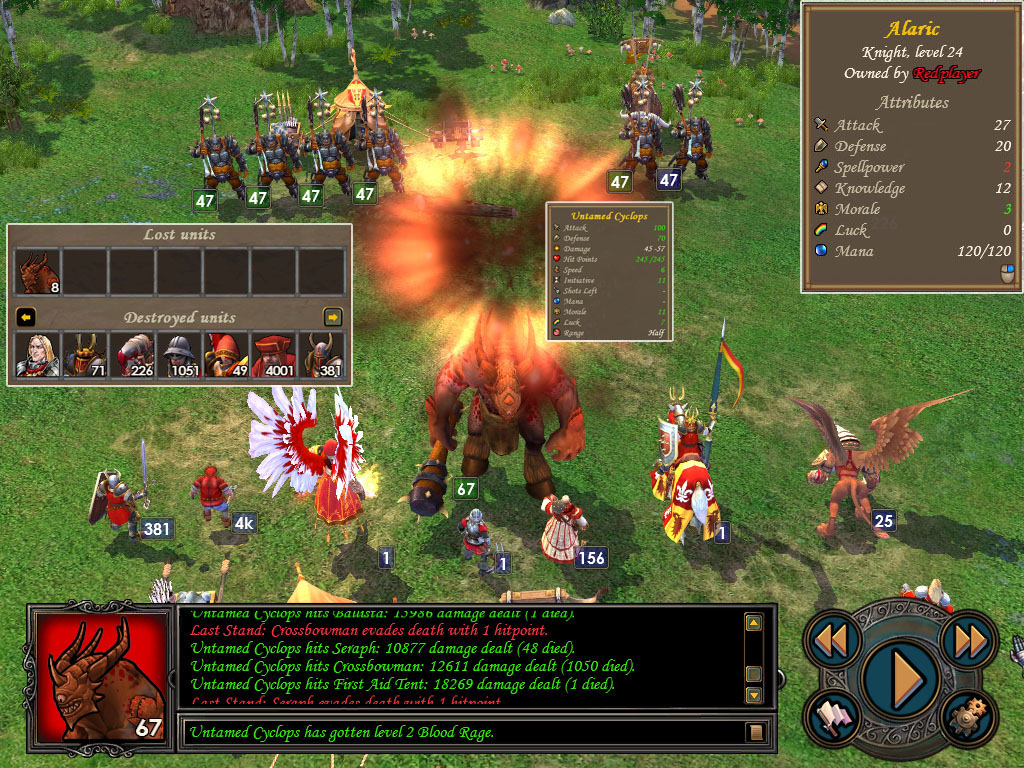
Immediately after claiming town (G) the real final boss of the campaign, Alaric, arrives just NE of (7). Alaric is a walking little guy just like Nicolai. Although he is a small man, he does have good stats and skills plus a powerful army. Alaric can reach your town (B) when his turn comes up, so in my game I used a mule hero to evacuate the entire town. This is why I suggest to get the Tear of Asha building in town (A), or Aleric will get it!
Obviously you now rush Gotai back to finish Alaric off. If you are absolutely afraid of Divine Vengeance, now go to the Memory Mentor (16) and get Expert Shatter Light. Personally I don't think it is necessary because you are so powerful now - take a look at your Gotai's stats. There is a +15 bonus on all four categories! He hits harder than the Demon Sovereign, the boss of boss in the original HoMM5!
With the set of two-way portals (a-a and b-b) and your Town Portal spell, you should reach Alaric after just a few days. Alaric's army is roughly the same size as the town (H) garrison, but he has better defense and the annoying "last man standing" feat. It is inevitable that your Cyclop will swallow 1 shot of Divine Vengeance from Alaric, even another one from the Seraphs if you don't finish that last one (with 1 HP) in time. Your Rage points should absorb most of the damage. With 6 Chieftains Alaric only acted once, still. Here is the replay.
Congratulations of finishing this quite-difficult campaign! I have a feeling that Nival is going to seriously nerf the insanely-powerful 1-Cyclop-6-Chieftain tactics in a coming patch, so have fun when it still works!
p.s. I have heard people reporting a minor bug. If you finish Gotai's turn on the door step of Town (H), the game crashes.