Mission 2 - The Ambush
Map Size: Normal
Carry Over: Wulfstan
Level Cap: 16
Difficulty Index: 2/5
Primary Objectives:
- Seize Asbrand within two weeks
- Liberate the Dwarven dwellings within two months
- Repulse the Imperial attack
- Wulfstan must survive
- Seize all (4) gold mines

If you like the gorgeous Treasure Hall hidden underground in Freyda's mission 5, you have an entire mission made out of it now! The Ambush features a large and beautiful Dwarven macro-structure, containing mines, creature buildings, even a five-story-Fortress town in the middle. The town is not even 1/5 as tall as the wall!

So far, we have always recommended taking the creatures as starting bonus, but we will make an exception here. Although 10 black bears sound good, they are insignificant compared to your large starting army. They also don't merge with your existing Bear Rider stack, thus leaving less room for your 1-defender stacks. The less 1-unit stacks, the more casualties you take! You will be better off by taking the Armor of Valor artifact, which offers 1 point of defense (about 5% reduction in damage), and 1 point of morale (extra 10% high-morale bonus).
Your first objective is to capture the the only town in this mission (A) within 2 weeks. This deadline is very easy to meet, since Wulfstan has the logistics skill by default, and the road leads to the town is very straight-forward.
From Wulfstan's starting location (1), pick up a small stack of cannon fodders, and follow the snowy path south. Three stacks of wolves are mandatory, and their number may pose a threat. If you can't kill a wolf stack completely (which is very likely since HoF Dwarves are bad in the offense department), when the wolves' turn comes up, they will run beside your stack, call forth the same number of wolves, and attack you simultaneously. This can be devastating if a large stack does that to you.

If you have built Rune Shrines back in mission 1, you probably have learned the Charge rune magic. By using up one unit of Wood, your unit doubles its speed (traveling distance, not initiative). You can use this Rune to enable your Bear Rider units to reach enemy shooters in round one, for a cheap price of 1 wood!
The Berserk special ability of Berserkers is quite powerful. All you need to do is to pull Berserkers away from your other stacks (start off the battle with them in another corner). When the Berserks are closer to an enemy stack (within striking range) than a friendly stack, choose the Berserk command, and the Berserkers will attack with greatly-enhanced power. The more defense they have, the more attack points they gain by sacrificing all defense points.

This virtual studio set is also used in a spider chase scene in "A Bug's Life 2".
The garrison at (2) is manned by some long-ranged Renegade units. Try to use your Bear Riders to rush the shooters, so you won't lose many vulnerable Berserkers.
Right after the garrison, you can see another stack of wolf in the west. This stack is larger than the previous, and it guards an artifact Boots of the Open Road. This artifact is not very useful for Wulfstan, though, because Wulfstan already has the Path Finding (-50% movement penalty) feat. Also, in this mission you will spend the majority of time on paved ground, which does not impose any movement penalty anyways.
Once underground, you have to fight a Necro stack, consisting of Wraths and Archliches. Note that the battlefield contains a 2-tile narrow passage in the middle, so you don't want to have your units stuck for good and make them easy area targets for the Archliches. Fortunately, the Archliches love to waste their turn casting Weakness on the Berserkers. I don't need to tell you how to kill 6 Wraths with 2 Defenders, right? Plus you can instantly reach the Archliches with another pile of wood. Nice!
After the liches are taken care of, follow the path south to enter the magnificent hall. Keep going west towards Town A. On your way you can easily flag an Ore Pit, and rescue a stack of Skirmishers from Vindicators. The Gem Mine is guarded by Crossbowmen. If you have the Rune of Charge, this is a perfect time to use it.
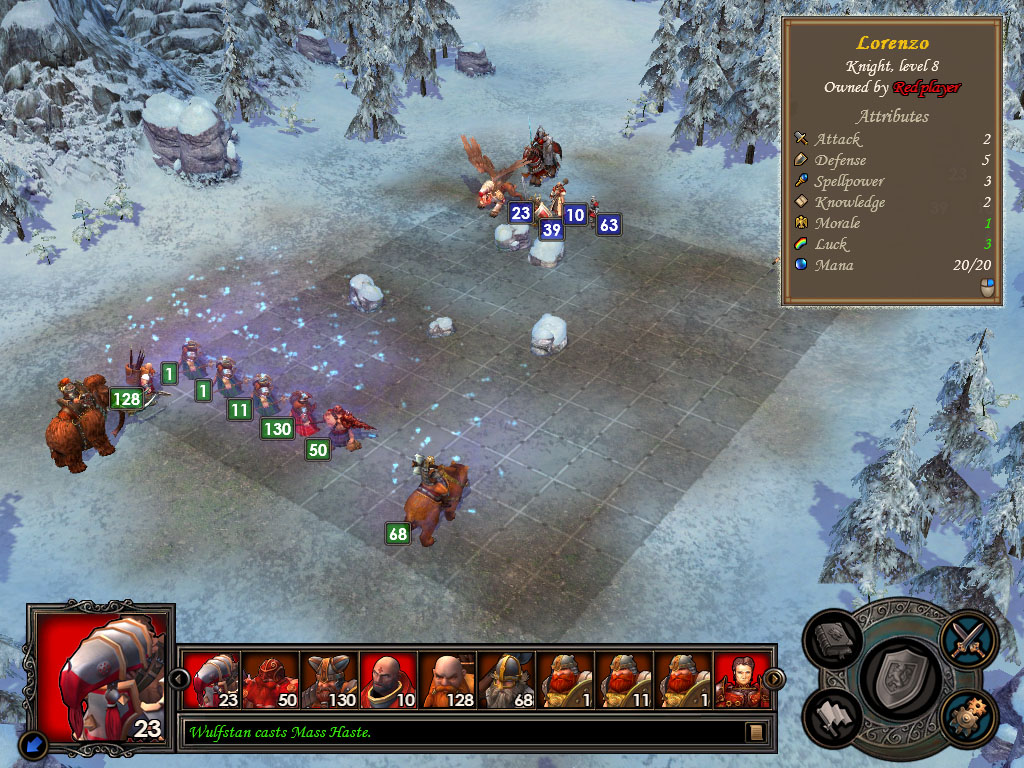
Town A is guarded by a Renegade hero with a familiar name - Lorenzo. Lorenzo has gained some levels in the meantime, and his army is also quite large.

If you have conserved troops well up to this point, you can win this fight even on Quick Combat. However, you can cut the loss down significantly fighting it yourself. The Zealots will blind your most powerful stack (bears). You can dispel it with Wulfstan's Cleanse, if you acquired it from mission 1. Don't let your Berserkers cross the half-field too fast, or they will suffer huge losses from Lorenzo's Zealots and Crossbowmen.
If you are low on mana, and have quite a few good difference-making magic to cast (such as Igniting-Fireball, Mass Haste / Righteous Might / Deflect Missile), there is a mana well at (3), with a easy-to-flag Sawmill half way. You only need to defeat a small stack of Zealots to gain access to it. Alternatively, you can directly go north after the Ore Pit on your way in. After flagging a Dwarven Warren, go west and you can see another mana well, plus a hidden boost at (5)... more on that later.
These round trips cost you several days, but you can still meet the 2-week deadline easily. Another good news is that Lorenzo will not hire from the town at all, so you can attack him after Day 1, Week 2 and still hire two-week growth of troops afterwards.

After taking Town A you get a new objective - to liberate all Dwarven creature buildings within two months. They are the little squares on the minimap, except the Dwarven Warren (to the north) is actually a random-resource mine.
Starting from your town, you now have two months to explore in different directions. You can probably get everything done in just one month, though. Here comes a list of the more important things to do:
- Hire lots of Skirmishers and (Black) Bear Riders. They are very useful in this mission. High-tier creature buildings are nice to have for the mission boss. You will have more than enough cash to hire them all.
- Flag both Sawmills and both Ore Pits. You may as well flag all the other mines on your way. The Crystal Cavern is useful for Thane (tier-6) building. You will be short of Sulfur, but there is no Sulfur pit. Hope for the best on the random-resource mine or trade for it.
- Build a Capital ASAP (requires lv-15 town), gives 4000G / day.
- Flag all gold mines. There are 4 in total, marked by yellow Gs above. There are no sweet reward for completing this side quest, but more cash is always welcome.
- By the end of the mission, try your best to advance your Light and/or Destructive magic schools to Expert level (Rune Magic as well if you can), and max your Magic Guild. 50% you can get the Resurrection spell, plus Armageddon or Implosion.
You will see nothing but Renegade units guarding the creature buildings and mines - Zealots, Battle Griffins, Vindicators and Crossbowmen. Zealots give pain, but Crossbowmen are relatively easy when you rush them with Bear Riders + 1 wood. Griffins can be easily blocked with a bunch of 1-unit Shieldguard stacks. The slow Vindicators are ridiculously easy.

In the NW region of the dungeon, there is a skeleton lying on the snow (4). You might pick up something interesting, or nothing at all.
There is a well-hidden chest lying in the middle of some strange murshroom landscape at (5). On my way there, Wulfstan was suddenly surrounded by mysterious green gas. I thought he was poisoned, but he didn't lose troop or anything. On the other hand, his Morale and Luck are all boosted to 5, and the effect lasted through the entire mission !! This is some crazy boost!
If you feel like trading troops for an artifact, there are optional surface areas blocked by nasty creatures. The two-way portal at (6'), which links to a small opening of (6), is guarded by Fire Elementals (shooter). The two-way portal at (7'), which teleports you to (7), features Water elementals (caster). The stairway at (8') takes you to 8, leading to a Tomb of Warrior (temporary morale penalty for one artifact), but you have to bear through Phoenixes. They are all completely optional.
Steadily build up your town, gathering troops and learning new Runes and Magics. As soon as you occupy all creature buildings, a new objective is triggered - to defend against another Red Hero. (guess who? Hint: These are only two full-time Renegade heroes so far.)
Andreas' army actually grows weekly, roughly at the same rate of a full Haven town's weekly production. For example, you will face 16 Champions by spawning him during Week 4, but you will see 20 Champions when he spawns in Week 5. Fortunately, Andreas has been demoted down 10 levels since your last encounter with him in the Freyda campaign. There will be more powerful Andreas and Lorenzo coming ahead, though.
By the way, the level cap of this mission is set way too low. I reached level 16 just two battles after defeating Lorenzo!

Gimme back the innocent (and not so bright) Lady Isabel!