Map 2 - The Liberation
Size - Very Large
Level Cap – 20

Bonus

To be honest none of the bonuses (bonii? :) you get offered here (or in the next couple of maps) are particularly useful. The breastplate is probably the best of a bad bunch, though, because it will boost your summoning spells. While clensing is useful there's a bunch of life towns (which should have it) coming up on the next map which is when you'll really nead it. Five Iron Golems are laughably weak, but if you break them up into 1s, you have five more chances of elemental replacement.

Walkthrough
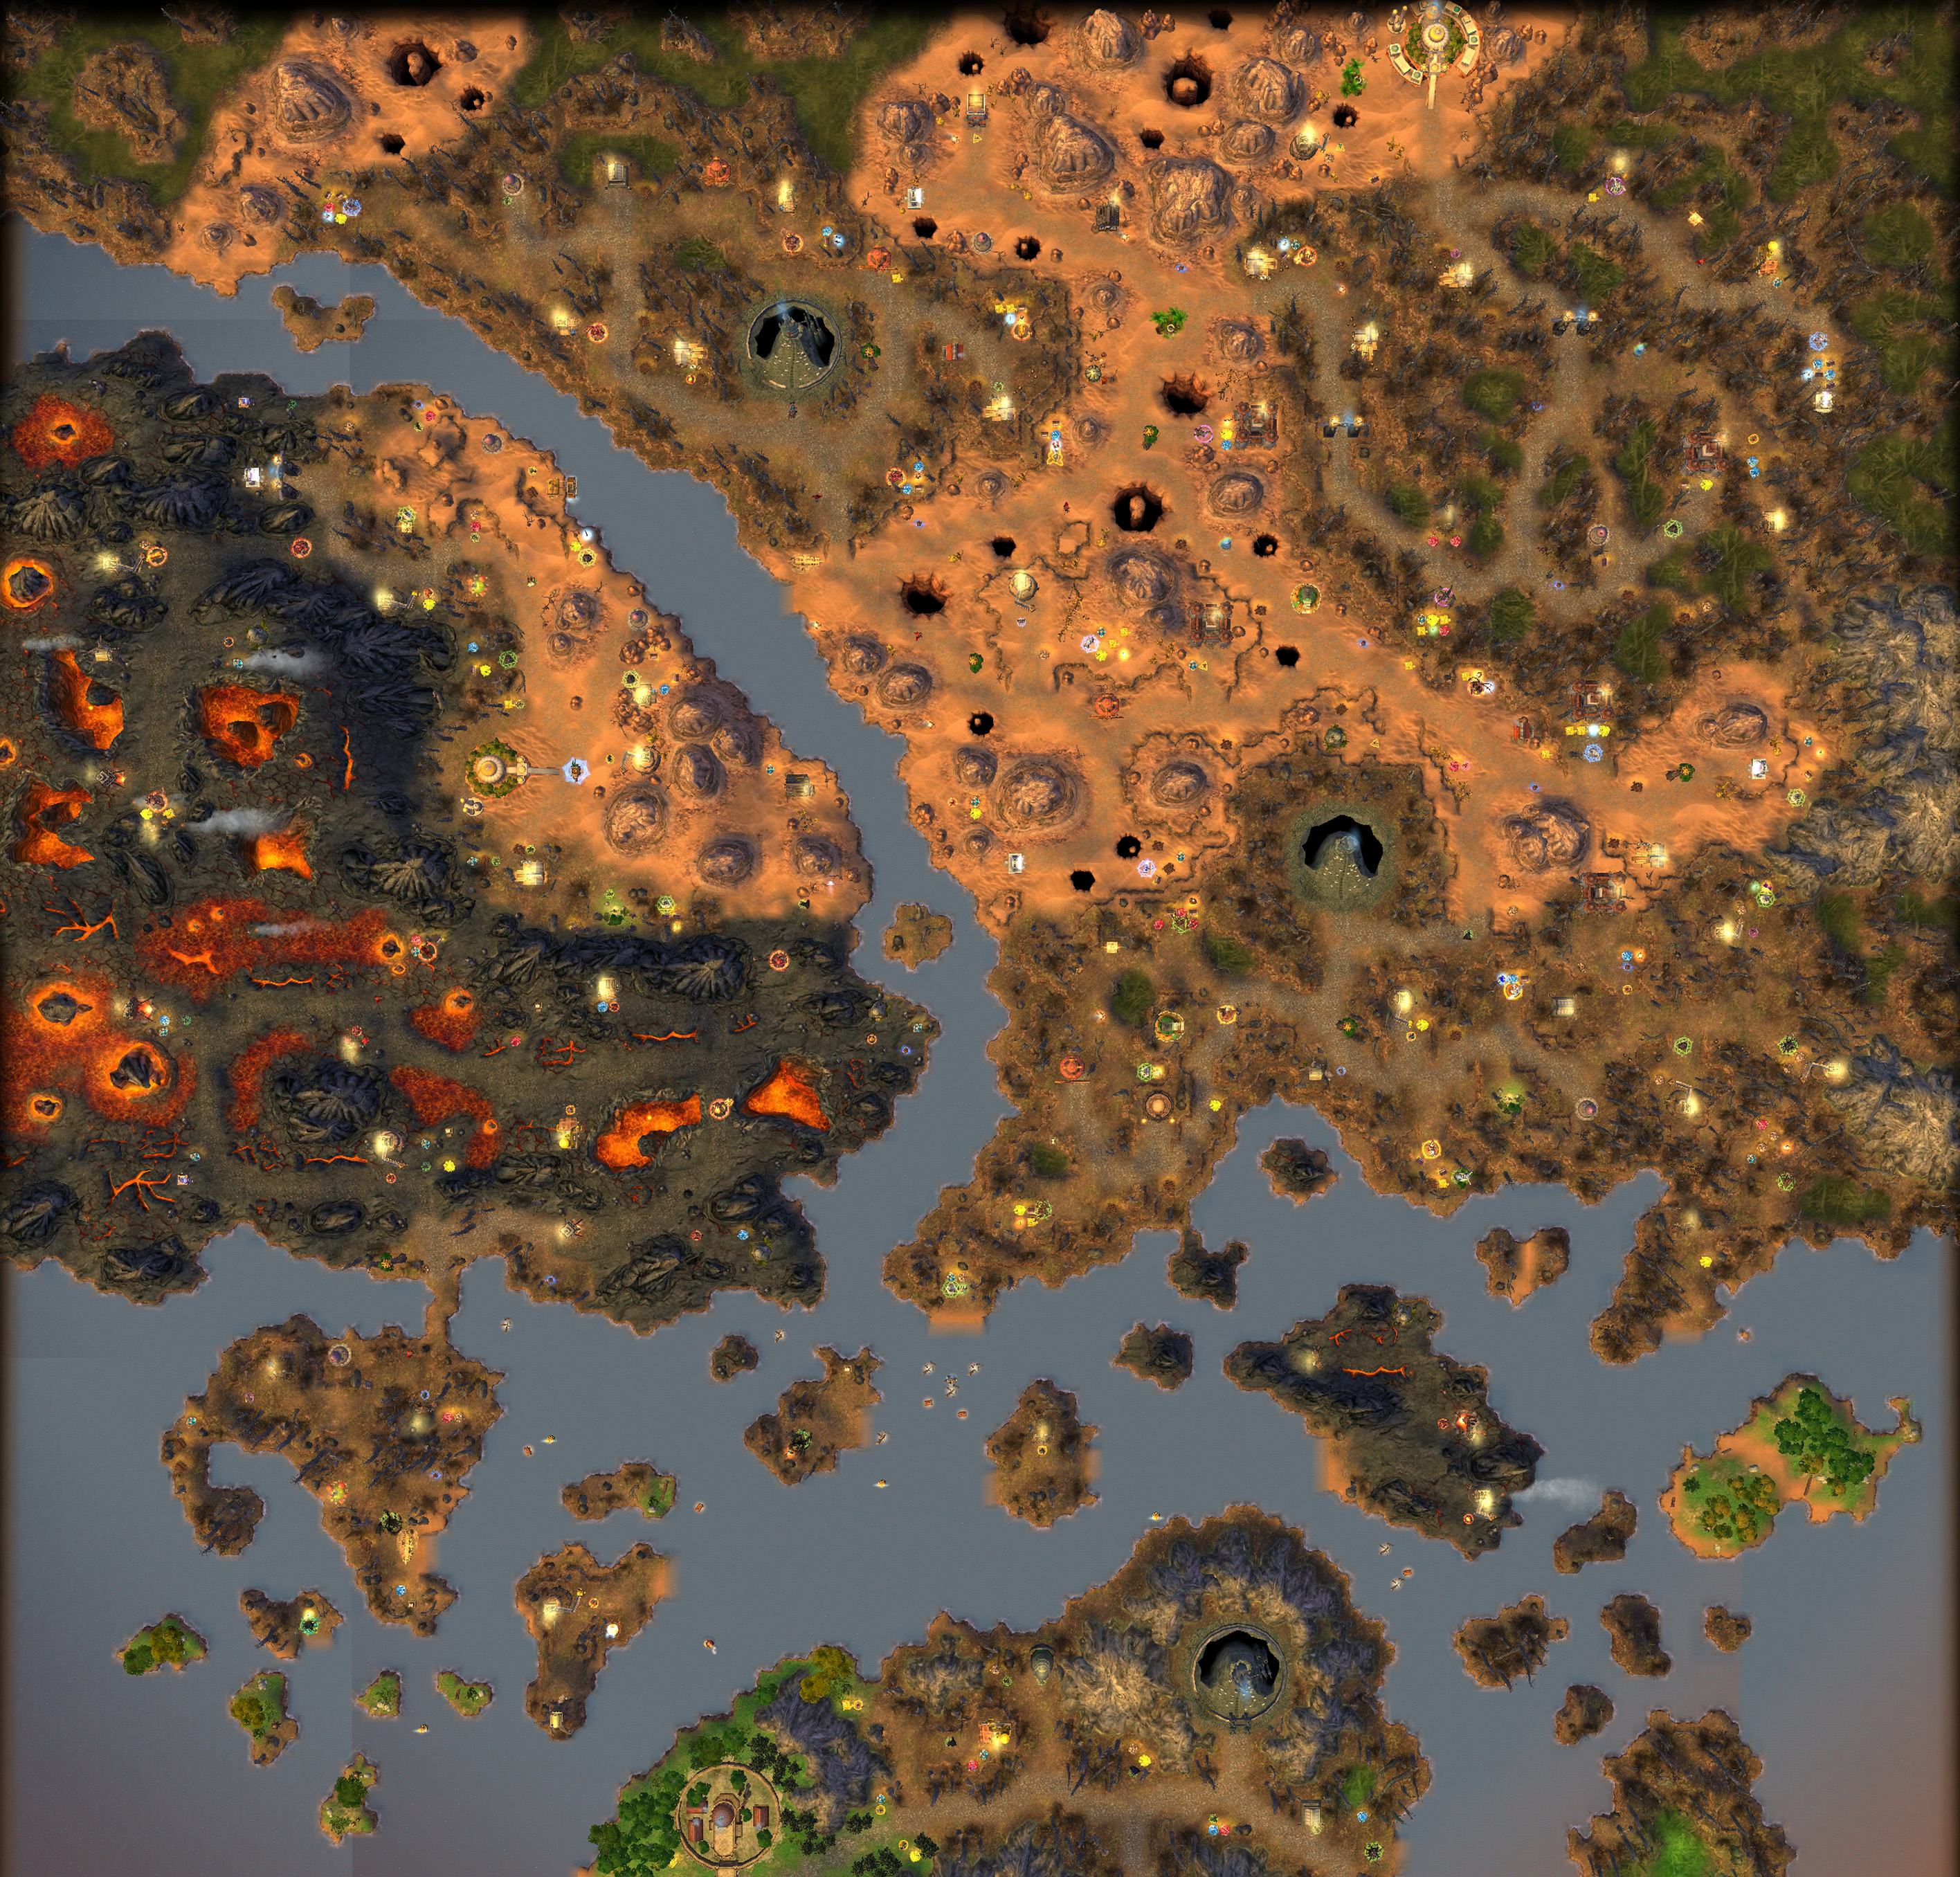
This is quite a fun, large map, though not particularly challenging, and if you think it's a bit familiar you're not imagining things! It is a remake of C3M3 map, with the removal of certain features (such as the Sylanna's Ancient) and the addition of quite a few artifacts.
Your first goal should be to flag some mines nearby, including the Saw Mill and the Gem Mine. There is a Sulfur Pit a little north. When you head south, you will enter the Inferno terrain. Here you can flag some more mines. When you head to the very south, you can grab two abandoned mines at 1, which are always 1000/day gold mines.
Thanks to Summoning (phoenix when you have the mana, elementals otherwise) Zehir should have no trouble taking on neutral stacks (except perhaps cerberi and succubi) with just his starting forces and what you can hire from the town on the first day.
Note: On heroic, you can actually leave almost all units at home, but just bring the gargoyles with you. Split them up to multiple stacks of ones (hide the reserve stack to avoid heavy casaulties). You go into battle with 6 stacks of 1 gargoyles. If against a human player you will soon be fried, but the AI enemies usually target the elemental replacements as they are more "worthy to kill". This way, you only lose a few useless gargoyles in each battle, even against lots of liches or cerberi. Since patch 1.3 increases the mana requirement a lot, you should try to avoid Summong a Phoenix (35 mana) if you can handle things with just Elementals (17 mana).
Be sure to avoid the pictured area (2) on the way down... it's simply not worth fighting a hoarde of succubus mistresses for the sake of a level 3 spell and a pile of ore! Also ignore the large arch-devil and pit fiend stacks on the east of the island as they aren't guarding anything important, just a shortcut to the south.

At about the start of Week 2, an enemy hero will probably attack from the north. This is nothing to worry about - even on heroic difficulty I was able to repel him with just what I had hired in the town by the end of the first week and a hired hero. If you're worried, though, then keep your main hero within a days walking distance until you get attacked. There will be no subsequent attacks. (On patch 1.3 heroic, there will be one more, quite a tough one actually (like outnumbering you 5 to 1). But that won't arrive for another two weeks, and your phoenix and elementals should be able to take care of them.)
Also, be sure to enjoy this town and build it up properly because it'll be the only Academy town you get to play with for the entire campaign (with the possible exception of this map's objective - Al Safir (11) - depending on the order you capture the towns in). I would definitely recommend building the Arcane Forge and messing around with the Artificier special ability, because it's quite fun. They take quite a lot of rare resources to make, though. It gets 50% cheaper if you wait until you get the pendant of mastery (sometimes offered on the map at 7).
I recommend giving your shooters luck and higher initiative your Rajas' speed and initiative and your golems/gargoyles health and defence. My Djinn's always die so I don't know what's good for them - health/defence artifacts makes too little difference. For the third slot it depends on the creature, +health is good for low level creatures, morale is good for titans and raja's but you want at least one of your creatures to reduce enemy defence. Experiment yourself, particularly when you hit the level cap as the power of your artifacts depends on your Knowledge points. If you can buy some artifacts that increase knowledge, put them on Zehir and then make the equipment.
Note: In recent patches (at least in 1.3), you can no longer build up the mage guild of your starting town past level 2. This is rather inconvenient as you lose the chance to learn Resurrection early on, and you cannot even Summon Creature until you take one of the cities on the southern continent.

Once you've cleared the large peninsula that you start on and built your town up a bit, it's time to enter the portal at 3. There are exit points at 4, 5 and 6. Your exit point is randomly determined. The map is very open-ended at this point, but I recommend that you head to 5 to start with and go south until you find the path to Yafia, the town at 7. It shouldn't be too hard to take this town. Clear as much of the surrounding areas as you feel like. If you picked Expert Dark Magic, Sandro's Cloak may be handy to you (to mind control undead and Titans).
There is one little trick (only applicable prior to patch 1.2) which is fun to use to take on large-sized neutral creatures is pictured to the left. Place your master gremlins in the corner of the battlefield with steel golems placed diagonally in front of them. This means the only creature (large) neutrals can attack is the golems. Let your gremlins repair the golems while your phoenix pounds on the attackers (golems defend) and when the attacking stack starts running out of steam stop attacking it until all your golems are repaired. You can take on stacks many times your size without any casualties in this way.

When you're done head to the portal at 6, to go to 3 and summon some creatures if you need to. Otherwise follow the path towards portal 4 until it branches off towars Ulamburiash at 8. This was a rather useful town for me - the AI seemed to forget to hire dragons so there were a bunch left over for me to give to a secondary hero. (the recent patches has improved AI's building and hiring, so this no longer happens.) The area to the south west of this town has two skill boosters - spellpower and attack/defence - which are worth grabbing.
Note: Somtimes, you can see NO teal AI hero defending a castle. This is because that there is a cap of the number of heroes AI can have. Somehow AI likes to hire new heroes in the southern continent, which is blocked off by two very powerful stacks of neutral creatures. When all available AI heroes are trapped down there, the main continent becomes yours to explore.
You are theoretically meant to capture Al Safir (11)at around this time. I wouldn't recommend it. The town (at least on hard and heroic) starts with a large head start on you in the creature race and even if you take minimal casualties and hire every creature you can from your main town you will be massively outnumbered. Even a summoned phoenix can't turn odds like this, unless you can somehow outlast the assault while casting Frenzy and Puppet Master like mad.

So I recommend you ignore that objective for the time being. Build up your two necropolis towns if the AI hasn't done that for you, and move Zehir back down to the shipyard near 1 (after flagging as many mines to the east of the town at 8 as you feel like - remember, high level artifact crafting burns through resources). Hop on a ship and head to the large island to the south. There's not much to do on the seas, the only stat booster is a knowledge one and you should have plenty of spell points by now. The first town there is Newpost (Haven) which isn't your aim. You can't see it now, but one of the map objectives (unlocked when you catpure Al Safir) is to capture the town Lorekeep at 9.
If you land on the west shore of the island, you will be greeted by a large number of cavaliers (on heroic you will see more than 200). Don't even think of landing on the east -- it is worse. If you have Expert Dark magic and learned Frenzy / Puppet Master from the previous mission, then you should be able to pull off unharmed.
Head head over to Lorekeep. It shouldn't be too tough to take over, just expect some losses. That's to be contrasted with the insanely tough stack of wraiths guarding the east shore. In my game there were 1000(!) of the beasties, which was way too much for me to handle. (Unless again, you have Sandro's Cloak + Expert Dark!) In the earlier game versions, Lorekeep was called "Undefined"; this is corrected as of patch 1.3.

After taking Lorekeep you'll get a cutscene. Before leaving the southern island, build up the Mage Guild in Newpost to level 5, and see if you can learn a few good high-level spells. On patch 1.3 this is the only other town on this mission that builds mage guild past level 2.
You're pretty much done with the map. The force in Al Safir will be truly formidable by now, though, so I suggest you gather as many troops from your necromancy town as possible and put them on a secondary hero. Head both these heroes to the portal exit at five and along the road towards Al Safir. If you want to go back to your Academy town to pick up some more creatures, the portal at 10 exits just north of 2. Weaken the Al Safir defences with your Necropolis troops (which should be fairly substantial given that you have had at least two towns worth of growth going into them) and then finish the map off with Zehir.
If you use only Academy units, you will be outnumbered about 2 to 1. The good news for you is that the castle is not defended by a hero (not even level 1). Also, if you can Frenzy or Puppet master some of the huge stacks, you will be surprised how easy this fight can be.
As a final comment, the creature dwellings in this map are odd to say the least. There's 3 high level haven creature outposts, one footman dwelling and a couple of random inferno dwellings on your starting island. I totally don't understand... would it have been so hard to give you some Academy dwellings?!