Seize the Yawning Shield of the Dead from the "Hand of Death" Necromancers cult to win the campaign. However, if Crag Hack is defeated in combat, the scenario is lost. Crag Hack is limited to level 25 but will carry over his experience, skills and spells on to the next campaign.
Starting Bonus: Barracks or 10 wood and 10 Ore or Equestrian Gloves.
Maps

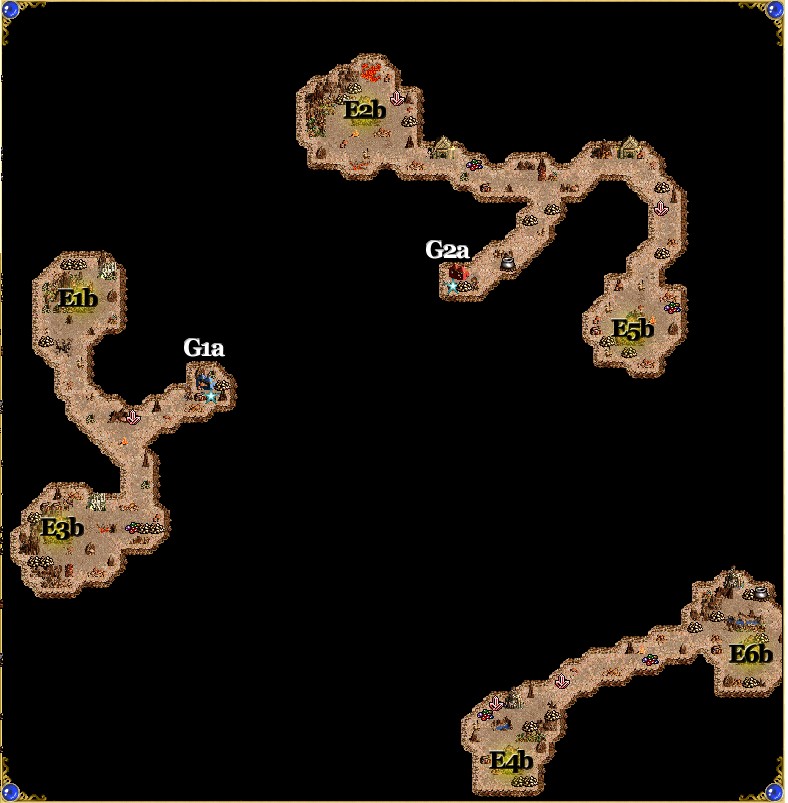
Click on a map to see a larger version.
Green - Friendly Town
Red - Enemy Town
Grey - Neutral Town
Yellow - Underground Passage
A# - Allied Towns
O# - Opponent Towns (a,b,c,d,e,f,g indicates which enemy)
N# - Neutral Towns
M# - Mirror Entrances (a) and exits (b). two-way unless stated
E# - Exit (a) entrance and (b) exit
S# - Seer (a) and the location of the item (b)
G# - Guard Tents (a) and the location of the Guard Tower (b)
J - Jail
X - Ambush
Starting Out
Grave Robber is probably one of the most frustrating maps you'll play in the entire Shadows of Death campaign. Your starting town is a Castle without a tavern and you can't even think about defeating the enemy since they're all protected by Guard Towers with an unreachable Guard Tent. The three Necromancer enemy towns all have a Cover of Darkness which makes figuring out where to go extremely difficult unless you have Expert Earth magic. You also have to go to three Guard Tents to get to a Necromancer you have to defeat in order to get the Yawning Shield of the Dead all the while either avoiding or defeating the enemy heroes.I picked the Barracks as the starting bonus because they are a strong unit and it makes getting Angels in the first week possible. If I was playing on Hard difficulty or higher, I would be tempted to pick the wood and ore bonus.
I have verified for myself that Crag Hack won't transfer over to the next campaign even though you are told that he will be. Therefore, it's not necessary to visit any places of learning or go out of your way to gain levels.
First Leg
Spend the first two week flagging mines and getting troops and in visiting the jail as soon as possible to release Slash, a level 18 hero that will defend your towns while Crag is getting the shield. What I did was give Crag the forces from Slash and conquer N1 since it provides another source of income. Hire some extra heroes to pick up loose resources until about the middle of second week or the start of the third where Crag should go down E1a to visit the Dragon Utopia that's northeast of E3a. Any loss of troops is well worth it since it prevents the computer from getting the artifacts. On your way back to E1b, be sure to visit G1a underground since you'll need it later. Once you've replenished any of the troops you've lost, going through E2a to get the second Dragon Utopia (east of E2a) is a good idea. Even if you don't decide to do this, you will still need to enter E2a in order to flag G2a. While Crag is away, be sure to put Slash with a good army close to the one-way mirror at M1b since the enemy will use that to attack you quite often and you don't want to lose your towns.
Second Leg
Once you have a good army on both Crag and Slash, you have to go to the island in the middle of the map. Have Crag visit either E1a or E2a and make your way to the west side of the tiny island where you can rent a boat. Once there, visit G3a and the tower that is blocking your access to the Yawning Shield of the Dead. There you will find out that you need to defeat a necromancer by the name of Charnath. This will be an extremely tough battle so be sure you have several weeks of troops before attempting to battle her. Once you're ready, go to E4a to end up right outside E6a and the three Guard Towers that you gained access to travel past. Visit each one of them in turn to meet up with Charnath.
Finishing Up
Charnath has stats around 22-25-16-14, 280 spell points, Expert Tactics, and has an army of approximately 30 Ghost Dragons, 82 Vampire Lords, 110 Wraiths, 250 Zombies, and 330 Walking Dead. If you fail to beat her, simply use a scout to ferry Crag some troops and try again. I did that at the same time as Crag was travelling to E6a so they both got there at about the same time which was a huge help.
Once you've defeated Charnath, you must return to the island and visit the same tower that sent you on the mission to defeat Charnath in the first place. Once you're there, you can pick up the Yawning Shield of the Dead to win this map and Crag Hack's campaign.