Anatasya's Mission 2 is a typical no-town journey. Used to be common in Heroes5, but this is the only one in Heroes6. There won't be any enemy hero coming after Ana, whom you navigate through stationary enemies and various scripted events. While the foes are actually much weaker than those an the end of mission 1, you are also handicapped with very limited recruit opportunities - in fact, there is not a single renewable recruitment site. once you burn a unit, it becomes greenhouse gas! You get reinforcement only from completing quests and a few one-time-only creature buildings. So don't miss out on those creature buildings because every rotting body counts.
Chances are you did not complete the objective of reaching the first Blood/Tear level in the previous mission. Worry not; you will have lots of Blood/Tear points to accomplish this objective here. It is also a good idea to manually fight battles and cast as many Life Drains as you can, so you can boost your Blood reputation and gain access to Curse of the Netherworld earlier in mission 3.
After this rather short and easy mission 2, we will be treated with a gigantic and challenging mission 3. Some of the level 15 skills/magics are vital to your initial success. It is a good idea to save up at least 2 ability points in this mission until Level 15, so you can grab Summon Earth Elemental and Meditation, and maybe Time Stasis as soon as you hit Level 15. Then you are bullet proof!
 Necro Campaign Mission 2
Level Cap: 15
Difficulty Index: 2/6
Last Updated: December 30, 2011
Dynasty Traits: There is no town and no creature growth, so you can pick something that helps with battles. You only need 15 of Wood and Ore for a quest, and there will be a lot more than 15 to pick up from the floor. On the other hand, you should collect all crystals and gold (cash all chests) in sight; they will become handy.
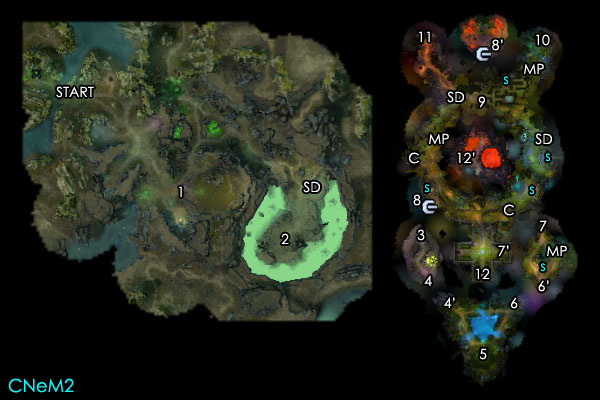
 You start on the surface at (Start). First, head west to have a little chatting and then head east. There are quite a few branches off the main road, and you can visit them all. This mission is quite easy, and there is not much time pressure. When you reach (1), you will receive a quest message to wait. I hanged around for two days before the road to the north opens up.
Keep following the winding path and you will come across a Shrine of Seven Dragons (SD). This is the counterpart of HoMM5's Sylanna's Ancient, the beloved level-up tree. But they are not so precious anymore, since there is no more exponentially increasing EXP requirement at high levels in Heroes6. You can also get an instant level at the Seven Dragons' Shrine by paying a lump sum of 10,000 gold plus 7 blood crystals. There are in total three Seven Dragon's Shrines in this mission. But there are additional usages of gold and crystals, so keep gathering them. In my game, I only used two of the three shrines, but there was still enough EXP to push Anastasya to the level cap after the final battle.
Noyr: A minor inconvenience of the Seven Draon Shrine is that your EXP is only raised to the minimum of the next level. If you are only a few battles away from the next level, fight the battles and level up first.
The surface portion of the mission ends when Ana reaches (2), and then she is irreversibly transferred into her dream world, starting at (3). Ana's dream world consists of a few isolated areas followed by a large main area. Whenever you are done with one area, speak to Jorgen in order to be teleported to the next area. For example, when you are done with this first small area, talk to Jorgen at (4) to start the next small area at (4').

This second small area is a circular path around a pond. The primary objective here is to destroy the town at (5), which should be a very simple task. When you are done, go to (6) to speak to Jorgen and proceed.
Ana appears in the next small area at (6'). You are hinted to pick a path of Blood or Tear. Throughout the campaign this is the only place that hands out wholesale amount of Blood/Tear points.
 Pick up the stat boost (s) - the same symbols are also used to mark other stat boosts. Here you can visit the first of the three Meditation Palaces (MP). Visiting all three palaces completes a quest that gives you some powerful units. You can see the map for the location of the other two palaces. When you are done, talk to Jorgen at (7) and proceed.
Finally, you arrive at the main area at (7'). Jorgen is just to your south at (12). But as the map numbering suggests, Jorgen gives no action yet. There are some resources nearby for collecting, but not much else. Go north and enter the circular path. I suggest that you first go east to flag the first of the two Crematoriums (C). But don't go further east to tackle the Arena, as you need more troops for that battle.
Turn back and head west. Before flagging the second and last Crematorium (C), you can go through a portal at (8), which brings you to yet another small area to the north, at (8'). It certainly looks like a boss battle here, but even quick-combat gave me a perfect victory. Follow the circular path clockwise and visit the second Meditation Palace.
Follow the west route up and you can see the second Seven Dragon Shrine for another instant level. Don't go northwest yet, as the boss there is still too tough for Ana. Continue down the circular road east, and you will come across an Artifact Merchant (9), the only trade opportunity in this mission. Here you can waste away your extra cash to buy randomly generated non-set artifacts. You need only 30,000 gold to level up, so anything extra can be spent here. (Like HoMM5, non-set artifacts will not be carried over to the next mission.)
 Pass the interesting garden maze (rotate the camera angle to see some hidden chests) and head northeast toward the dead-end(10). You should be able to visit the third and final Meditation Palace and finish its quest. Now is a good time to complete the circle to get another paid instant level at the third Seven Dragon's Shrine. Don't forget to train at the Arena just northeast of the first Crematorium.
Now you should have completed all side quests that provide free units. You are powerful enough to crush the army at (11) all the way to the northwest. But this is not yet the final boss, so keep your loss to minimum. When you have done everything in the main area, visit a Meditation Palace and other one-time combat bonuses, and come back to Jorgen at (12) to proceed to the last battle.
The boss fight takes place at the small area (12'). Don't worry about the meaningless resources on the floor - there won't be any use of them. If you have been keen on unit conservation, you should have no problem defeating the mission boss at all.