Objective:
- Rescue Isabel and capture Dunmoor
- Capture any town in 1 week
- Hold Dunmoor against enemy attacks (later during the mission)
- Set up Tears of Asha in Dunmoor (later during the mission)
- Send Godric to Nicolai (later during the mission)
- Isabel and Godric must survive
Carries Over:
- Isabel & Godric (Max Level 24)
Walkthrough:
At the beginning of the scenario, you must choose a bonus from one of these three:
- Imperial griffin: 4
- Four leaf clover
- Gold: 1500
It's not vitally important which one you choose, but the gold is useful at the beginning of this scenario - so that'll be my advice. You could argue that 4 imperial griffins costs more than 1500 gold, but you can't use the griffins to build structures in your town. If you are playing on high difficulty then you really need the griffins' battle dive to succeed in the first half of this scenario.
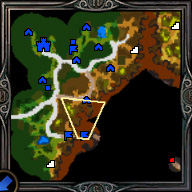
Capture any town in 1 week / Rescue Isabel and capture Dunmoor: These two objectives are tied in with each other. There is only one accessible town on the map, and that is Dunmoor (you can see it on your minimap from the start). So that'll be your first objective.
From your starting point go immediately northeast to the Garden of the Wee Folk (that's the leprechaun for all you old-timers) and then follow the road east. Avoid the Artifacts' Merchant for now. You'll need your money for troops in the beginning and there'll be plenty of time to visit it later. Once you get to the crossroads; turn north towards the Haven Military Post. It's guarded but you should easily manage. Get the monks and griffins of course and continue north until you see a Ore Pit to the west - flag it and continue along the road towards Dunmoor. Don't forget to visit the Crystal of Revelation on the way.

After you've captured Dunmoor, you can see Isabel's prison just northeast of your town; it's guarded by a few pit lords. Build either dwellings or town hall in the town, get what troops you can and then go bash the pit lords.
A particularly cheap but effective tactics in this scenario is to abuse imperial griffin's battle dive. If you deploy nothing but these armored birds, the enemies will stand still and wait to be dived to death! You will lose your first aid tent to the fireball, but it's useless anyways.
Once you've freed Isabel, give her the main part of the army and send her to Dunmoor (again, don't forget the Crystal of Revelation for Isabel either). From Dunmoor Isabel should head to the northwestern corner of the map to the spectral dragon. Try to use good tactics to preserve your troops. Whatever the outcome, it will be worth it; there's a Gold Mine and some treasure that you want to cash in. Next return Isabel to Dunmoor.
At the beginning of week 2, you'll get a new objective: Hold Dunmoor against enemy attacks. At the same time you should be able to spot the Demon Lord Agrael (red hero) approaching from the south. He's coming for Dunmoor, so if Isabel and the army aren't already there ... well, then get a move on. Be sure to keep Godric out of the way, as the Demon Lord will attack him if he gets a chance. He can hide out either near the Gold Mine to the northwest or near a Saw Mill to the east.
Once you've defeated Agrael's army you'll have about 10 days until the next attacker arrives, so spend the time well. Let Godric pick up the troops from the Haven Military Post and have Isabel ride east along the road to the Saw Mill. (Since patch 1.1 the Haven military post in this area has been removed.) There are a couple of mines around here, but you shouldn't engage in combat that'll give you too many losses. Since patch 1.3 you will probably have a severe mercury shortage, so consider flagging the alchemy lab east of the Haven military post ASAP.
While Isabel stays fairly close to Dunmoor, Godric should explore the northeastern part of the map. There are three significant places he should locate there. The first, and most important, is a portal exit, because this is where the next Demon Lord will arrive - so once Godric has found it, he should stay clear of it. There are a few of creature stacks, but Godric can easily move around in the area. The two other locations are a Subterranean Gate Entrance and an Obelisk in the very NE corner that Godric should definitely visit.
In the middle of week 3 the next Demon Lord arrives not far from Dunmoor, so make sure Isabel can make it to the town before the Demon Lord. After the battle with the Demon Lord, you'll be given a new objective again: Set up Tears of Asha in Dunmoor. Every now and then (roughly weekly) a quite-powerful Demon Lord will appear from the one of the two portal exists (S and SE)- they will attempt to take Dunmoor, but not if you have some troops in the garrison (you'll need more than 1 peasant of course, but a huge army isn't needed). If you get the chance, let Isabel deal with these roaming Demon Lords.
Keep exploring the lands, while keeping an eye out for enemy heroes. It's helpful to remove some of the fog of war in the southern part, so you'll be warned earlier if enemies approach. To complete your newest objective, you'll need to visit some Obelisks. There are 3 on the map, but if you try searching the map, you can probably figure it out after visiting only 2. When you have an idea of its location, move a hero and start digging in the area - if you're close, the game will tell you in what direction to dig. Once you have it, take it to Dunmoor and construct it.
During week 1 of month 2, yet another Demon Lord is released in the south, so it's time to head home. If you think you have enough troops then head out and meet Alastor, instead of waiting for him to come to you. Defeating him triggers the final objective: Send Godric to Nicolai.
If you just want to complete the scenario, then load Godric with troops and send him along the road leading south from Dunmoor, near the bottom of the map the road turns west. Follow it across the bridge (see the picture at the top). Keep heading east until the edge of the map, then turn south towards the garrison (it's visible in the southeastern corner) and watch the spectacular ending.

If you don't want to finish just yet, there's plenty of stuff to explore. From here on the demon armies will pose only a minor threat to you, but from time to time - they prove no real threat since you have a lot of cash now. There's a large tunnel system underneath the surface, that has a lot of interesting things; Marletto Tower, Arena, Star Axis and 2 Crystal Caverns (a big help when building and upgrading the Jousting Arena and building high-level Mage Guild). If you want to level Godric to level cap (quite useful later, but might cause you headache as well), make him stay at home to fight all spawned demon lords. They are very juicy.
There's a special place in the northeastern corner, to get there use the entrance to the underground near the northeastern corner. Then head north along the curving tunnel until you see stairs leading up. Once above surface, head south - there's a powerful artifact here, but it's guarded by LEGIONS of imps. Kill them and claim the prize, but bring enough troops. In the same area, you can venture west from the Subterranean Gate to find some level-7 creatures guarding another artifact and some treasure.
A very useful spell "Town Portal" can be learned when you build the lv-5 mage guild and reach lv 20 with your hero. This spell portals your hero from any position back to the nearest town under your control. If you have this spell, then you can travel very far away, and portal back just the day before a demon lord reaches Dunmoor!