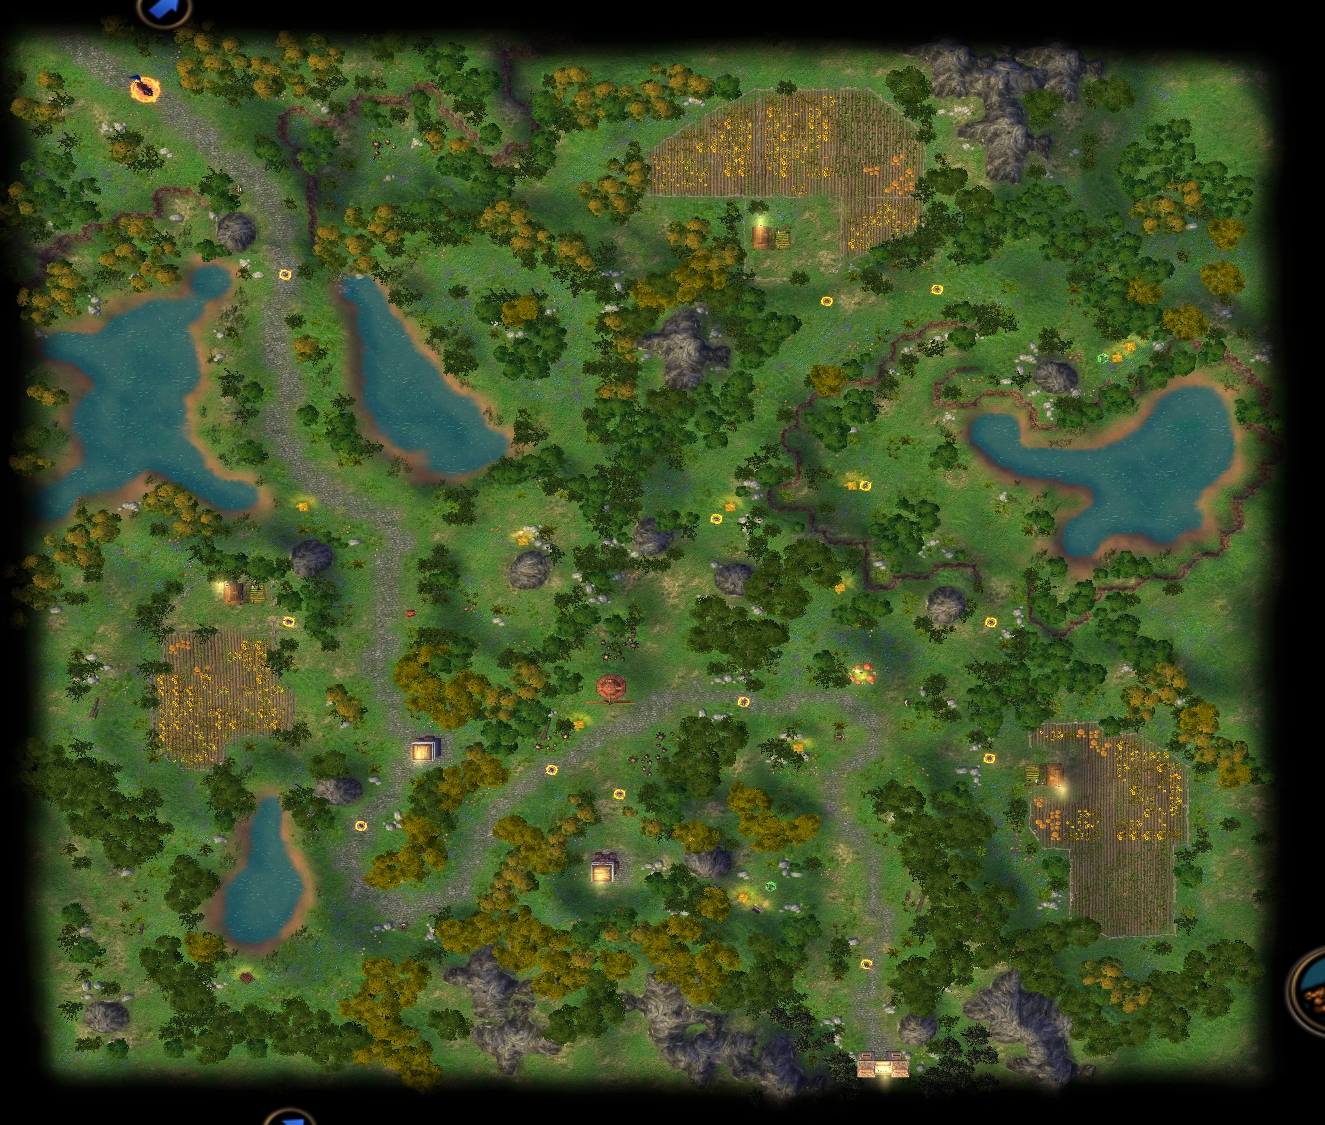
 A first walkthrough article has been posted for The Queen scenario of the Haven campaign in Heroes V. Why a walkthrough for the tutorial you may ask? Well, some people may think that the tutorial lacks some detail, especially for the combat part. In my article I describe the most important parts of the interface and lists the controls that are really useful to the new player. I also a provide a few tips for the Heroes veteran who feels uncomfortable with the new camera system. There's also a screenshot of the Collector's Edition aura, in case you have been wondering what it was like. I didn't provide any detail about the plot of the campaign, but I posted a minimap of the first map, so open the page at your own risk.
The Walkthrough section will be expanded with a series of new articles during the next few weeks. Contact us if you have tips to share with fellow Heroes players. Objectives:
Level Cap: 5
Carries Over: Isabel

The first scenario of the Haven campaign serves as a tutorial for Heroes of Might and Magic V. Whether you have played a Heroes game before or not, you will have to go through this mission in order to unlock the next map, and so on.
Isabel starts in the Northwest corner of the map (1) with a small army. There is no time limit so you can take all the time you need to explore the area. Alternatively, you can try to rush to the end as soon as possible to boost your score on the Hall of Fame (new feature in patch 1.2, refined in patch 1.3). Your final Hall of Fame score depends on the days you used to finish the missions, as well as the difficulty you were playing at.
Now is a good opportunity to familiarize yourself with the camera. The left mouse button is used to move your hero and select options as in all previous Heroes games. The mouse wheel zooms up and down. The right mouse button, however, is now used to rotate the camera in any direction. While this is useful to get closer to the various adventure map objects, it can also get very disorienting. If you are ever unsure of the direction you should be going, take a look at the position of the white rectangle in the minimap on the lower left side of the screen. It should allow you to bring back the camera to its original position. Players who feel uncomfortable with the new camera can keep it facing North and move around like in the previous Heroes game, but be prepared to miss a few treasures oriented at inconvenient angles. To minimize the amount of scrolling that needs to be done with the mouse, try using the arrow buttons with the left hand while you click around with the right hand. To center the camera back on Isabel, click on her portrait at the bottom of the screen. Notice that the camera angle remains the same though. The space bar is used to order the hero to move once you have selected a destination. Be careful with the Enter key as it ends your turn. Using both keys in sequence will allow you to move your hero over a great distance without having to use the mouse. If you feel your heroes are moving too slowly, you can adjust various game speed options in the Options - Game menu.

The nearby forest is empty, so follow the road to the South-east until you meet a stack of peasants. These few peasants will generously offer to join you, so accept. The neutral stacks in HoMMV can be categorized into: Will Join, Unpredictable, and Will Fight. The join and fight ones are scripted and thus will always remain so, while the unpredictable stacks are committed to fight or flight based on the relatively strength of yours and theirs. There is an optional skill later to reveal this information.
Further down the road is the first of a series of resources, a pile of gold. There's another one on the right side of the road. That money will be used to recruit troops later on, so pick up everything if you feel like to. The red Flag will boost your morale by 1, and give you a little movement bonus. The morale bonus will be applied to your next battle only, and the movement increase is a one-time bonus for the current day only. Next to a Peasant Hut (2) is a tiny stack of footmen who will join you as well. Recruit them along with the peasants in the Hut. In the South is a Barrack with 10 footmen that you can recruit every week. You are now more than halfway through the first objective requirement (recruit 25 footmen). Keep following the road, picking up resources and recruits, until you meet some peasants (3) who trigger a cut scene.
Now is the time of your first battle. Finding your way around the battlefield is obviously easier than on the adventure map, so move the camera around until you find a view that's comfortable. By default, the camera is high in the air and all creatures are very small. Move closer to your hero using the arrow keys or the mouse (go to the edge of screen), and use the mouse wheel to zoom in. If you prefer visuals, you can very well focus on your own army only. Here is a summary of the combat commands:
Auto Combat (A, V): Allows you to bypass an easy fight by letting the computer do the dirty work. It is disabled in this scenario. An even faster option to skip battle is a Quick Battle, which can be enabled from the Options - Game menu.
Cast Spell (C, S): Allows you to view your spell book and cast spells. In this scenario, Isabel doesn't know any spell so magic tricks will have to wait until another time (precisely, mission 4).
Retreat: Allows you to flee from battle (disabled for now). If you flee with any of the main heroes of the campaigns, you automatically lose the mission and have to reload from a save.
Defend (D, Space Bar): Allows a creature to bypass an entire turn and get a defense bonus. If you have nothing to do for a unit for now, instead of defending, you should choose --
Wait (W): Allows you to delay your creature's action by HALF a turn, without any defense bonus. Wait is much more frequently used than Defense because it usually allows your units to react earlier when the enemy gets close.
Battles against neutral creatures are all about avoiding losses. Let's have a simple example here. In the picture below, we can see that if Isabel's 39 peasants move into any of the squares marked with an orange X, they will be attacked by the enemy's 13 peasants while the 13 peasants' next turn comes up. Therefore, it is better to order them to wait (W) until the enemy comes into the striking range of Isabel's own troops.

The AI also tries to optimize its chances. In the following picture, the enemy's 11 peasants (lost 2 to Isabel's melee attack) have moved up one tile. Now these 11 peasants can hit Isabel's 1 squire in their next turn, and Isabel's 1 squire can also hit the peasants in his next turn. On the other hand, the footmen and the peasants are safe because the enemy's 11 peasants will not be able to reach them in their next turn. Similarly, Isabel's footmen and peasants cannot reach the enemy peasants in their next turn, either.

Waiting won't do any good to the squire, because he will be hit if he does nothing. Now, if you charge up with the squire to hit the enemy peasants, they will NOT be able to kill off the enemies, so they will inevitably suffer from retaliation. Even worse, since Isabel's footmen and peasants cannot follow up the attack because they are too far away, the poor squire is likely to suffer another blow from the enemy peasants when the peasants' turn comes up. Therefore, it will not be smart to march up the squire. Let's move him one tile back, so all of Isabel's stacks are safe.

The AI is scripted that it will always press forward. Our patience has paid off - the AI peasants has fallen into the trap, as shown in the above picture. Now it is the time to decide which stack to be used to attack first. The best choice is the stack that can kill off the target in one blow, so there is no way they will suffer from the retaliation. Our peasants in this case seems to be a perfect candidate. However, when you face much stronger foes later on, peasants are usually not the best unit to absorb retaliations due to their low hit points (HP) and defense.
Continue recruiting troops and picking up resources by following the road. The windmill gives you some random resource every week. In this scenario the resources actually do not have any use, but in later missions you can use them to build up your towns, or trade them for other resources. Right after the windmill you can choose to follow the road to the East or turn North.
On the north path lies one more creature dwelling (4) as well as a few other stacks that provide an opportunity to experiment with combat tactics. The zombies at (5) are slightly tougher, but far from posing any threat. This north path will bring you back to the main road eventually, so use it if you are not in a rush. Here are a few basic tips for the battles that await you:
In a typical campaign, it is recommended to fight as many battles as possible for your hero to gain experience, until the level cap is reached.
Most creatures get a single retaliation per turn. Try to attack the same creature multiple times during a single turn to minimize the retaliation damage. Try attacking with a tough creature first (such as squires), and follow up with more fragile units (like peasants).
Unless your opponents shoot at you, wait for them on your side of the battlefield. Wait when there is nothing better to do. Weaken the largest stacks a little with Isabel's special attack. Multiple stacks do not reach you at the same time if you are hiding in a corner.
As you complete the objectives of collecting enough footmen and peasants, soon Isabel will gain a level. She will first gain a 1 random point bonus to one of her primary skills. You will then be allowed to choose either a skill or an ability. Since this level-up system in HoMMV does not allow a lot of degree of freedom, it is useful to plan out a good hero skill set as soon as you grasp the basic ideas of what the skills do. For now, let us tell you that the good skills for Isabel (just Isabel) are Luck, Attack, Leadership (Isabel starts with it), and one or two magics that are specialized in Haven towns (Light & Dark). You can customize your Isabel otherwise to try out different tactics and strategies. For example, a particularly versatile build for later main heroes is Light, Dark, Sorcery and Enlightenment. If you want to challenge the highest difficulty, it is crucial to build a powerful hero to stand up to the strong opponents, and improve your skills to minimize your loss in any battle. In lower difficulties you can probably get around with any combination of less-useful skills.

When you return to the paved road, you will see a Faerie Ring (luck + 1) nearby. Similar to the Rally/Tattered Flag, it only affects your next battle. When you completed the 100 peasant and 25 footmen objective, the game will give you a visual notification that a new objective has been added to your journal. Hit the 'O' key to view it. Your last goal of this mission is to defeat the garrison to the South, bottom of the minimap.
Just before the garrison, you can fight more zombies on the west (6). Next to these zombies are some gold and a treasure chest. A treasure chest contains a variable amount of gold that you may pick or convert into experience. Choosing gold or experience could be the topic of a whole article, so for now let's just say that gold is more useful on stand-alone maps and harder campaign missions, while experience should be considered on easier campaign missions that focus on a main hero. In the current scenario, you have more gold than you need, so you can choose experience instead.
When you feel ready, follow the road south until you meet the last stack of reinforcements. That Garrison (7) is guarded by a larger army, so plan your moves carefully. Try not to rush out to take the first hit, and concentrate your attacks on the more vulnerable enemy units first. If you have the Quick Battle option turned on, you should try to win this fight manually with a better outcome than the auto-calculated result.