To win, you must capture all towns and castles and defeat all enemy heroes. Regardless of which side you choose, the other will forever consider you a traitor. Starting Bonus: Map 1 Heroes (Fortress) or Map 2 Heroes (Stronghold)
Maps
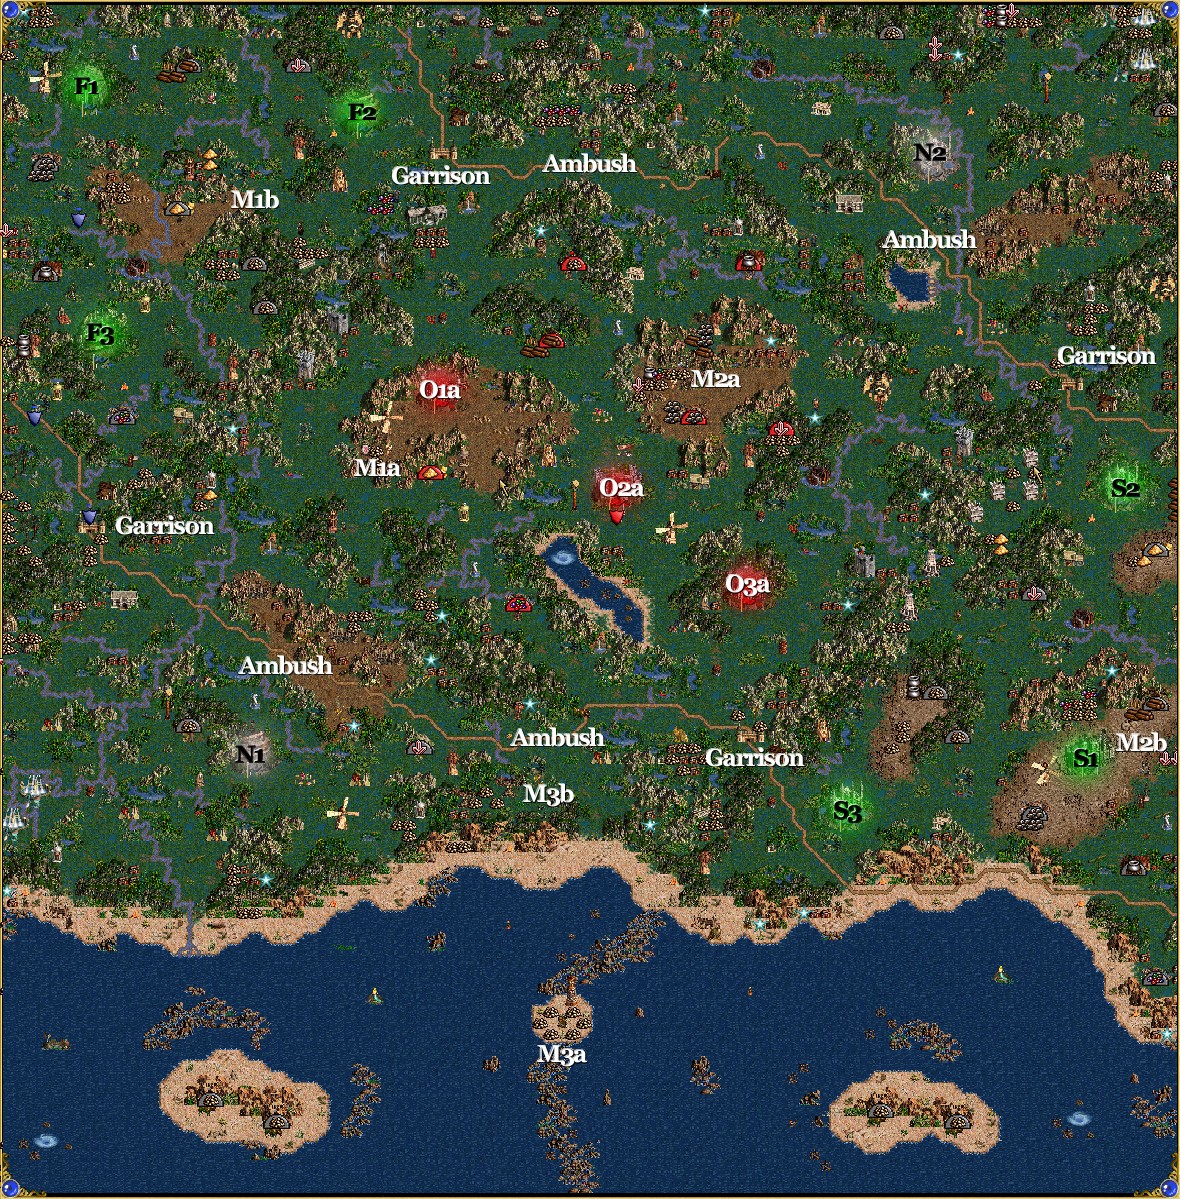
Click on a map to see a larger version.
Green - Friendly Town
Red - Enemy Town
Grey - Neutral Town
Yellow - Underground Passage
A# - Allied Towns
O# - Opponent Towns (a,b,c,d,e,f,g indicates which enemy)
N# - Neutral Towns
M# - Mirror Entrances (a) and exits (b). two-way unless stated
E# - Exit (a) entrance and (b) exit
S# - Seer (a) and the location of the item (b)
G# - Guard Tents (a) and the location of the Guard Tower (b)
J - Jail
X - Ambush
Starting Out
Now you get to use the heroes that you built up in either Map 1 or Map 2. On the one hand, the large amount of swamp will make picking the Fortress side more appealing but don't disregard the Stronghold if you can get Pathfinding and/or Logistics. I've found that it is possible to win with both sides so pick the one that you like the best. This guide will work for either side with the Stronghold towns represented by S# and the Fortress towns represented by F#.
First Leg
There is a lack of wood and ore so you will only be able to build up one of your towns (F1 or S1) and since the other two towns don't have a Fort, they will be used for gold production and Resource Silos. There are two garrisons preventing you from reaching the middle section where the Red enemy is so I recommend taking from 2-3 weeks exploring your section to flag mines and build up troops. Once you have a sufficient force, work to eliminate the Red enemy as soon as you can not only for the gold the towns will provide but the wood and ore from their Resource Silos. The other side also has garrisons preventing them from reaching the middle area so if you are aggressive, you can reach the middle before they do.
Second Leg
After you've claimed the Castle towns, you will see the other opponent very soon so it's important to not lose any of your towns. A good way to do this is by using View Air which will reveal the location of all heroes at the Advanced and Expert level. Another benefit of gaining access to the middle area are two one-way mirrors that will take you either to the Fortress or the Stronghold area. Just be careful of the four ambushes that are marked on the map since they are very strong and can easily overwhelm a scout. Therefore, I recommend avoiding the roads near these areas unless you have a strong force and want the extra experience. There are also the two neutral towns that you can capture if you want to, just make sure the enemy doesn't get them.
Finishing Up
When you're ready to finish you'll have to take over the enemy's town either by going through the one-way mirror or through a garrison. Just remember to use View Air to note where the enemy heroes are and defeat them before moving on to prevent the captured towns from being retaken. There's a good chance that there are enemy heroes on the water so you can wait them out since chasing them on the water will likely be a futile attempt. Whatever you decide to do, the defeat of the final enemy hero will mean your success and the end of this campaign.