Quests
  • Skraelos: Light the Six Pillars
  • Sven: Save Frosgard
  • Fre: Temple of Honk
  • Bath house - TBD
  • 1000 Terrors - TBD
Trainers
  • Weapons and Armor: None
  • Magic: None
  • Specialties: None
  • Grandmaster Training: None
Promotions
  • None
Altar
  • ???
SHIPPING SCHEDULE
  • None
OPEN QUESTIONS:
  • None
Arslegard City
Hall of Gods
You enter the hall of the gods through a transporter in the SE corner of Arslegard.

Afterworld

Skraelos will give you back your army if you light the six pillars -- Guilt, Confession, Suffering, Retribution, Absolution, Rebirth.

(I suggest you save before you talk to Skraelos!)

He transports you to the eerie Afterworld. In the distance you can see bodies on the ground -- the dead army from Yorwick. Now you have six tests.

  • Guilt: Simple question "Are you guilty of the death of your friends?" Yup.
  • Confession: Find each of the six Jaarls and admit your guilt to them. Then return to Skraelos. (Interesting minor scripting bug -- If you visit Drangheim, Sigmund is still up in his bedroom! The rest of the Jaarls are gone.)
  • Suffering: A set of 6 questions. Get any one wrong and you are diseased (no apparent loss of hit points, though) and have to start the sequence over.
  • Retribution: You have to kill off two groups of your enemies who appear, including Forad Dare. (Too bad, it's not the real Forad. Kill him will be enjoyed soon, though!)
  • Absolution: Get the Jaarl's weapons and return them to Skraelos. Go over to the dead army area (not to where you found the original Jaarls) and search for their weapons. Pick them up with the spacebar. Hint: There are only 5, not 6. Markel did not die in Yorwick!
  • Rebirth: Just step through the pillar of fire.

You return to the Hall of the Gods. See Skraelos again, and he will tell you that you have the army back. Meet Sven outside the hall. Rush to Frosgard (I set a beacon first.)

Battle in Frosgard When you get your army back, town portal to Frosgard (set a beacon in Arslegard first!) Tamur Leng and Forad Dare are there with their army.

There are skirmishes between your soldiers and Leng's near the training corral. Best keep away from those ... your army can handle it, and it's quite hard to tell who to hit!

Head towards the Jaarl's house. Along the way you will meet a couple squads of the enemies you can dispatch. Near the Jarrl's house is Forad. The real one. Ah yes, finally vengeance.

Inside the Jaarl's hut you will meet Tamur. Big battle? NOT! Turns out he has a Writ of Fate, too, but it seems to say the opposite of yours! You have to return to the Hall of the Gods to sort it out. So he joins your party!

(With the extra sword of Tamur, I decided to not go directly back. Why not let him help me clear out the Temple of Honk, first!!

Temple of Honk (Part II) Fre back in the Hall of the Gods gave you this quest.

Sorry -- just a very brief walkthrough until Monday!

After Fre in Arslegard gives you this quest, the upper door at the Temple of Honk in Guberland can be opened.

You seem to be able to go anywhere and loot the place at will UNTIL you take the "Accountant's Key" in the N Central room. At that point, everyone is your enemy. I suggest you loot all the chests before taking the key. The chest in the central room has some especially nice goodies.

The Golden Honk is in the sanctuary all the way to the E.

Once you set the temple against you, the Honk followers are TOUGH!!! 800-1200 HPs, and a strong melee and magic attack. Take the S route back to the entrance (or Town Portal out) to miss the large number of Honkers in the central room.

When you return, Fre answers three questions for you. Unfortunately, they tease more than help!

Open question: What does the Accountant's Key do??

Bath House

Thanks to Terry, SyCottic, DvuS, Claus, and 1979 for filling in some blanks!)

This quest is given by the Tavern barkeep. He is peeved that Ebora has taken up light housekeeping in the baths.

Note: Many readers have reported (and I also confirmed) that battling in turn-based mode in the bathouse (aginst the concubines) or in the 1000 Terrors (against demons) can cause the game to lock up. Play this section in real-time mode. For the concubines, it might is possible to kill all but the last concubine in turn-based mode then switch to realtime for the last one.

It does not appear to play a key part in the endgame. I did go in and clean it out, set the steam pressure on overload, and stopped the propeller --- so maybe by dumb luck I did the right things. Also, while I chased Ebora out of her quality time ("You've ruined my bath.") she disappeared again and I did not see her again although l won the game later that day.

Clear the top half of the main area, and be sure to check the pots! Many have nice goodies inside that help you pay for training.

Now, enter room "A" in the SW. You can take out the Colloidal Warriors in the next room through a window, and do the same thing for the baddies in "B".

Once "B" is cleared, swim down to the lower level. There is a switch that turns on/off a propeller at "J". The switch un-floods the area to the east of the stairs leading to "G".

Zone K is the same as zone L. Put yourself in front of the switch in zone J. Look at a map and you can see the left hand chess from zone G. (Submitted by Raistlin)

Now, swim up the tunnel at "D" into the concubines room. Jump out of the pool (so fewer of them can beat on you at once) and kill three concubines and a colloidal icky. You'll see Ebora bathing in the next room at "E". When you've cleared out her friends, she leaves "You've ruined my bath" and I never saw her again. Note: I was able to easily defeat the big green Colloidal beastie in the pool. Others found it impossible without using the steam to fry him (see below.)

Open the grate an "F" and watch out for the 200HP damage steam vents! Head down to the control room. There is a wheel that puts the steam vents on overload. This will toast the colloidal in "D" if you haven't already whacked him

Finally, at G are several good chests.

1000 Terrors

The final dungeon!

When Krohn sees the two Writs of fate, he gives you the key to Njam's house and asks you to find out what Njam is planning. Njam's house is NE of the baths. (Note: I was unable to open this door until I realized I had to have the person holding the key active!)

Note: Many readers have reported (and I also confirmed) that battling in turn-based mode in the bathouse (aginst the concubines) or in the 1000 Terrors (against demons) can cause the game to lock up. Play this section in real-time mode. For the concubines, it might is possible to kill all but the last concubine in turn-based mode then switch to realtime for the last one.

Inside you find a scroll on a desk. Njam rushes in. Take Krohn's advice and run like mad out of there! Report back to Krohn, and receive your final quest: lure Njam into his own trap deep within the Tomb of 1000 Terrors.

This 3-level dungeon is filled with demons, beholders, and Desert Terrors. Plus, Njam shows up many times to beat on you, then runs away just when you are starting to hurt him.

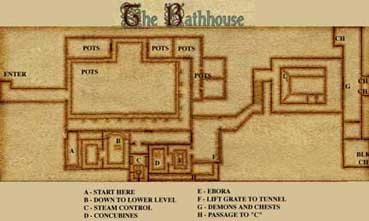
The two rooms at "A" have nice chests, and a pair of dueling statues that keep hitting you in their crossfire. The door at "J" is locked. You need a key to move on to level 2.

(Note: the area between "K" and "M": in the NW is part of level 2.)

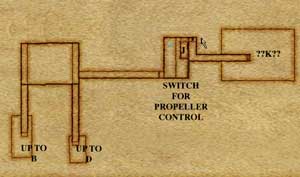
Head into the room at "B". Lots of beholders in this area. Once they are cleaned out, you can jump across on the blocks (they sink as you stand on them) or swim. If you stand on the central block (right under the "B") and let it drop, you will see a hidden switch. It opens secret area "D." Inside, guarded, are two nice chests. At "C" are another pair of dueling statues. Stay out of their line-of-fire as you clean out the beholders, then loot the rooms.

Either the door or the tunnel "E" lead you to the next section. The puzzle doors at "F" are not hard to figure out. ( Does rearranging the letters N-J-A-M give you an idea?) )A "reset" button is next to each. When all squares are depressed, the door opens.

The hallway at "G" is trapped with fireballs. At level 48+, just run down the side and you take little damage.

Room "H" is tough, but rewarding! Four demons, beholders, and good old Njam himself. Defeat them, wait for Njam to run away, and loot the chests. Three black chests! Plus, the key to the stairway. Another NJAM puzzle door to get out.

Ready for level 2.

The stairs lead up to the skull room. The skull shoots fireballs while demons and beholders attack. The area is very dark -- light your torches before entering. (Note: I ducked out, then back in, and found the skull had now stopped firing, and did not restart on my 2nd entry.)

Careful!!! The trap at "N" leads to death even for a strong party! The outer two of the three switches are safe. But the middle drops you into a pool full of beholders, demons, and Desert Terrors. You are surrounded, trapped, and the only question is if you drown before they kill you. From location "O" you can work your way back and clean out this area a lot more safely.

At "O" is a genie lamp. I rubbed it, some smoke came out, but I never saw what actually changed.

Open Question: What did the genie lamp do??

Head down the stairs into the water, and clean out all the nasties (lots of demons, beholders, and desert terrors) down there. Work your way to the chess room. There are several pieces on the board (2 pawns, 2 knights, 2 kings.) Don't step on any squares they guard. At the far side are two black chests, and Njam makes another brief visit. You also find the maze key needed to access the final area.

For those who do not play chess, do not walk on the gray squares:

Open Question: Is there a way into the rooms at "??P??" (Update thanks to Chang, Jinx, Fire, Claus --- There are two ways into area "P." You can jump the bridge if you first cast fleetfoot on the party. Also, if you are standing on the broken bridge and look to your left, you will see broken pillars that let you jump your way up to the area. Inside you battle a couple lesser terrors, and meet up with Njam again.

Now, head through the water to the hard to find rap leading up to the area at "Q". Demons and Njam guard some treasure. Njam also shows up at "S."

Time for the maze. use the maze key from the chess room. Not much treasure or opposition here -- mainly beholders and a couple demons. Get to the far NE corner, cross the bridge, and follow the narrow path to position "L." Looking back at the level 1 map, work your way to the elevator at "M". There are traps in both hallways.

The final confrontation:

You enter at "A." When you get to position "B," Njam (cutscene) tells you he will disappear and come back when you are dead.

Just at the entry to "C" is a trap.

At "C" starts one of the toughest battles in the game. The chess pieces come to life as lesser demons, along with lesser demons and beholders from the large area to the east. Six lesser demons and 6 beholders sounds simple? Well, when you kill these lesser demons, they are immediately resurrected as greater demons.

When finally done, you enter the main room. It looks like nothing special. How do you convince Njam you are dead so he will return?

Enter the secret room and hide at "D." A cutscene takes over. You've done it. Mrs. Filbert's frozen Njamwich.

The Finale The final scene is an arguement between the Gatekeeper and Krohn. Turns out that the previously wimpy gatekeeper dares to argue with Krohn himself to save you. You are now free to roam arond Chedian at will.

Congratulations! You made it!